
Contents
Overview
Duo Passwordless uses passkeys and platform authenticators, security keys from access devices, or Duo Push to secure application access without passwords, reducing the risk surface and administrative burden associated with passwords while improving the user experience. With Duo Passwordless, users no longer have to remember or type long, complex passwords. Instead, they can log in securely with a single gesture that provides the security of two authentication factors.
Duo Passwordless enablement for your organization relies on Duo Single Sign-On, which can authenticate your users against your Active Directory or consume authentication from an existing single sign-on identity provider you may already use, such as AD FS, Okta, or PingFederate. The applications your users sign into with Duo Passwordless may be federated with Duo SSO or with your existing SSO identity provider.
Duo Passwordless is available to Duo Premier, Duo Advantage, and Duo Essentials plans customers.
Read the posts in our passwordless blog series, learn more about the benefits of passwordless authentication, and explore The Administrator's Guide to Passwordless for technical details.
Please contact us via this form to share feedback about your experience with Duo Passwordless.
Supported Identity Sources
Duo Passwordless requires Duo Single Sign-On with Active Directory authentication. However, if you already have an existing SSO identity provider in place — like Okta, Microsoft Entra ID (formerly known as Entra ID), or PingFederate — you can still use Duo Passwordless by chaining your organization's existing SAML identity provider (IdP) to Duo SSO.
Find more information about using your existing IdP with Duo Passwordless in the Duo Passwordless and External Identity Providers step of the deployment instructions below.
Supported Authentication Methods
Duo Passwordless supports a diverse set of end-user authenticators and passkeys, including:
- Windows Hello on compatible Windows devices.
- Touch ID on compatible macOS devices.
- Face ID or Touch ID on compatible iOS and iPadOS devices.
- Android Biometrics, such as Pixel fingerprint or facial recognition, or Samsung fingerprint or facial recognition.
- WebAuthn FIDO2 security keys with biometric or PIN verification, like those from Yubico or Feitian.
- Duo Push authentication request sent to Duo Mobile on Android or iOS when the mobile device is secured with biometric, PIN, or passcode to unlock.
Supported Browsers
Duo Passwordless supports Chrome (Desktop and Mobile), Safari (Desktop and Mobile), Edge, and Firefox. Not all browsers support all verification methods on a given operating system, so for the widest compatibility we recommend Chrome or the browser that came with your operating system.
Check the tables below for supported browser versions and Duo verification option compatibility. While other browsers may work with Duo Passwordless, Duo actively tests and supports the browser minimum versions listed in the tables.
We define "platform authenticators" as the authentication methods integrated into to your device hardware and operating system, like the Touch ID fingerprint reader on a Mac, and "roaming authenticators" as authentication methods that can be inserted into or paired with your device and then removed, like a USB security key.
The access device's browser must be able to store cookies to use Duo Push as a passwordless authenticator.
Windows 10 and Later
| Browser | Minimum Supported Version | Platform Authenticator | Roaming Authenticator (Security Keys) |
Duo Push Authenticator |
|---|---|---|---|---|
| Edge | 79 | Yes 1 | Yes | Yes |
| Chrome | 73 | Yes1 2 | Yes | Yes |
| Firefox | 66 | Yes | Yes | Yes |
-
Windows Hello not supported in Chrome Incognito or Edge InPrivate browsing sessions.
-
Use of passkeys as platform authenticators requires Windows 11 and Chrome 108 or later.
macOS 11 and Later
You must sign in with the same iCloud account and enable iCloud Keychain sync on all the Apple devices you plan to use with Duo and passkeys. See the iCloud documentation for instructions specific to your device types:
| Browser | Minimum Supported Version | Platform Authenticator | Roaming Authenticator (Security Keys) |
Duo Push Authenticator |
|---|---|---|---|---|
| Safari | 14 | Yes 1 | Yes | Yes |
| Chrome | 70 | Yes 1 | Yes | Yes |
| Firefox | 114 | Yes 2 | Yes 3 | Yes |
-
Use of passkeys as platform authenticators requires macOS 13 and Safari or Chrome 108.
-
Firefox 122 or later is required for platform authenticators.
-
Firefox on macOS cannot prompt to create a security key's PIN. Security keys that already have a PIN set can be used to authenticate in Firefox.
iOS/iPadOS 14.5 and Later
You must sign in with the same iCloud account and enable iCloud Keychain sync on all the Apple devices you plan to use with Duo and passkeys. See the iCloud documentation for instructions specific to your device types:
| Browser | Minimum Supported Version | Platform Authenticator | Roaming Authenticator (Security Keys) |
Duo Push Authenticator |
|---|---|---|---|---|
| Safari | 14.5 | Yes 1 | Yes | Yes |
| Chrome | 95 | Yes 1 | Yes | Yes |
| Edge | 95 | Yes 1 | Yes | Yes |
| Firefox | 38 | Yes 1 | Yes | Yes |
- Use of passkeys as platform authenticators requires iOS 16 or iPadOS 16 and work with any browser.
Android 10 and Later
| Browser | Minimum Supported Version | Platform Authenticator | Roaming Authenticator (Security Keys) |
Duo Push Authenticator |
|---|---|---|---|---|
| Chrome | 95 | Yes 1 | Yes 2 | Yes |
| Firefox | 68 | Yes 3 | No 4 | Yes |
-
Passkey support with Google Password Manager.
-
Chrome on Android 10 and 11 cannot prompt for the security key's PIN to fulfill the passwordless user verification requirement.
-
Firefox on Android 10 and 11 does not support Android biometric enrollment.
-
Firefox on Android cannot prompt for the security key's PIN to fulfill the passwordless user verification requirement.
Linux
| Browser | Minimum Supported Version | Platform Authenticator | Roaming Authenticator (Security Keys) |
Duo Push Authenticator |
|---|---|---|---|---|
| Chrome | v73+ | No | Yes | Yes |
| Edge | v18+ | No | Yes | Yes |
| Firefox | v66+ | No | Yes 1 | Yes |
- Firefox 114+ is required for security keys.
Enrollment and Authentication Experience
When a user without a passwordless authenticator accesses a Duo Single Sign-On application which has a passwordless policy applied, the user enters their username and password as usual and completes Duo two-factor authentication (2FA). When an authentication method supported by Duo Passwordless is used for 2FA then the user receives a notification that they can log in without a password in the future with that method. Otherwise, the user sees the option to enroll in Duo Passwordless by registering their first platform or roaming passwordless authentication method for that access device if these options are enabled in your authentication methods policy.
If a user has an Android or iOS device with Duo Mobile activated for Duo Push login request approval, then they can use that same device as a Duo Push passwordless authenticator.
After that, the user experiences passwordless login for the application or applications subject to the passwordless policy when using that access device. Instead of entering a password, the user's registered passwordless authenticator supplies identity verification.
If a user's registered passwordless authenticator isn't available at application sign-in, Duo falls back to the username and password plus 2FA authentication flow.
Remembered Devices
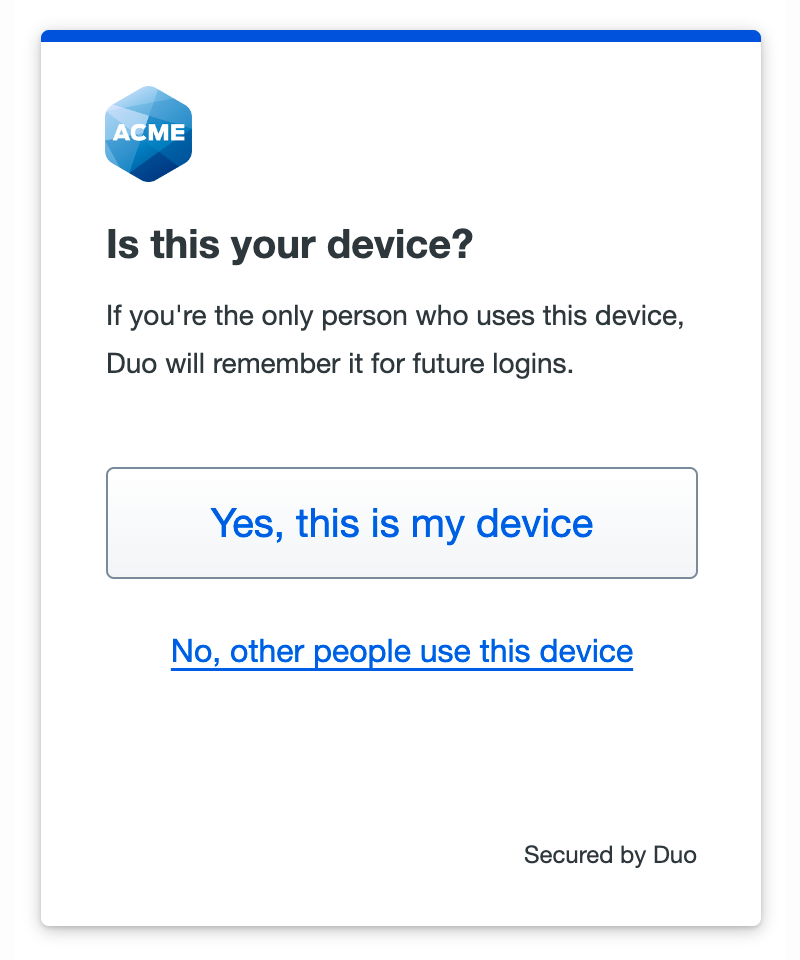
Passwordless logins may be subject to the same remembered devices policy as 2FA-only application logins. Users can opt to trust the browser when logging in to the application.
Changes to Duo Policies
When you activate Duo Passwordless in your Duo account, you'll notice some changes to the available policy settings when you're using the policy editor.
Authentication Methods
The authentication methods policy distinguishes between 2FA methods and passwordless methods. Enabling any of the passwordless methods in a policy permits use of passwordless authentication for any Duo Single Sign-On application subject to that policy. The passwordless authentication methods settings have no effect for non-SSO applications, as those applications do not support passwordless logins today.

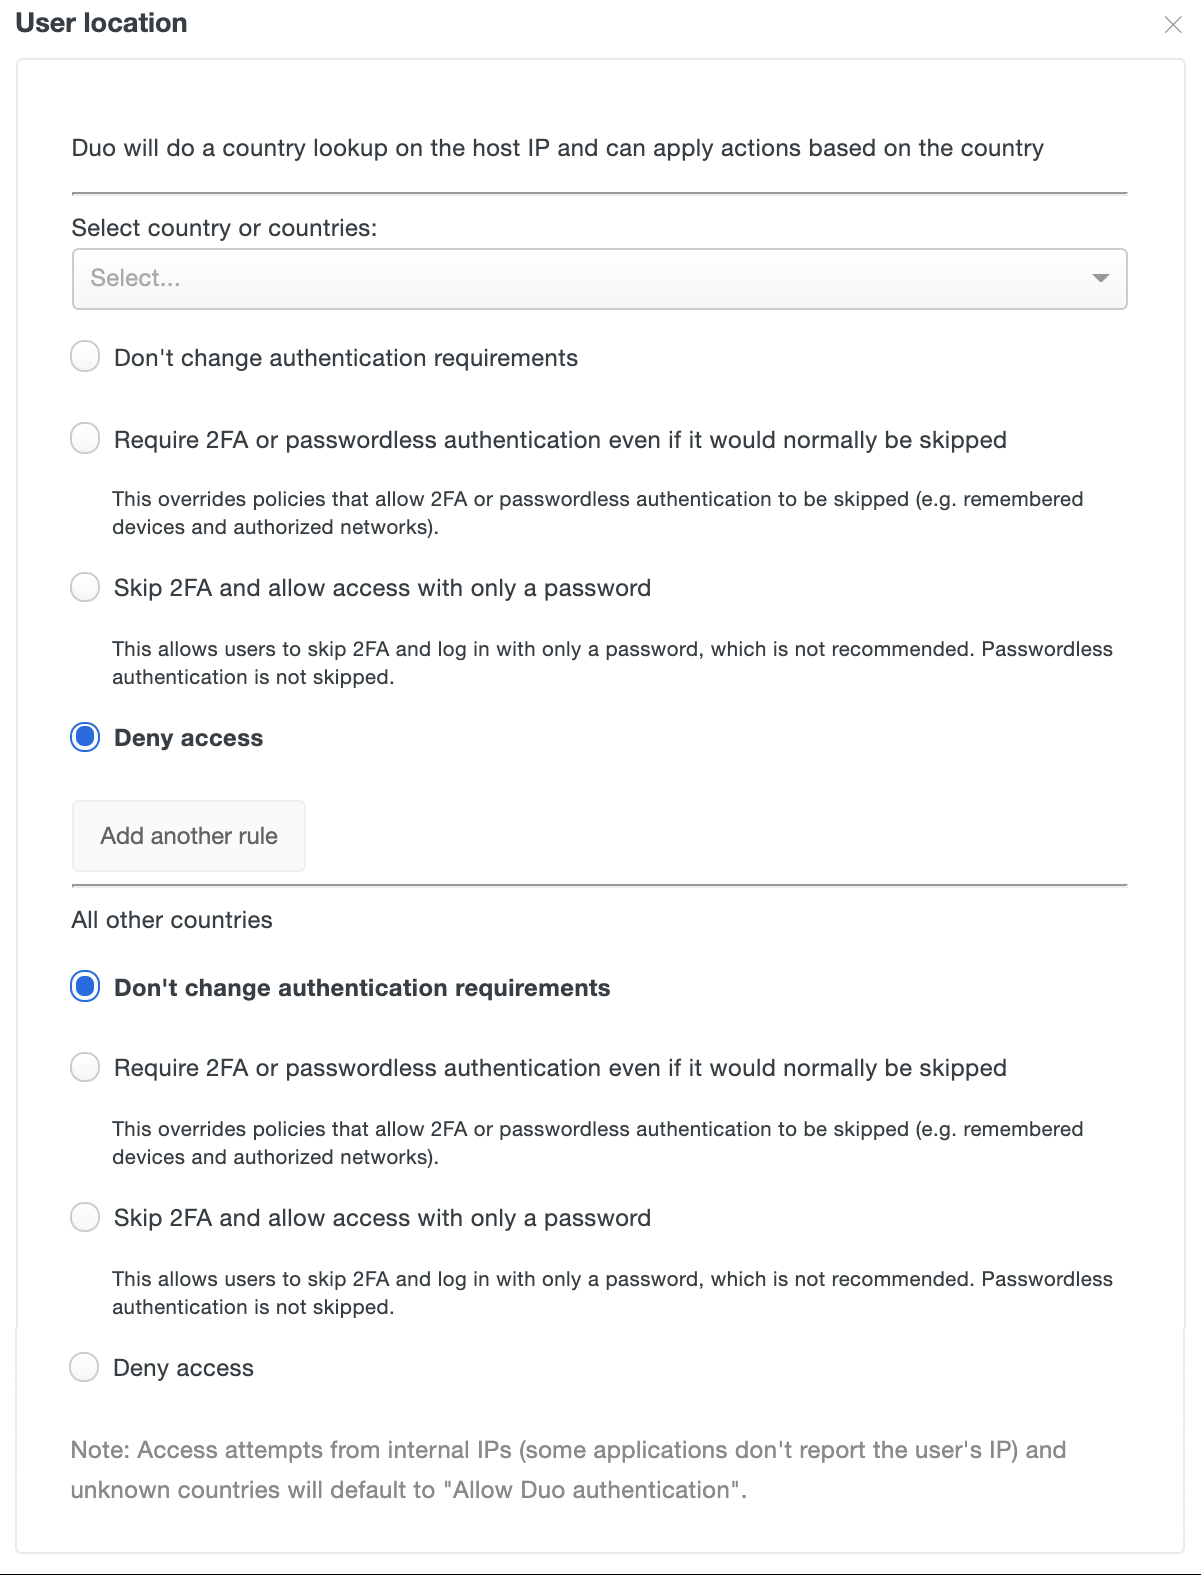
User Location
The user location policy expands to apply to both two-factor authentication and passwordless authentication.
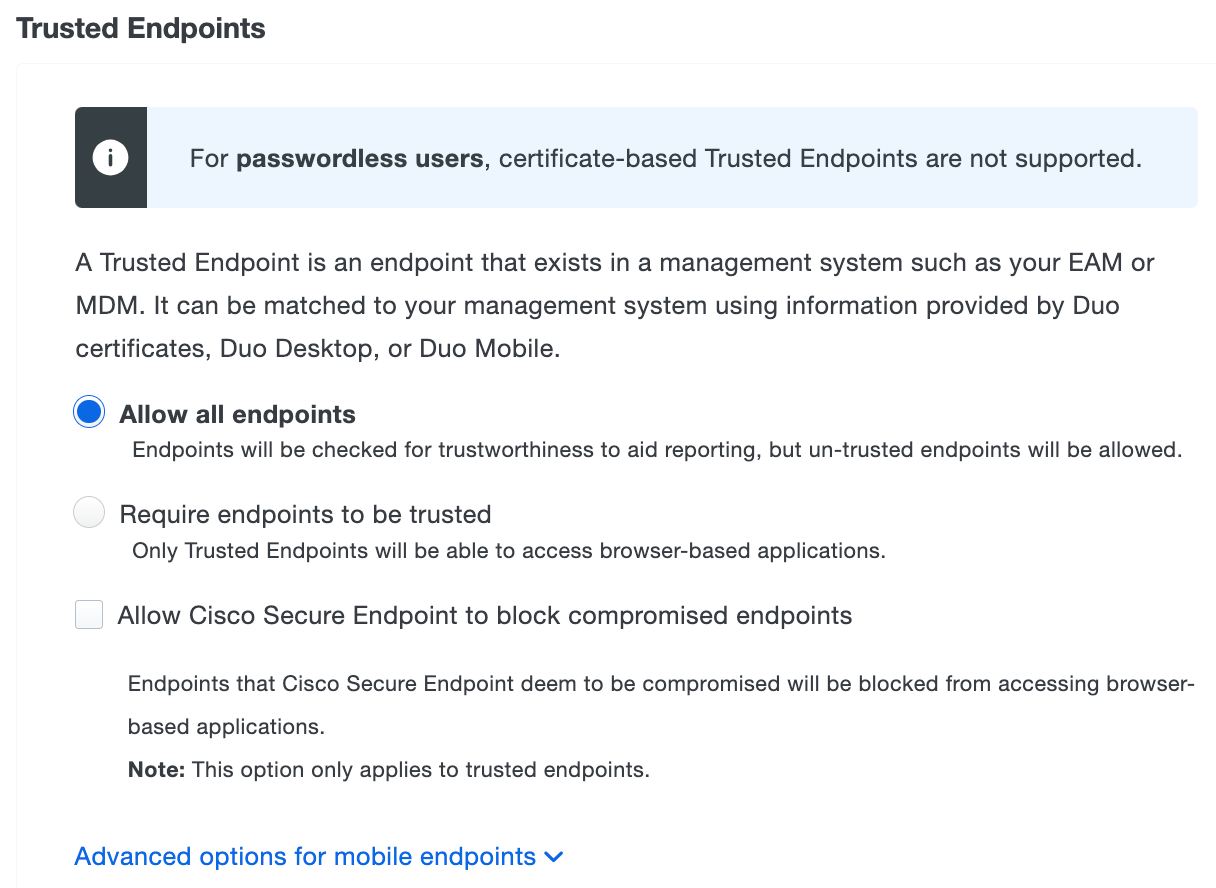
Trusted Endpoints
The trusted endpoints policy information mentions which types of management integrations can verify device trust status during passwordless authentication: management systems that rely on Cisco Secure Endpoint verification, Duo Desktop trust verification, or Duo Mobile managed devices.
Passwordless enforces the trusted endpoints policy after you perform an authentication, so on an untrusted device you will be allowed to approve a push or use a platform or roaming authenticator after device trust verification and then be blocked if device trust was required for access but the device is not trusted.
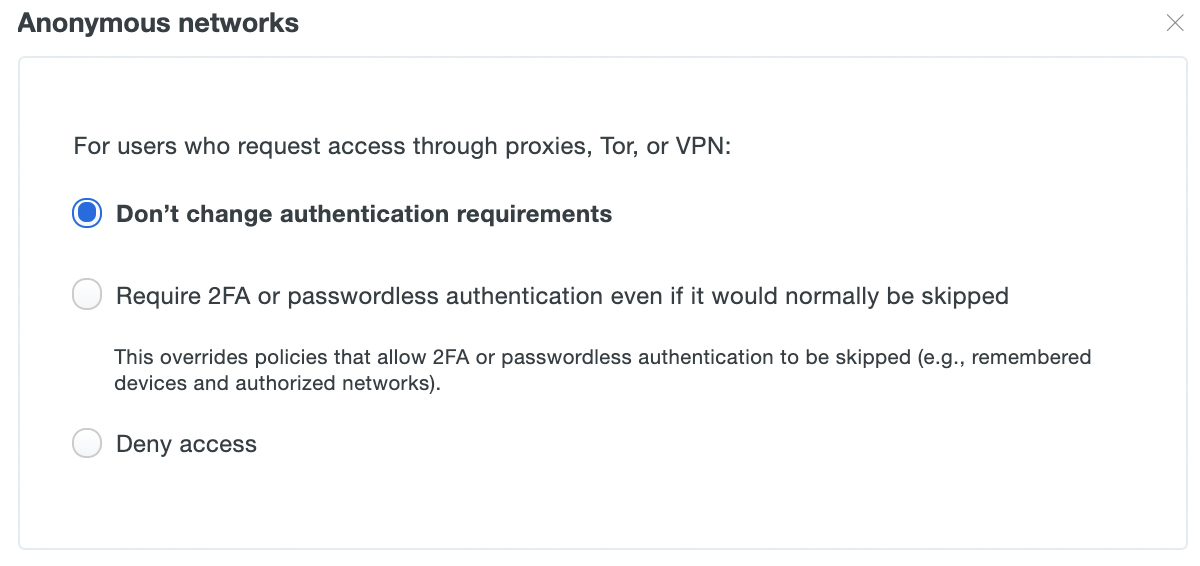
Anonymous Networks
The anonymous networks policy expands to apply to both two-factor authentication and passwordless authentication.
Authorized Networks
The authorized networks policy can't be used to allow access to an application without completing passwordless authentication, but defining the "Require MFA from these networks" and "Deny access from all other networks" options do apply to passwordless authentication.
2FA-Only Policy Settings
When a policy setting applies to two-factor authentication and has no effect for passwordless logins, the policy editor reflects this when you edit the configuration for that setting.

The Plugins policy settings apply only to two-factor authentication. All other policy settings apply to both passwordless and 2FA-only users.
Passwordless Features
Available Now
-
Support for WebAuthn FIDO2 security keys as a passwordless authenticator.
-
Support for platform authenticators and passkeys from various vendors like Microsoft, Apple, Google, Samsung, etc.
-
Support for Duo Mobile as a passwordless authenticator on Android and iOS devices.
-
Self-service initial registration of access device passwordless authenticators after successful password verification and two-factor authentication.
-
Self-service management portal for passwordless and MFA devices accessible from the Duo Passwordless authentication prompt when the self-service portal has been enabled for the application being accessed.
-
Automatic fallback to password login with two-factor authentication in scenarios where passwordless isn't available.
-
Duo Administrators may view and delete users' platform and roaming passwordless authenticators from the Duo Admin Panel.
-
Verified Duo Push for passwordless logins with Duo Push.
-
Support for Authorized networks policy.
-
Support for Remembered Devices policy at passwordless login.
-
Support for these Duo authorization policy settings: User Location, Operating Systems, Browsers, and Anonymous Networks.
-
Support for Duo Duo Desktop policy checks at passwordless login.
-
Support for Trusted Endpoints device trust policy with management systems that rely on Cisco Secure Endpoint verification, Duo Duo Desktop trust verification, Duo Mobile Verification, or Duo Mobile managed devices.
- Trusted device verification using certificates or Google Verified Access is not supported.
-
Reporting for passwordless authentications in the Authentication Log.
Requirements
To deploy Duo Passwordless in your organization, you need the following:
-
A Duo Admin with the Owner or Administrator admin role can enable passwordless configuration for your Duo account. Once enabled, Owner or Administrator admin roles may create or edit policies that include passwordless authentication methods.
-
Target applications for Duo Passwordless that support SAML 2.0 authentication.
-
Passwordless authentications available for your user access devices: WebAuthn platform or roaming authenticators such as Face ID or Touch ID on Apple iOS and macOS devices, Windows Hello on Windows devices, Android biometrics, or FIDO2 WebAuthn security keys; or Duo Mobile installed on Android or iOS devices and activated for Duo Push.
-
An on-premises Active Directory identity store. This configuration requires LDAP authentication from Duo to Active Directory. Continue to the Prerequisites to learn more.
Prerequisites
Before you begin setting up Duo Passwordless, be sure you have:
-
Duo Single Sign-On (SSO) set up and working with an Active Directory (AD) authentication source and a SAML service provider.
You still need to set up Duo SSO with an AD authentication source if you have an existing SSO IdP. You'll federate your existing SAML IdP with Duo SSO to add passwordless authentication. Refer to the Duo Passwordless and External Identity Providers for more details about this configuration. You do not need to reconfigure applications already federated with your existing SSO identity provider to point to Duo SSO.
-
Your Duo Single Sign-On AD authentication source must use Duo Authentication Proxy v5.3.0 or later, with the latest version recommended. Refer to the instructions for upgrading the Authentication Proxy servers used by Duo SSO to the current release version.
-
A SAML service provider (SP) application federated with Duo Single Sign-On, with both SSO primary authentication and Duo two-factor authentication working.
We recommend activating the Universal Prompt for your target SAML application, to provide users with a seamless experience and common look and feel between regular and passwordless authentication.
Duo Passwordless and External Identity Providers
If you don't plan to use Duo Passwordless with an existing external identity provider, you can skip this section and proceed to Enable Duo Passwordless.
While using Duo Passwordless requires Duo Single Sign-On with Active Directory authentication, you can chain your organization's existing SAML identity provider (IdP) to Duo SSO to provide passwordless login to the applications already federated with your IdP.
You will create a generic SAML application in Duo SSO using information from your IdP, and then in your IdP you will construct an authentication policy that delegates to Duo. Your existing identity provider will act as a service provider, and Duo will act as an identity provider to your IdP.
Service provider applications (like Salesforce, Microsoft 365, etc.) remain federated with your existing identity provider. You do not need to change the federation configuration for those applications to point to Duo SSO instead.
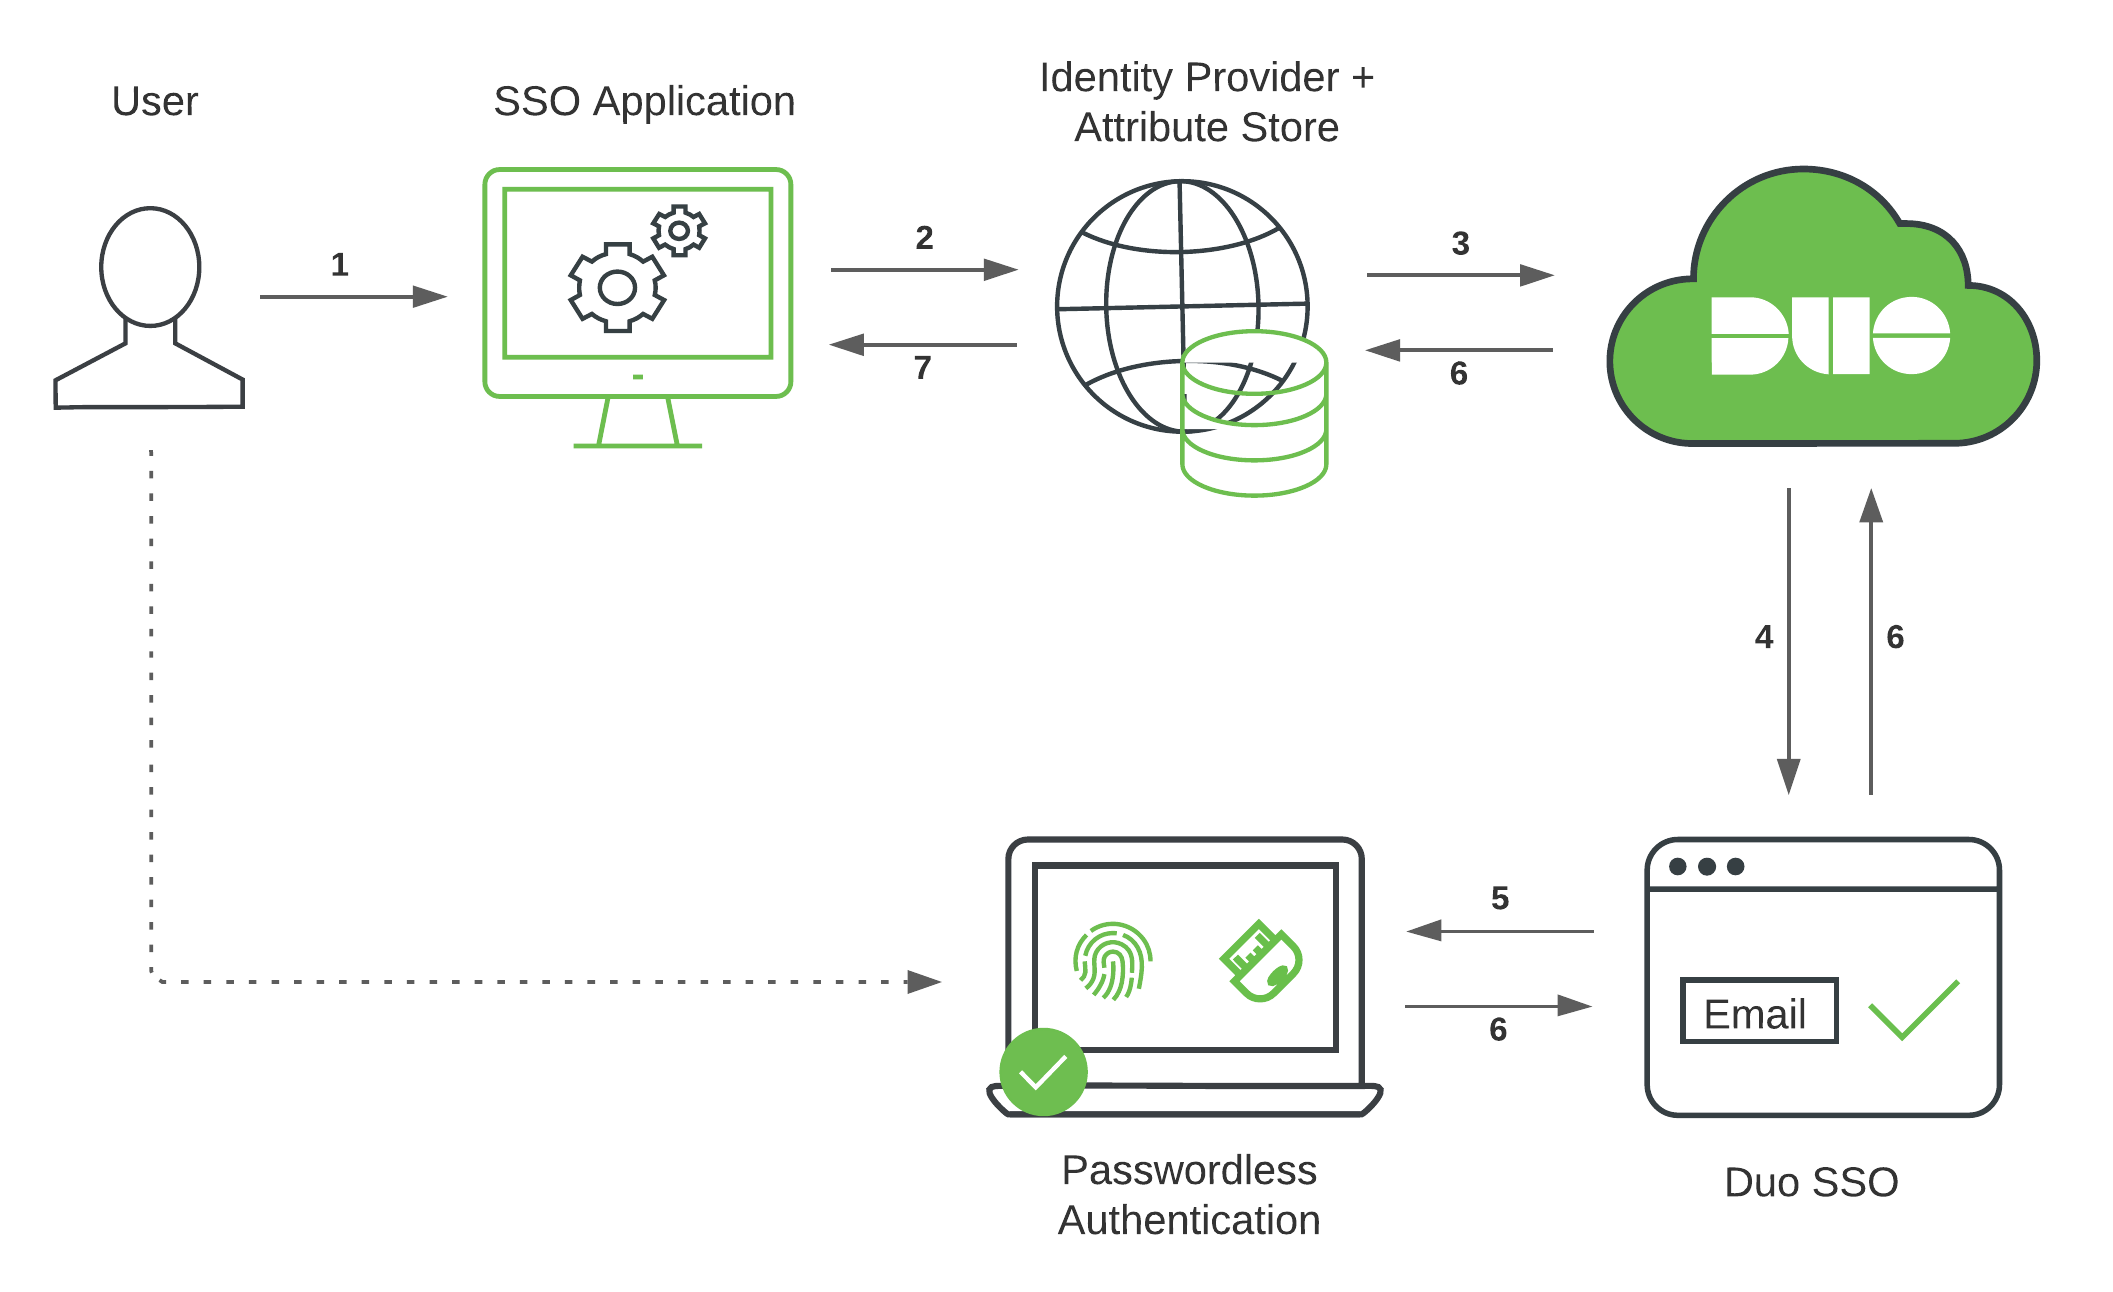
- User initiates login to application with email address or other unique identity attribute.
- The application redirects to the federated identity provider.
- The federated identity provider redirects to Duo SSO.
- Duo initiates authentication for the user based on the identity attribute.
- The user performs Duo Passwordless authentication.
- Passwordless authentication success returned for the Duo user back to the identity provider.
- The identity provider issues an access token and redirects the user to the application.
No additional IdP configuration steps necessary when Duo Single Sign-On is your identity provider for SAML applications.
You will add Duo SSO as a new claims provider in AD FS.
Create the Duo SAML Application
-
Click Protect an Application and locate the entry for Generic SAML Service Provider with a protection type of "2FA with SSO hosted by Duo (Single Sign-On)" in the applications list. Click Protect to the far-right to start configuring Generic SAML Service Provider. See Protecting Applications for more information about protecting applications in Duo and additional application options. You'll need the information on the Generic SAML Service Provider page under Metadata later.
-
In a new browser tab or window, navigate to your AD FS server's federation metadata at https://Your-AD-FS-Server/FederationMetadata/2007-06/FederationMetadata.xml. This downloads a FederationMetadata.xml XML metadata file to your computer.
-
Open the FederationMetadata.xml file obtained from your AD FS server in a text editor. Use the information from the XML file to complete the Duo Generic SAML Service Provider application's Service Provider section as follows:
Name Description Example Value Entity ID The entityID parameter from the XML file. http://Your-AD-FS-Server/adfs/services/trustAssertion Consumer Service (ACS) URL The AssertionConsumerService Location parameter from the XML file. https://Your-AD-FS-Server/adfs/ls/Single Logout URL The SingleLogoutService Location parameter from the XML file. http://Your-AD-FS-Server/adfs/ls/Leave other settings in this section unchanged.

-
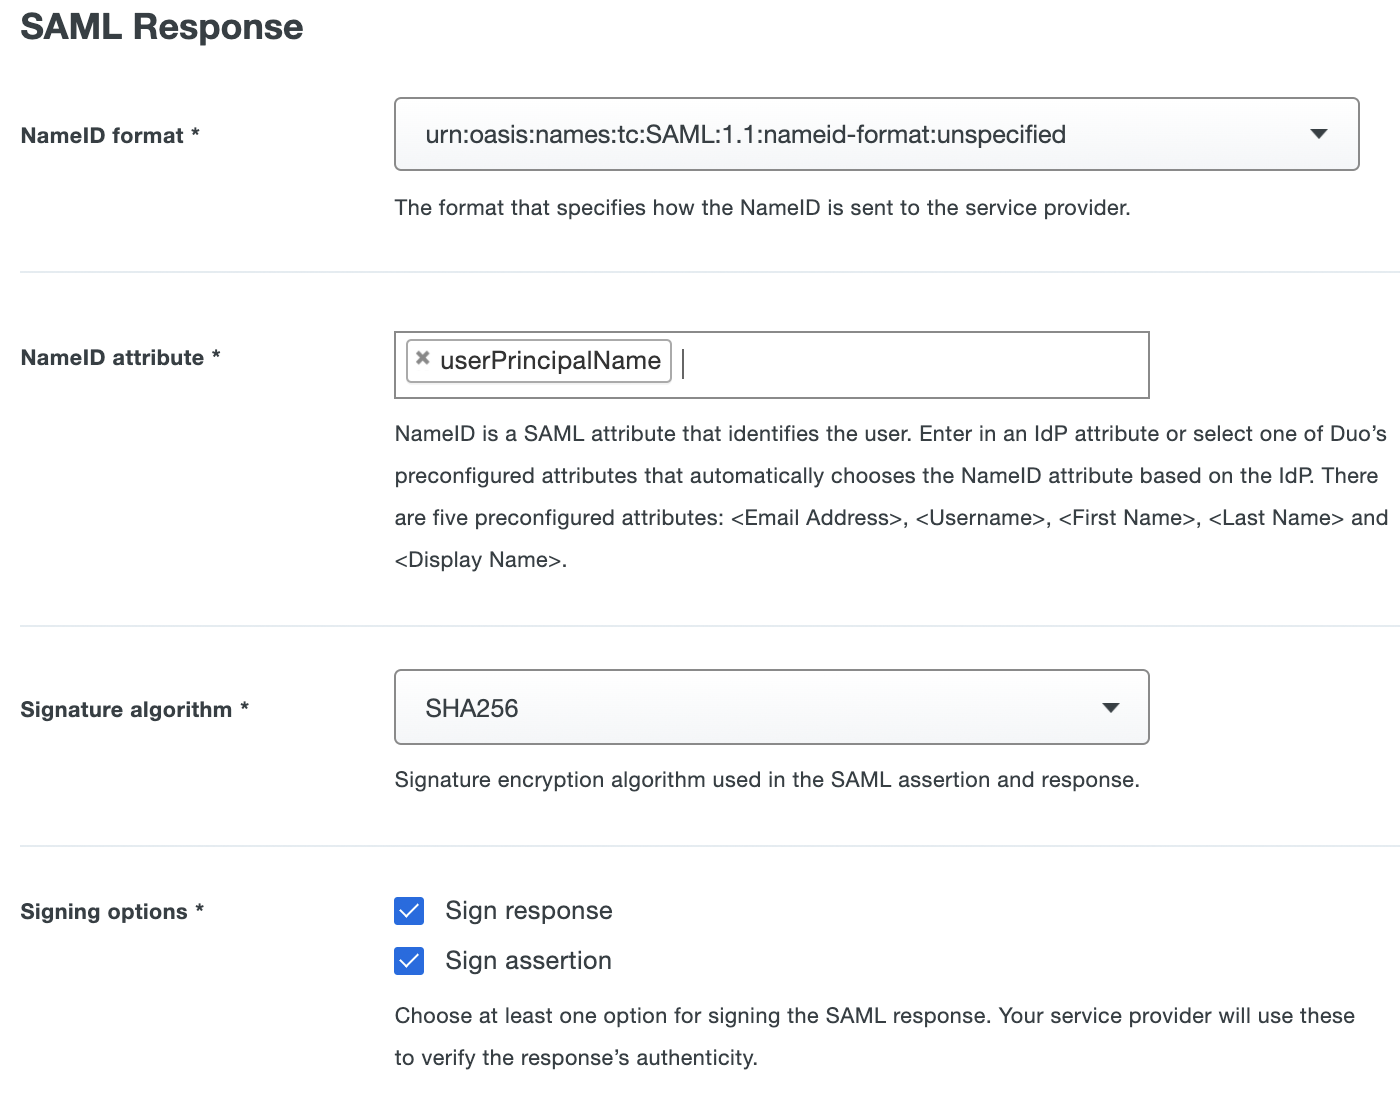
Make the following selections in the Duo Generic SAML Service Provider application's SAML Response section:
Name Value NameID format Select urn:oasis:names:tc:SAML:1.1:nameid-format:unspecified. NameID attribute Type in the complete attribute name userPrincipalNamefollowed by pressing Enter.Signature Algorithm Use the default selection of SHA-256. Signing Options Enable both Sign response and Sign assertion. Leave other settings in this section unchanged.
-
Scroll down on the Duo Generic SAML Service Provider application's page to the Universal Prompt section and select Show new Universal Prompt if not already selected.
-
Scroll down to the "Policy" section and apply a group or application policy that permits passwordless authentication methods.
-
Scroll down further to the "Settings" section. Enter a descriptive name for this application, like "AD FS Claims Provider Trust".
-
Click the Save button at the bottom of the page.
-
After saving the application configuration, scroll down to SAML Metadata in the "Downloads" section. Click the Download XML button. The XML file you download will have the same name that you gave this application in Duo.
-
Copy the XML file you downloaded from Duo to your AD FS server.
Create the AD FS Claims Provider Trust
-
Log in to your AD FS server and launch the AD FS Management console. Navigate to AD FS → Claims Provider Trusts.
-
Click the Add Claims Provider Trust... action in the "Actions" pane on the right.
-
Click Start on the first page of the "Add Claims Provider Trust Wizard".
-
On the "Select Data Source" page, select the Import data about the claims provider from a file option, and browse to the XML file you downloaded from the Duo Admin Panel and copied over to the AD FS server. Click Next after selecting the Duo XML file.
-
Enter a descriptive name for the Duo claims provider on the "Specify Display Name" page, and any additional information in the "Notes" field to help you identify this trust, and click Next.
-
Make no changes on the "Ready to Add Trust" page and click Next.
-
When you reach the "Finish" page, enable the Open Claim Rules option and then click Close.
-
On the "Edit Claim Rules for ..." page click Add Rule.... A new window will appear.
-
On the "Select Rule Template" page select Transform an Incoming Claim from the drop-down and click Next.
-
On the "Configure Rule" page type Name ID to UPN into the "Claim rule name" field.
-
Select Name ID from the "Incoming claim type:" drop-down.
-
Leave the "Incoming name ID format:" value as Unspecified.
-
Click the drop-down next to "Outgoing Claim Type" and select UPN.
-
Click Finish. If you receive a warning about passing claim values, click OK. You'll return to the "Edit Claims Rules for ..." window.
-
Click OK. The window will close and you'll return to the AD FS Management console.
Learn more about creating claims provider trusts at the Microsoft site.
Create a Claim Issuance Policy for Office 365
If you have Office 365 federated with AD FS, and you want to extend Duo Passwordless to Office 365 logins, follow these additional steps:
-
In the AD FS Management Console, go to AD FS → Relying Party Trusts
-
Right-click on the Microsoft Office 365 Identity Platform relying party and select Edit Claim Issuance Policy....
-
On the "Edit Claim Rules for ..." page click Add Rule.... A new window will appear.
-
On the "Select Rule Template" page select Send Claims Using a Custom Rule from the drop-down and click Next.
-
Name the new claim rule Send UPN as ImmutableID and enter in the following into the "Custom Rule" text box:
c:[Type == "http://schemas.xmlsoap.org/ws/2005/05/identity/claims/upn"] => issue(store = "Active Directory", types = ("http://schemas.xmlsoap.org/claims/UPN", "http://schemas.microsoft.com/LiveID/Federation/2008/05/ImmutableID"), query = "userPrincipalName={0};userPrincipalName,objectGUID;YOURDOMAIN.COM\adfs_service_account_name", param = c.Value);IMPORTANT Make sure to update the service account information specified in the rule from
YOURDOMAIN.COM\adfs_service_account_nameto match your actual domain and the service account used to run the AD FS service on your server. -
Click Finish. You'll return to the "Edit Claim Issuance Policy for Microsoft Office 365 Identity Platform" window.
-
Click OK. The window will close and you'll return to the AD FS Management console.
No additional IdP configuration steps necessary when you federate Microsoft 365 with Duo Single Sign-On using an on-premises Active Directory as the authentication source. Users in the federated tenant will redirect to Duo SSO for passwordless login.
Duo Passwordless authentication is not available to Duo SSO deployments using Entra ID as a SAML authentication source.
Delegation between Duo SSO and PingFederate requires entering information from the Duo Admin Panel into PingFederate and vice-versa. Please refer to Ping's documentation for Managing IdP Connections and identifying identity providers in PingFederate for more details about this process.
Create the Duo SAML Application
-
Click Protect an Application and locate the entry for Generic SAML Service Provider with a protection type of "2FA with SSO hosted by Duo (Single Sign-On)" in the applications list. Click Protect to the far-right to start configuring Generic SAML Service Provider. See Protecting Applications for more information about protecting applications in Duo and additional application options. You'll need the information on the Generic SAML Service Provider page under Metadata later.
-
Make the following selections in the Duo Generic SAML Service Provider application's SAML Response section:
Name Value NameID format Select urn:oasis:names:tc:SAML:1.1:nameid-format:emailAddress. NameID attribute Select <Email Address>. Signature Algorithm Use the default selection of SHA-256. Signing Options Enable both Sign response and Sign assertion. Leave other settings in this section unchanged.
-
In the Map attributes section, enter this mapping:
IdP Attribute SAML Response Attribute <Username> userid -
Scroll down on the Duo Generic SAML Service Provider application's page to the Universal Prompt section and select Show new Universal Prompt if not already selected.
-
Scroll down to the "Policy" section and apply a group or application policy that permits passwordless authentication methods.
-
Scroll down further to the "Settings" section. Enter a descriptive name for this application, like "PingFederate Service Provider".
-
Click the Save button at the bottom of the page.
-
Scroll up the page to the "Downloads" section of your generic SAML service provider's page and click Download XML to download the Duo Single Sign-On XML metadata file. You will import this file into PingFederate.
Add the Duo Application to PingFederate
Perform the remaining steps in the PingFederate administrative console. Refer to the PingFederate OpenToken Adapter documentation for more information about these configuration steps. You should have an adapter configured in PingFederate for your target service provider (SP) application (the application with which you want to use Duo Passwordless).
-
Log in to the PingFederate administrative console and navigate to Authentication → Integration → IdP Connections and create a new SAML 2.0 IDP connection for Duo, using the Import Metadata file selector to upload the metadata XML file you downloaded from the Duo Admin Panel. This will populate PingFederate with information about the Duo IdP, such as the Entity ID and connection name.
-
Go to Browser SSO and configure the SAML profiles to allow so that IDP-Initiated and SP-Initiated.
-
Go to User-Session Creation and configure it with your desired Identity and Account Mappings.
-
Go to Target Session Mapping and map your SP application adapter, including mapping attributes between systems (such as mapping
subjecttocn). -
Complete adapter mapping on the "Adapter Mapping Summary" tab and proceed to the "User-Session Creation Summary" tab to continue, clicking Done to accept your changes.
-
Go to Protocol Settings to configure the protocol settings. The SSO Service Endpoint URLs should be populated as a portion of the Duo EntityID metadata attribute, for example
/saml2/sp/DI73P00LD4DLMLNR9M00, and the SAML bindings should allow Post and Redirect. -
Use SAML Standard signature policy and no encryption. Proceed to the "Protocol Settings Summary" to continue, clicking Done to accept your changes.
-
Go to Credentials and verify the Duo IdP signing certificate and key was imported from the Duo metadata file.
-
Proceed to the "Activation and Summary" tab to make the connection active, and the save.
-
Test logging in to the SP whose adapter you selected during configuration; you should be redirected to Duo SSO.
If you use policy contracts you may need to create a new policy contract for Duo SSO and then create a new authentication policy tree in PingFederate, using the Duo Generic SAML application's IDP connection and the policy contract you just created as part of the authentication flow.
The Ping document Connecting Okta as an IdP through SAML to PingFederate as an SP is a step-by-step example of similar configuration that can be used as a guide to configuring Duo's SSO IdP as an SP in PingFederate.
Create the Duo SAML Application and add to Okta
-
Click Protect an Application and locate the entry for Generic SAML Service Provider with a protection type of "2FA with SSO hosted by Duo (Single Sign-On)" in the applications list. Click Protect to the far-right to start configuring Generic SAML Service Provider. See Protecting Applications for more information about protecting applications in Duo and additional application options. You'll need the information on the Generic SAML Service Provider page under Metadata later.
-
Scroll down on the "Generic SAML Service Provider - Single Sign-On" application page to the Downloads section. Click Download certificate. You will upload this certificate file to Okta in the next set of steps.
-
Keep the Duo Admin Panel open in your browser. You will need to copy information from Duo into Okta and vice-versa.
-
Log in to the Okta administrator console and navigate to Security → Identity Providers. Click the Add Identity Provider button and select Add SAML 2.0 IdP.
-
Fill out the information for the new identity provider using the following information from the Generic SAML Service Provider application in Duo:
Name Description and Example Value Name Enter a descriptive name for this IdP like Duo SSO - PasswordlessIDP Usage If you see this field set it to SSO only IdP Username Enter idpuser.subjectNameIdMatch against Set this to Okta Username or Email If no match is found Set to Redirect to Okta sign-in page IdP Issuer URI The Entity ID from the Duo Admin Panel i.e. https://sso-abcd1234.sso.duosecurity.com/saml2/sp/DI73P00LD4DLMLNR9M00/metadataIdP Single Sign-On URL The Single Sign-On URL from the Duo Admin Panel i.e. https://sso-abcd1234.sso.duosecurity.com/saml2/sp/DIABC123678901234567/ssoIdP Signature Certificate Click Browse files... and select the certificate you downloaded from the Duo Admin Panel. Click Add Identity provider when done.
-
Click on your newly-created identity provider for Duo Passwordless to expand its properties.
-
Return to the Generic SAML Service Provider application in the Duo Admin Panel and enter the following information from Okta in the Service Provider section:
Name Description and Example Value Entity ID The Okta Audience URI value i.e. https://acme.okta.com/sso/saml2/0oa13h448i8B0Ahp00l8Assertion Consumer Service (ACS) URL The Okta Assertion Consumer Service URL value i.e. https://www.okta.com/saml2/service-provider/spmbjynpoolcvndadqkqcLeave other settings in this section unchanged.
-
Scroll down on the Duo Generic SAML Service Provider application's page to the Universal Prompt section and select Show new Universal Prompt if not already selected.
-
Scroll down to the "Policy" section and apply a group or application policy that permits passwordless authentication methods.
-
Scroll down further to the "Settings" section. Enter a descriptive name for this application, like "Okta Service Provider".
-
Click the Save button at the bottom of the page.
Configure Okta Authentication Rules
-
Return to the "Identity Providers" page in the Okta console and click the Routing Rules tab. Click Add Routing Rule.
-
Configure the new routing rule's logic to scope Duo Passwordless authentication to specific applications and/or specific users. For example, you may want to create a rule that routes any user assigned to a Salesforce app federated with Okta to your new Duo identity provider for passwordless authentication.
-
Click Create Rule to save your new rule. Once you save it you can drag it up or down your rules list to change its priority during rule evaluation.
For other IdPs not listed here by name, refer to the Duo Single Sign-On for Generic SAML Service Providers documentation for creating a Duo SAML SP application that you will then configure as a delegated identity provider in your organization's IdP.
Enable Duo Passwordless
Role required: Owner or Administrator
-
Log in to the Duo Admin Panel and use the left-side navigation to go to Single Sign-On → Passwordless.
-
The Passwordless landing page shows whether you've completed the Duo Single Sign-On, Active Directory (AD) authentication source prerequisite steps, and whether you need to upgrade your Duo Authentication Proxy.
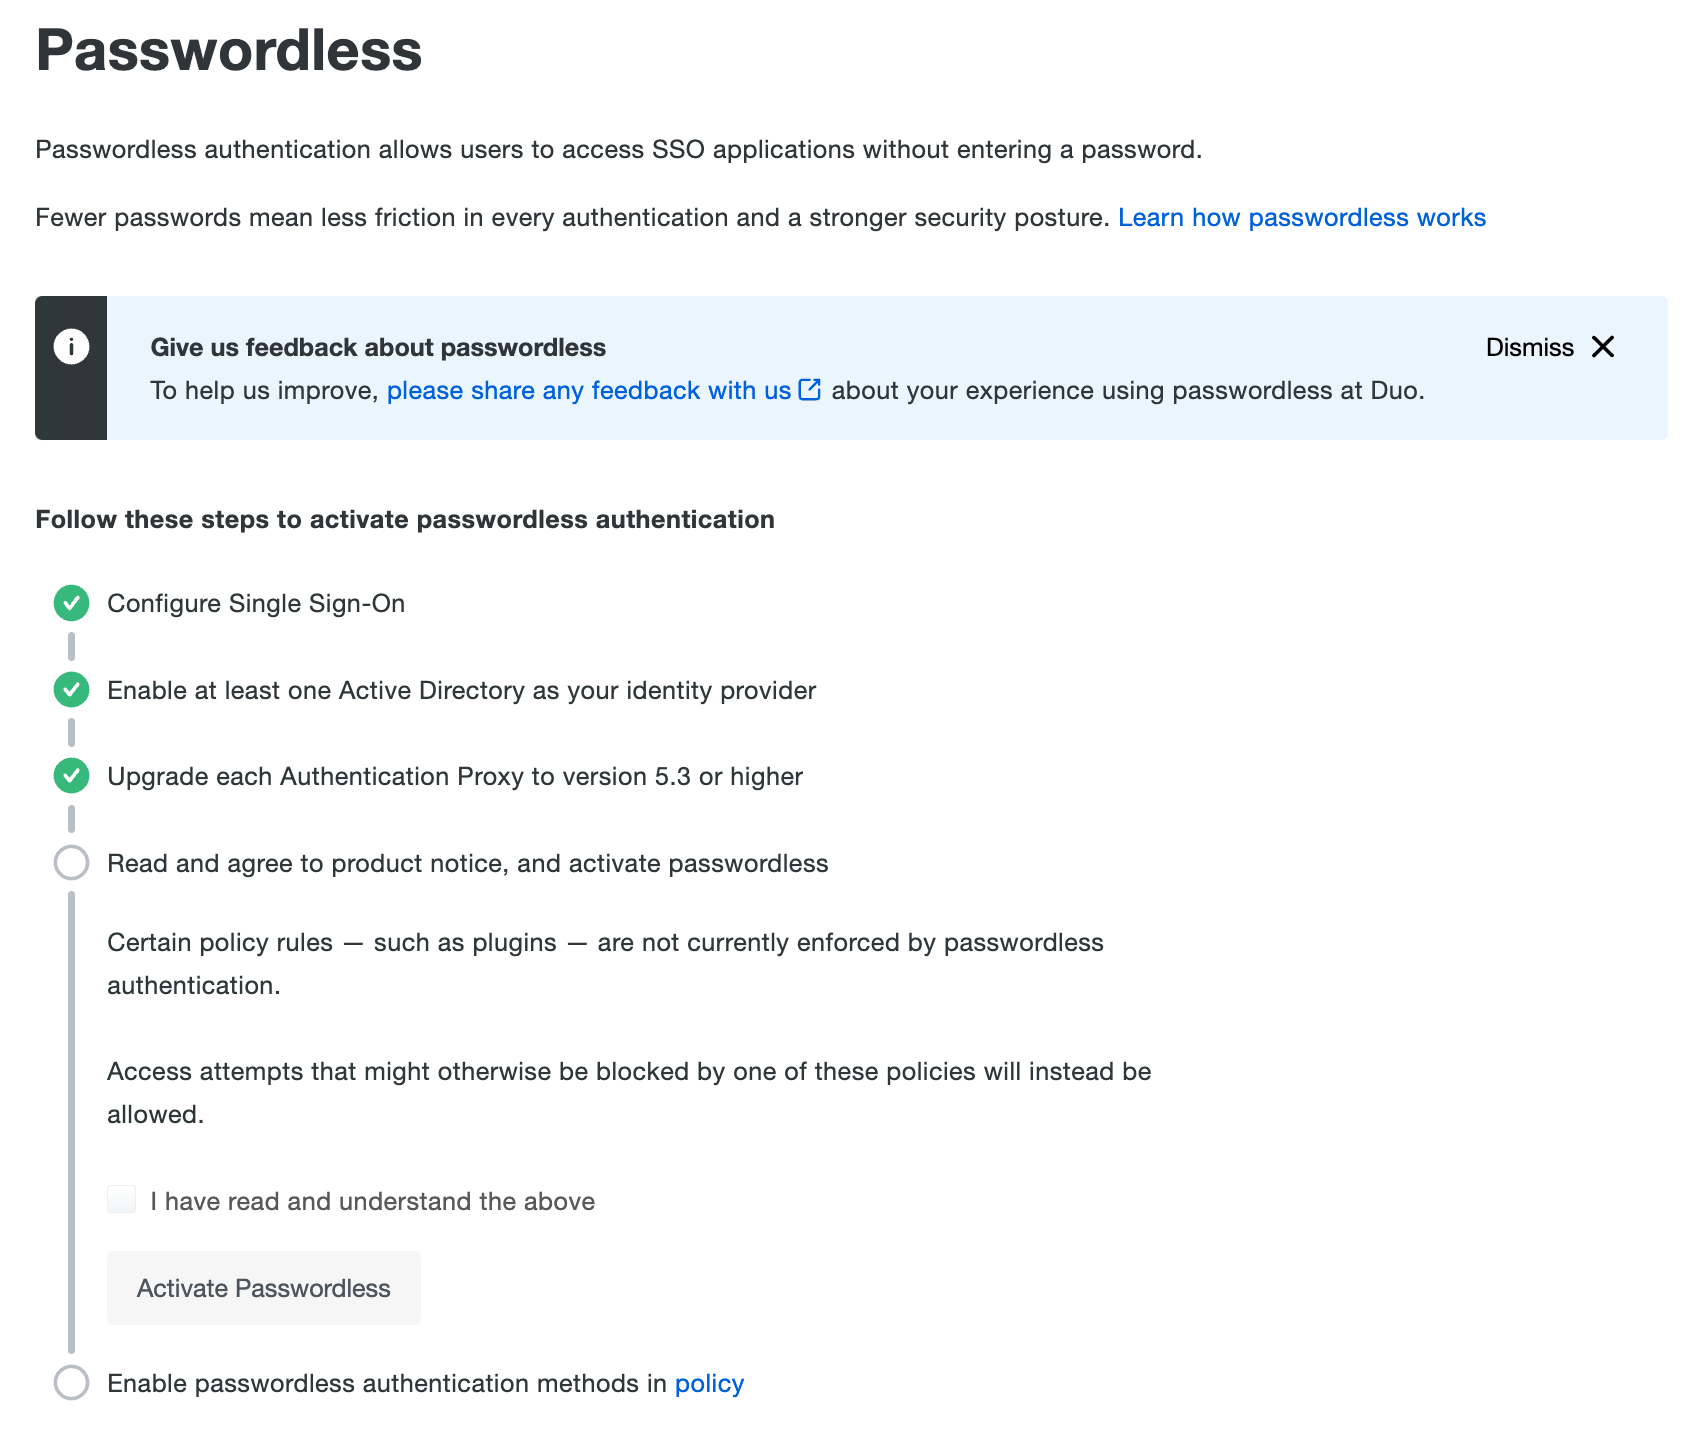
If you haven't completed the first three steps yet, please do so and return to the Passwordless page when done.
-
If you have completed all the prerequisites, the next step is activating Passwordless for your Duo account. Review the information presented, check the I have read and understand the above box, and click the Activate Passwordless button.
-
After you activate Passwordless for your account the Passwordless start page updates to show you have completed the setup requirements. Your next action is to enable passwordless authentication using Duo policies.
Configure Passwordless Policy
Role required: Owner or Administrator
The next step in deploying Duo Passwordless is to update your Duo policies to enable passwordless authentication methods. Before making any policy changes you should decide if you want to enable passwordless authentication for specific users or SSO applications, or for all users and compatible SSO applications.
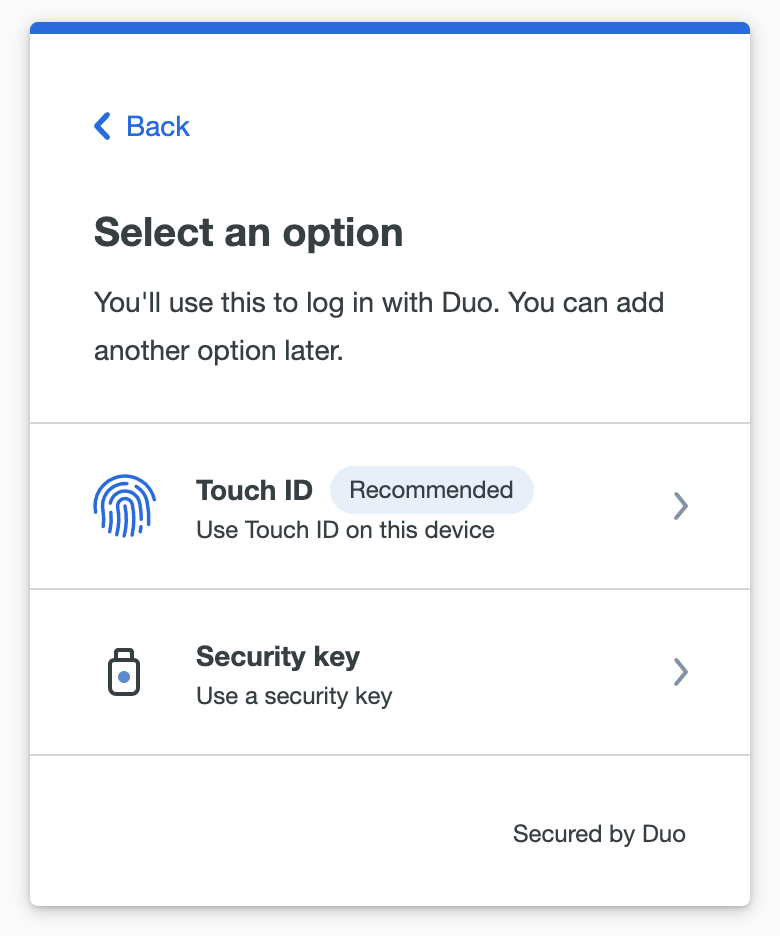
There are three types of passwordless authentication methods you can enable in the policy:
-
Platform Authenticators: This enables end-user authentication using authenticators or biometric sensors built into their access devices, such as Touch ID or Face ID on Apple devices, Windows Hello on Windows 10 and 11 systems, or Android biometrics. This also includes the use of passkeys synchronized across devices within a platform vendor's ecosystem. Enabling platform authenticators prompts just those users with compatible access devices to register a passwordless authenticator when they log in.
If you only enable this method in your policy, then users with devices that do not have a compatible platform authenticator do not receive the prompt for passwordless registration because their device does not support it. They will continue to log in with their password.
If a user previously registered a roaming authenticator while subject to a different policy, they would not be able to use it to access an application when the effective policy only permits platform authenticators and will fall back to username and password authentication.
-
Roaming Authenticators: This enables end-user authentication using FIDO2-compliant WebAuthn security keys attached to their access devices, like those from Yubico or Feitian. Enabling roaming authenticators prompts all users to register a passwordless authenticator whenever they log in.
If you only enable this method in your policy, then users cannot register platform authenticators but they will still be offered the opportunity to register a security key. They will need access to a supported roaming authenticator to complete passwordless registration. Don't enable roaming authenticators if your users do not have access to compatible WebAuthn security keys with PINs or biometrics.
If a user previously registered a platform authenticator while subject to a different policy, they would not be able to use it to access an application when the effective policy only permits roaming authenticators and will fall back to username and password authentication.
-
Duo Push: This enables end-user authentication by approval of a login request pushed to Duo Mobile on a user's Android or iOS device.
When a user has previously activated a device for Duo Push in order to perform two-factor authentication, or if a user performs first-time enrollment during Duo SSO login and enrolls Duo Push, they can use that same device for Duo Passwordless authentication without repeating the enrollment process. In order to approve Passwordless Duo Push login requests the device with Duo Mobile installed must have its security settings configured to require biometric identification (like Face ID or fingerprint), PIN entry, or passcode entry to unlock the device.
Duo Push authentication for Duo Passwordless is enabled for the specific browser used to log in to a protected application from a given access device. Successful registration of Duo Push as a passwordless authenticator is accomplished by placement of a "known-device" browser cookie i.e. when a user logs into an application with Duo Push allowed for Passwordless using Chrome, Duo sets the "known-device" browser cookie for Chrome on that device.
The first time a user attempts to authenticate with Duo Push for passwordless login, they must perform a verified Duo Push. This means entering the six-digit code displayed in the Duo browser authentication prompt into Duo Mobile on their Android or iOS device. The user must also perform biometric or PIN/passcode verification while they approve this login request.
If the user opts to trust the browser after this first login, then future passwordless logins from that browser do not require entry of the six-digit verification code.
Enable Passwordless with Group Policy
-
Log on to the Duo Admin Panel as an administrator with the Owner or Administrator admin role.
-
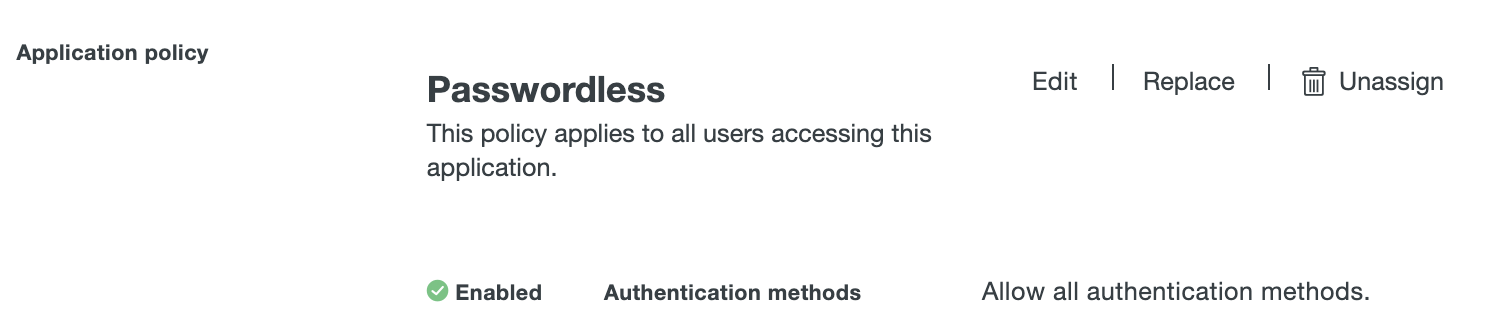
Navigate to the details page of the Single Sign-On application to which you want to apply the Passwordless policy.
-
Click the Apply a policy to groups of users link to assign the new Passwordless policy to a test group.

-
Click the Or, create a new Policy link instead of selecting a policy to apply from the drop-down list.
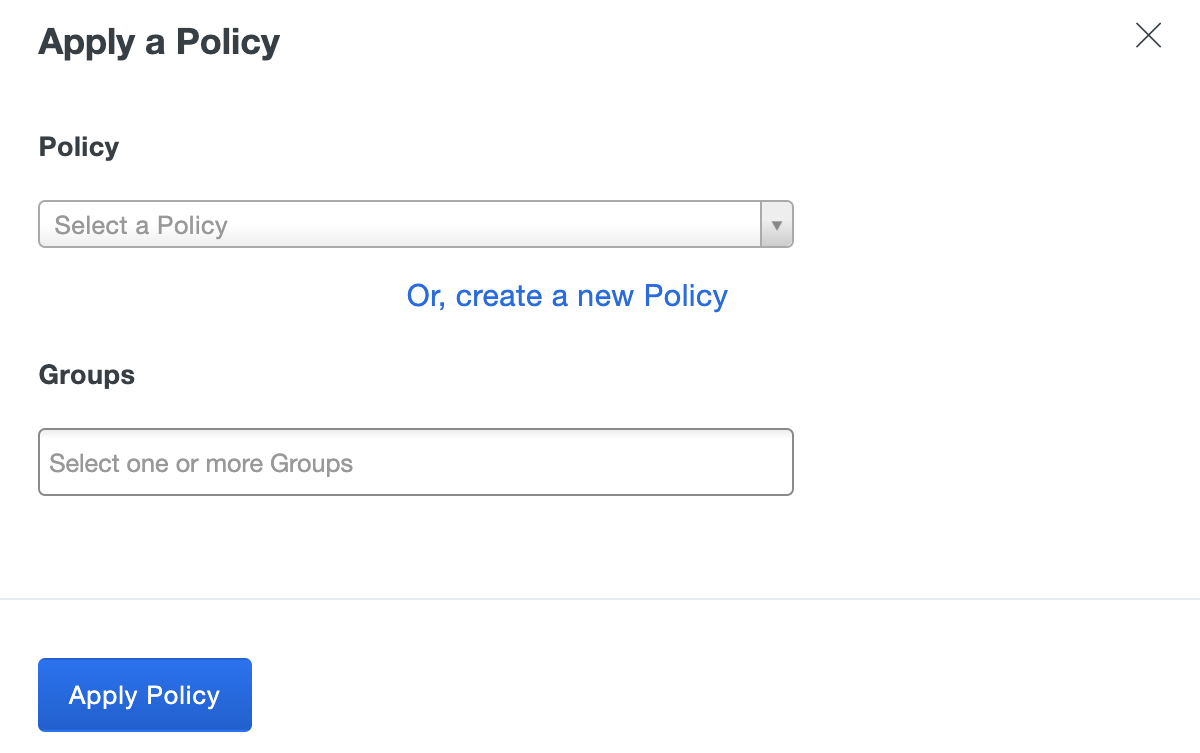
-
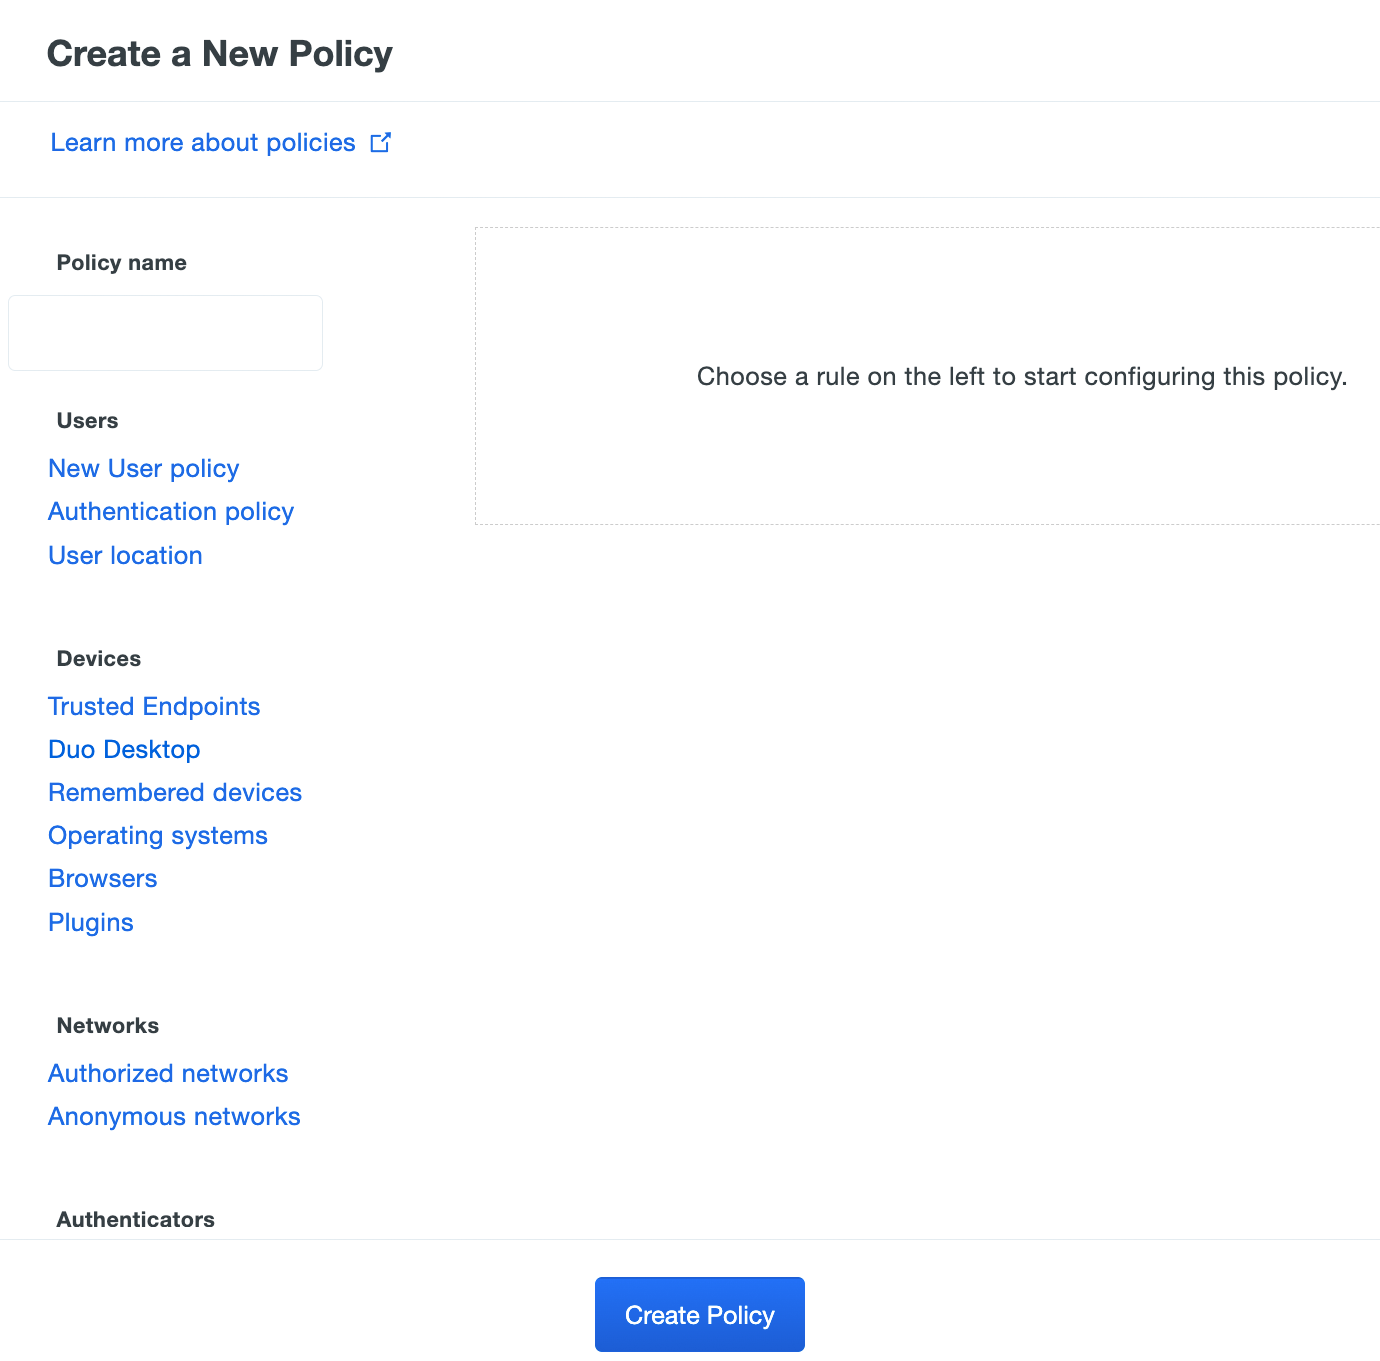
The policy editor launches with an empty policy.
-
Enter a descriptive Policy Name at the top of the left column, and then click the Authentication methods policy item on the left.
-
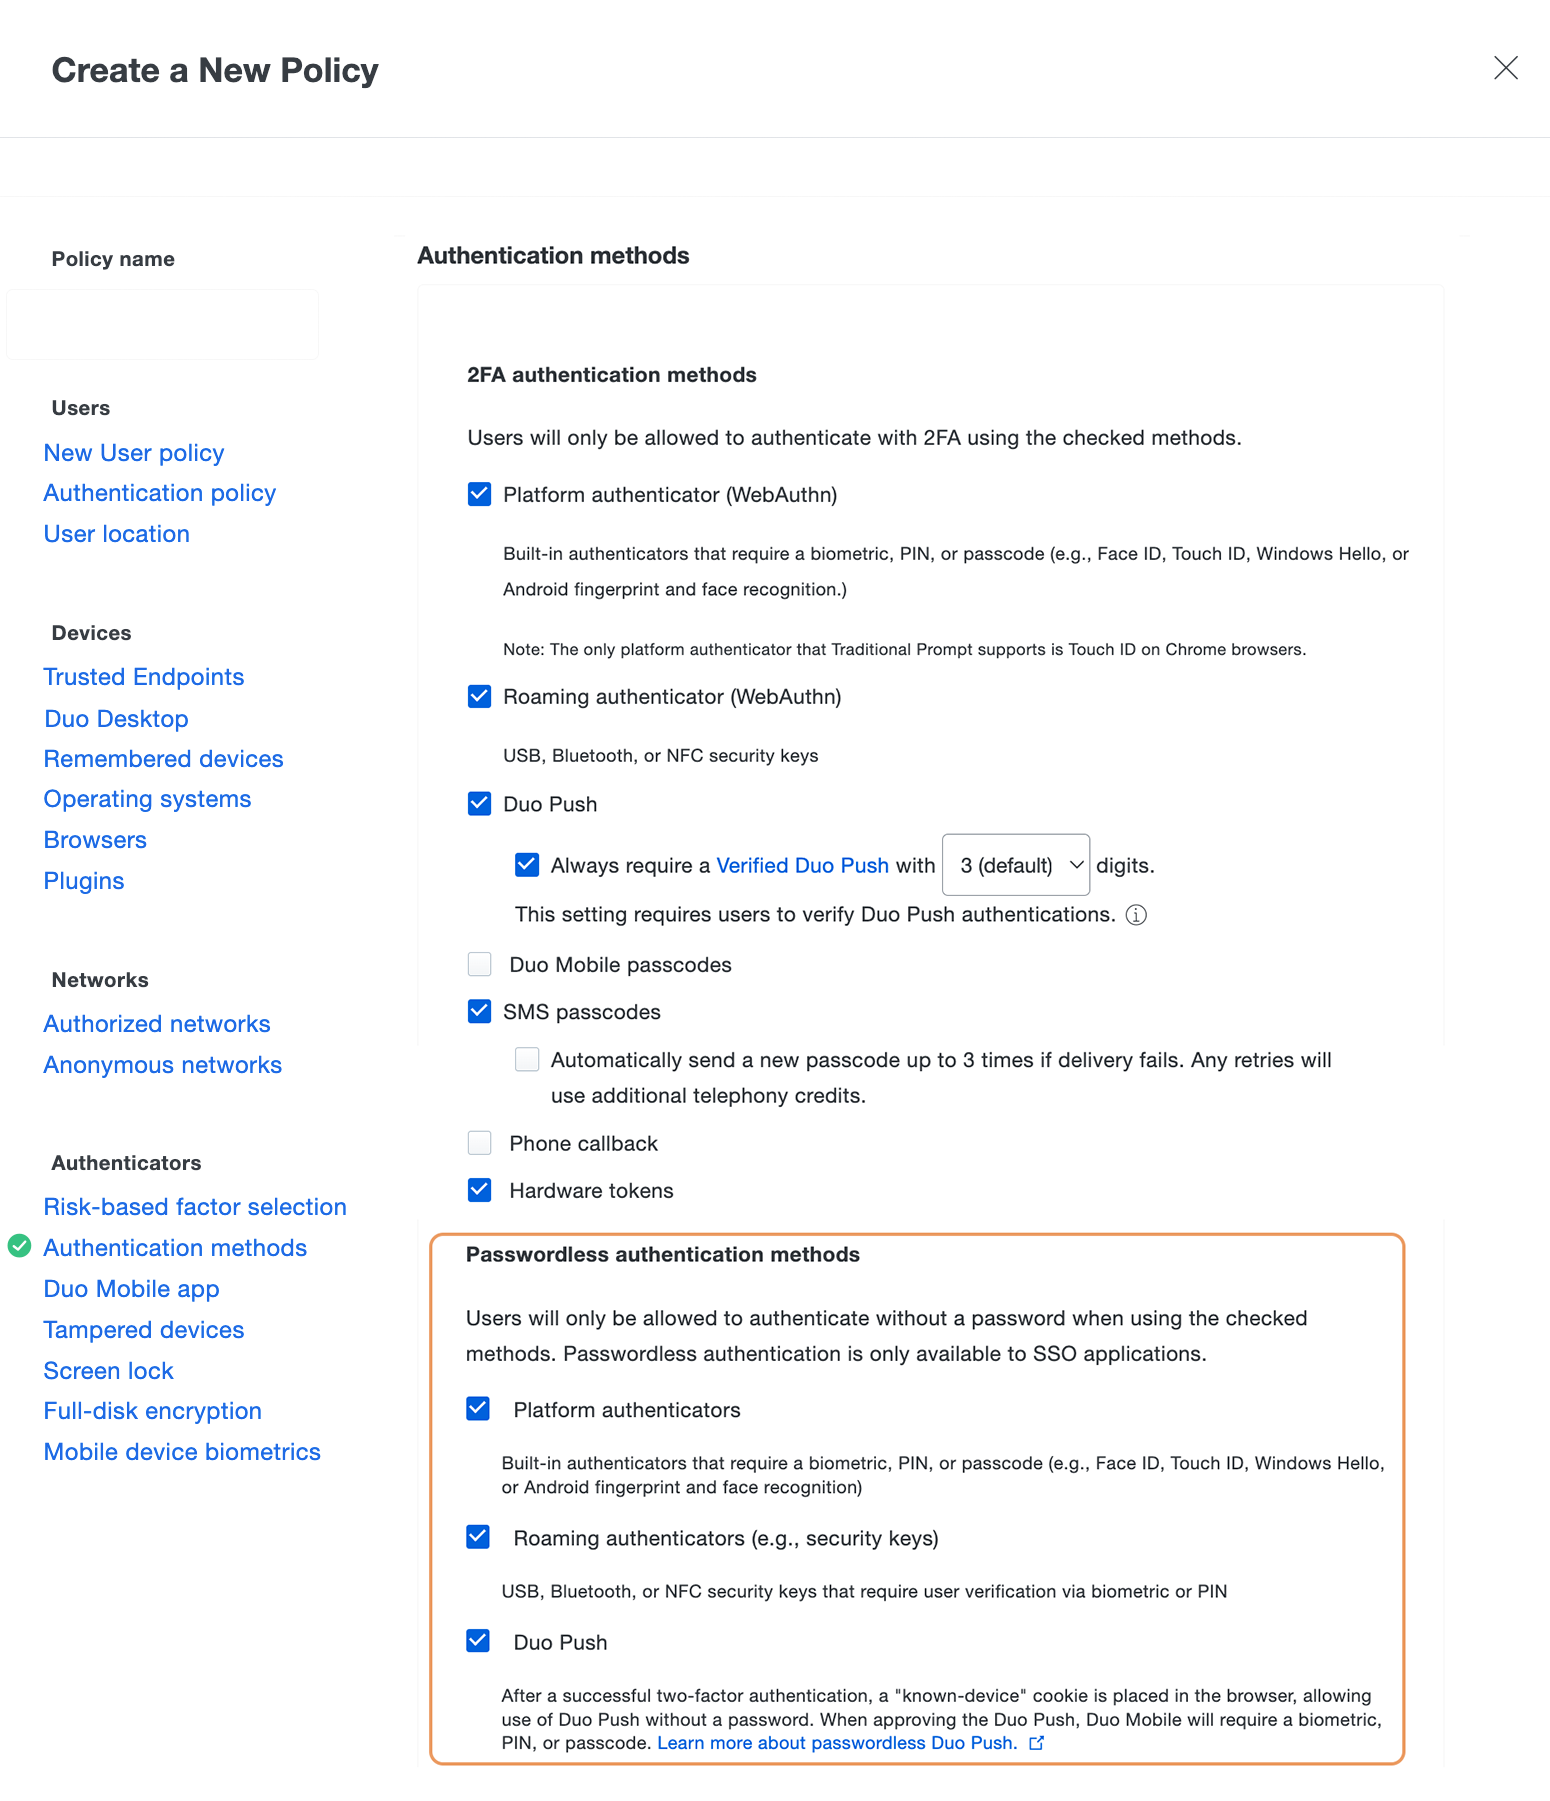
Select any or all types of passwordless authentication methods to enable for users:
-
Platform Authenticators enables authentication by your users with authenticators or biometric sensors built into their access devices.
-
Roaming Authenticators enables authentication by your users with FIDO2-compliant WebAuthn security keys attached to their access devices.
-
Duo Push enables authentication by your users with Duo Mobile push request approval on Android and iOS.
-
-
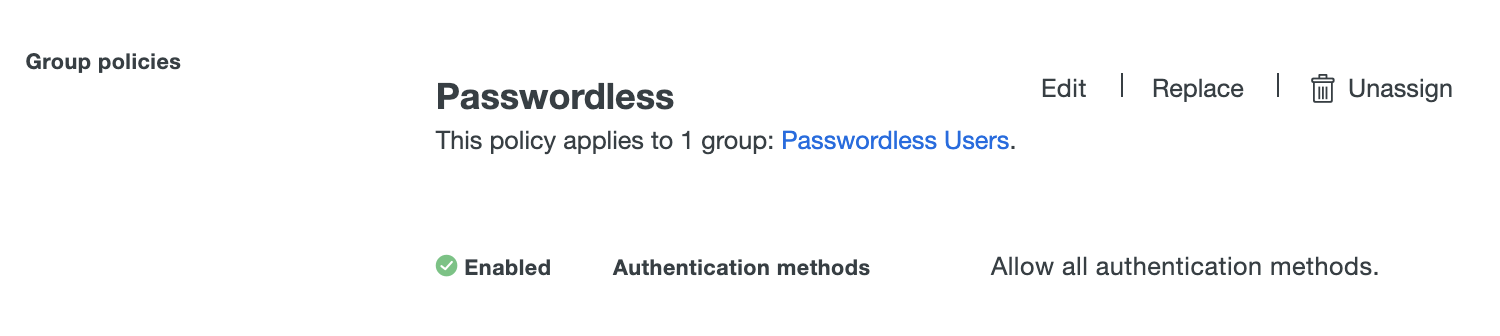
Click the Create Policy button to save the settings and return to the "Apply a Policy" prompt, with the new passwordless authentication methods policy selected. Start typing in the pilot group's name in the Groups field and select it from the suggested names.

-
Click the Apply Policy button. The application page shows the new group policy assignment.
For more information about creating and applying group policies, see the Policy documentation.
Enable Passwordless with Application Policy
-
Log on to the Duo Admin Panel as an administrator with the Owner or Administrator admin role.
-
Navigate to the details page of the Single Sign-On application to which you want to apply the Passwordless policy.
-
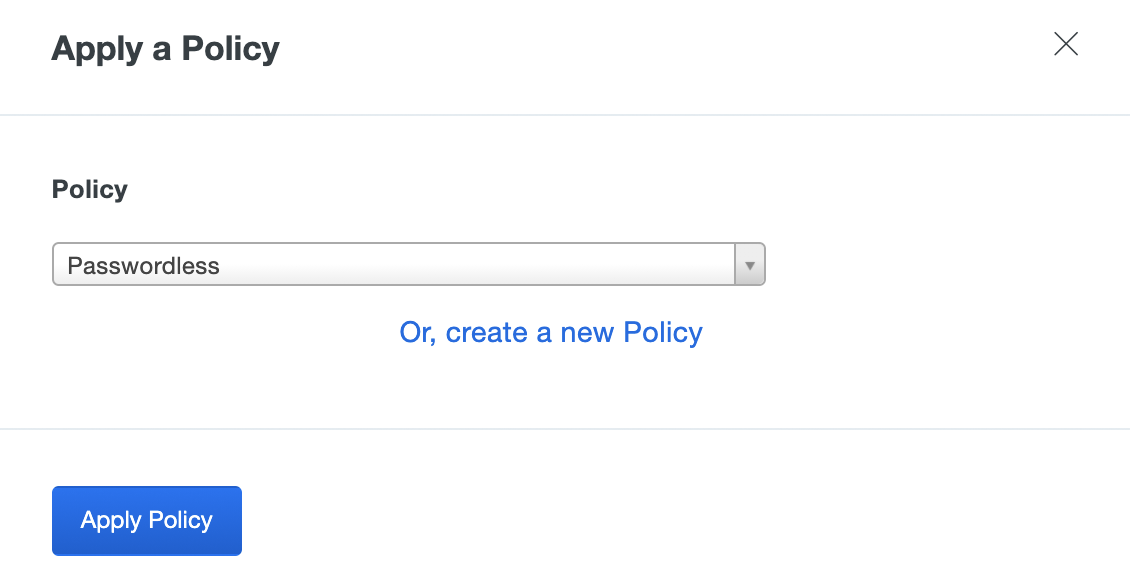
Click the Apply a policy to all users link to assign the new passwordless authentication methods policy to all users of the application.

-
Click the Or, create a new Policy link instead of selecting a policy to apply from the drop-down list.
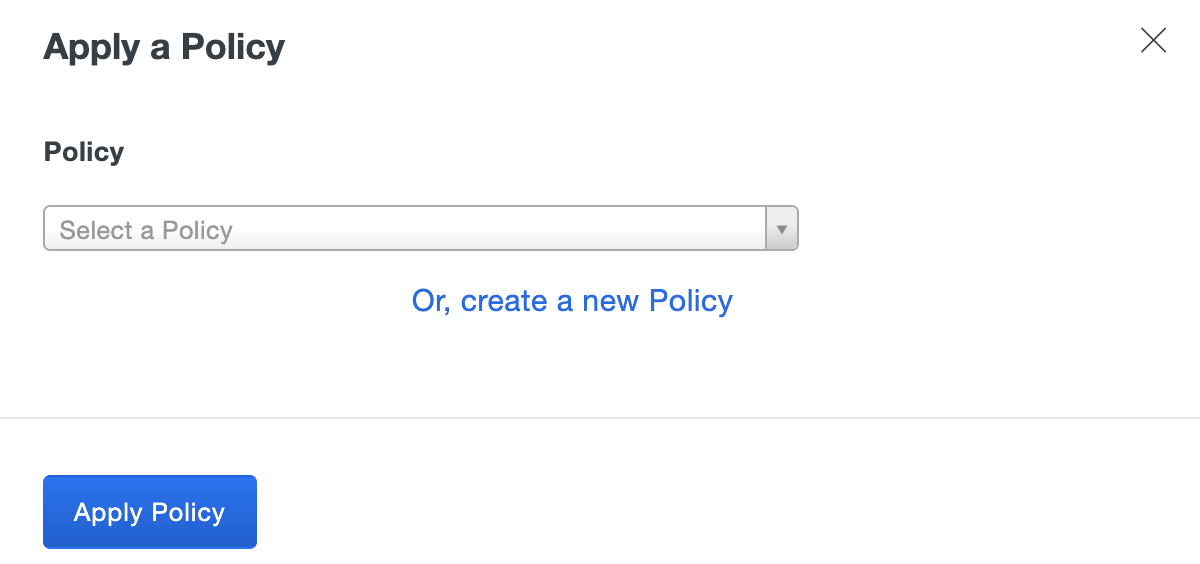
-
The policy editor launches with an empty policy.
-
Enter a descriptive Policy Name at the top of the left column, and then click the Authentication methods policy item on the left.
-
Select any or all types of passwordless authentication methods to enable for users:
-
Platform Authenticators enables authentication by your users with authenticators or biometric sensors built into their access devices.
-
Roaming Authenticators enables authentication by your users with FIDO2-compliant WebAuthn security keys attached to their access devices.
-
Duo Push enables authentication by your users with Duo Mobile push request approval on Android and iOS.
-
-
Click the Apply Policy button. The application page shows the new policy assignment.
For more information about creating and applying application policies, see the Policy documentation.
Test Your Setup
Access your federated service provider application as a user whose effective authentication methods include passwordless authenticators from an access device that has a supported platform or roaming authenticator available. Log in with username and password, and then complete Duo two-factor authentication.
Automatic Passwordless Registration
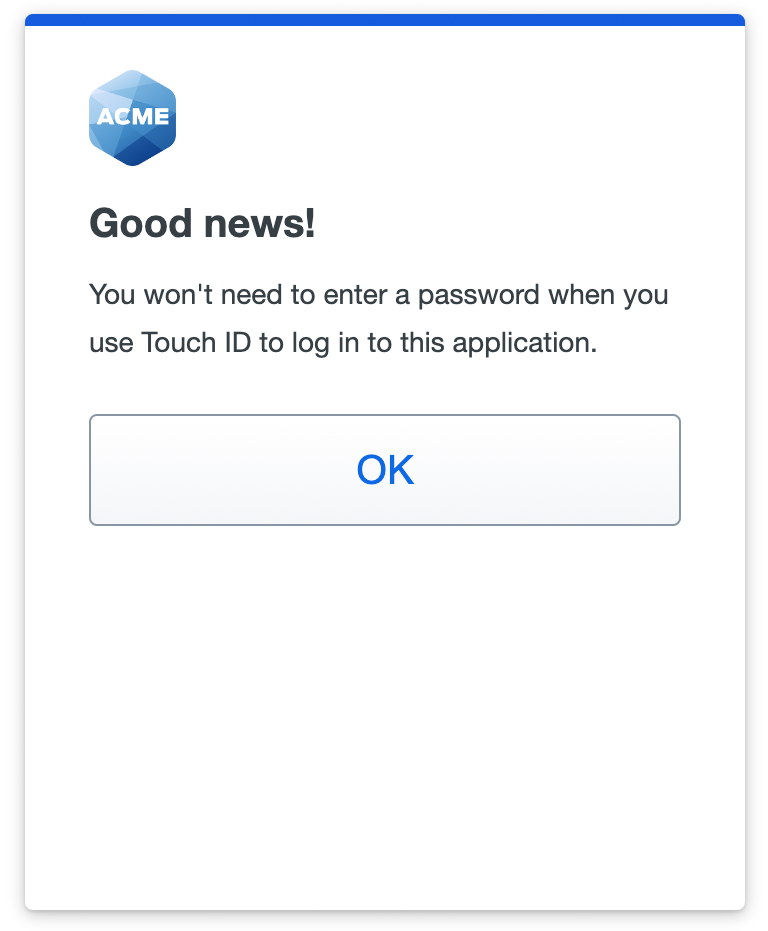
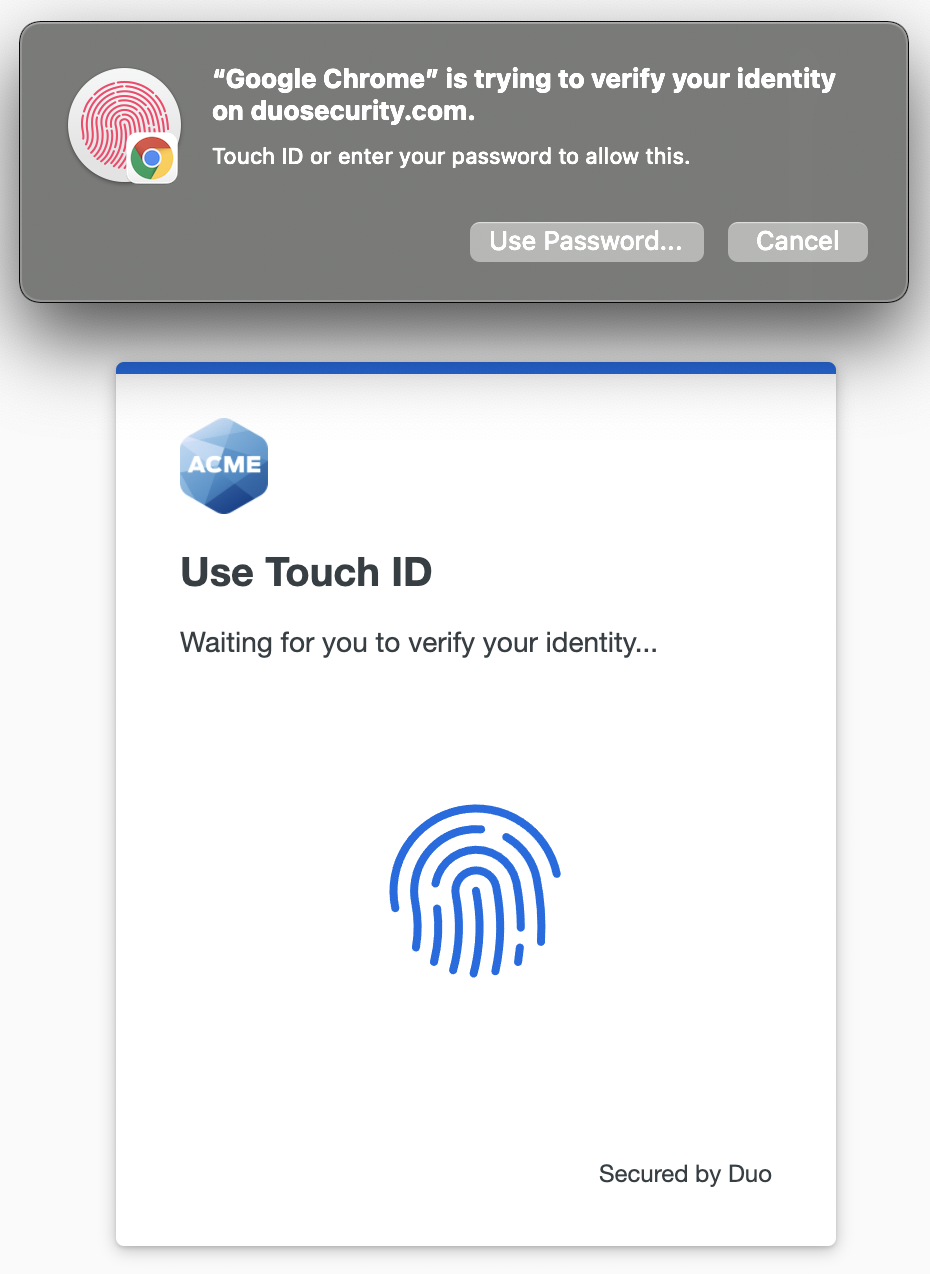
If you sign in to Duo SSO using a platform authenticator for two-factor authentication, such as Touch ID or Windows Hello, then you'll automatically be able to use that same authentication method for Duo Passwordless login in the future without any further setup.
Signing in to Duo SSO applications using other Duo 2FA options will prompt you to begin passwordless registration.
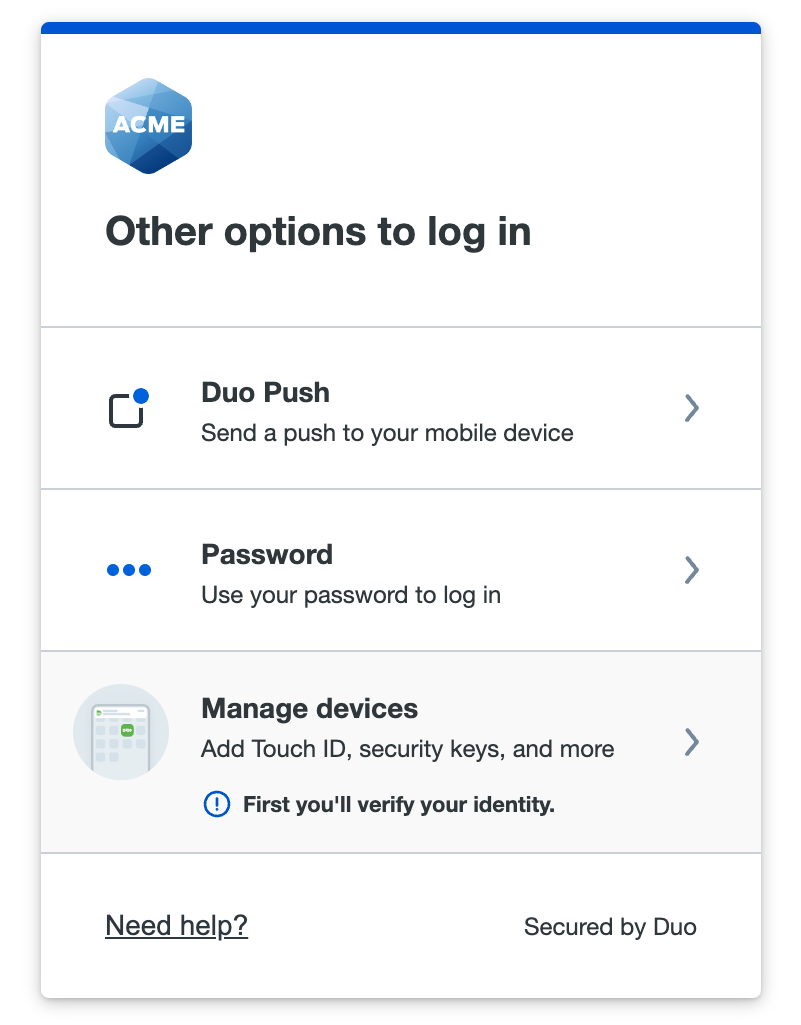
Platform or Roaming Authenticator
After performing Duo authentication with an authentication method that doesn't support passwordless authentication (like an SMS passcode), Duo prompts you to begin passwordless registration. Click or tap Continue to begin. To delay passwordless setup click or tap Skip for now; you won't be asked again to set up Duo Passwordless in that browser for seven days.
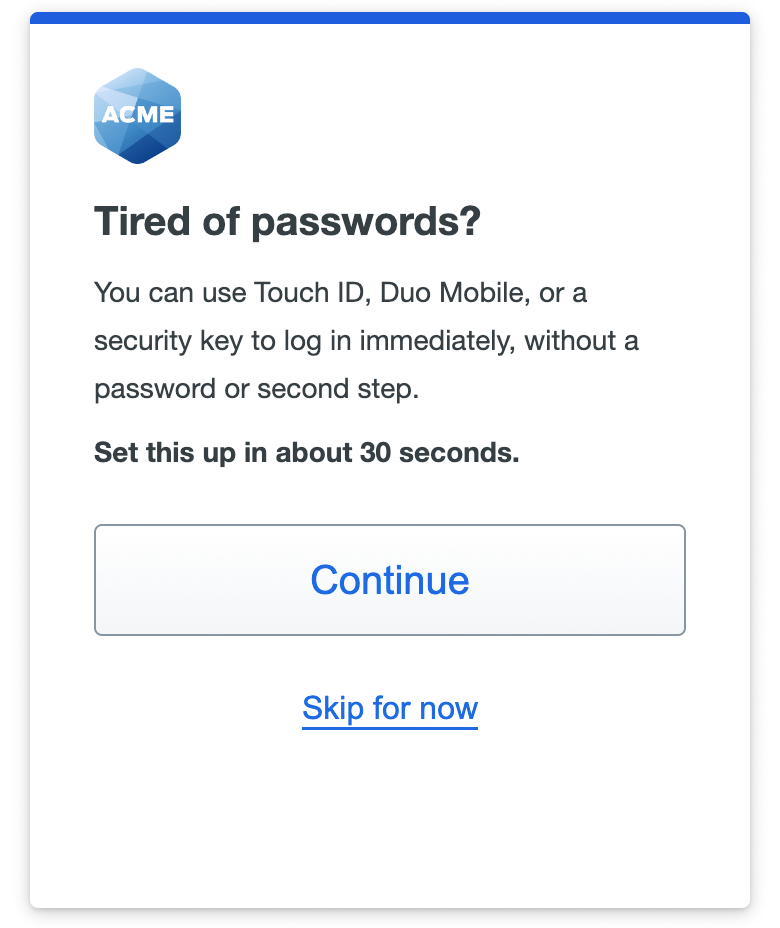
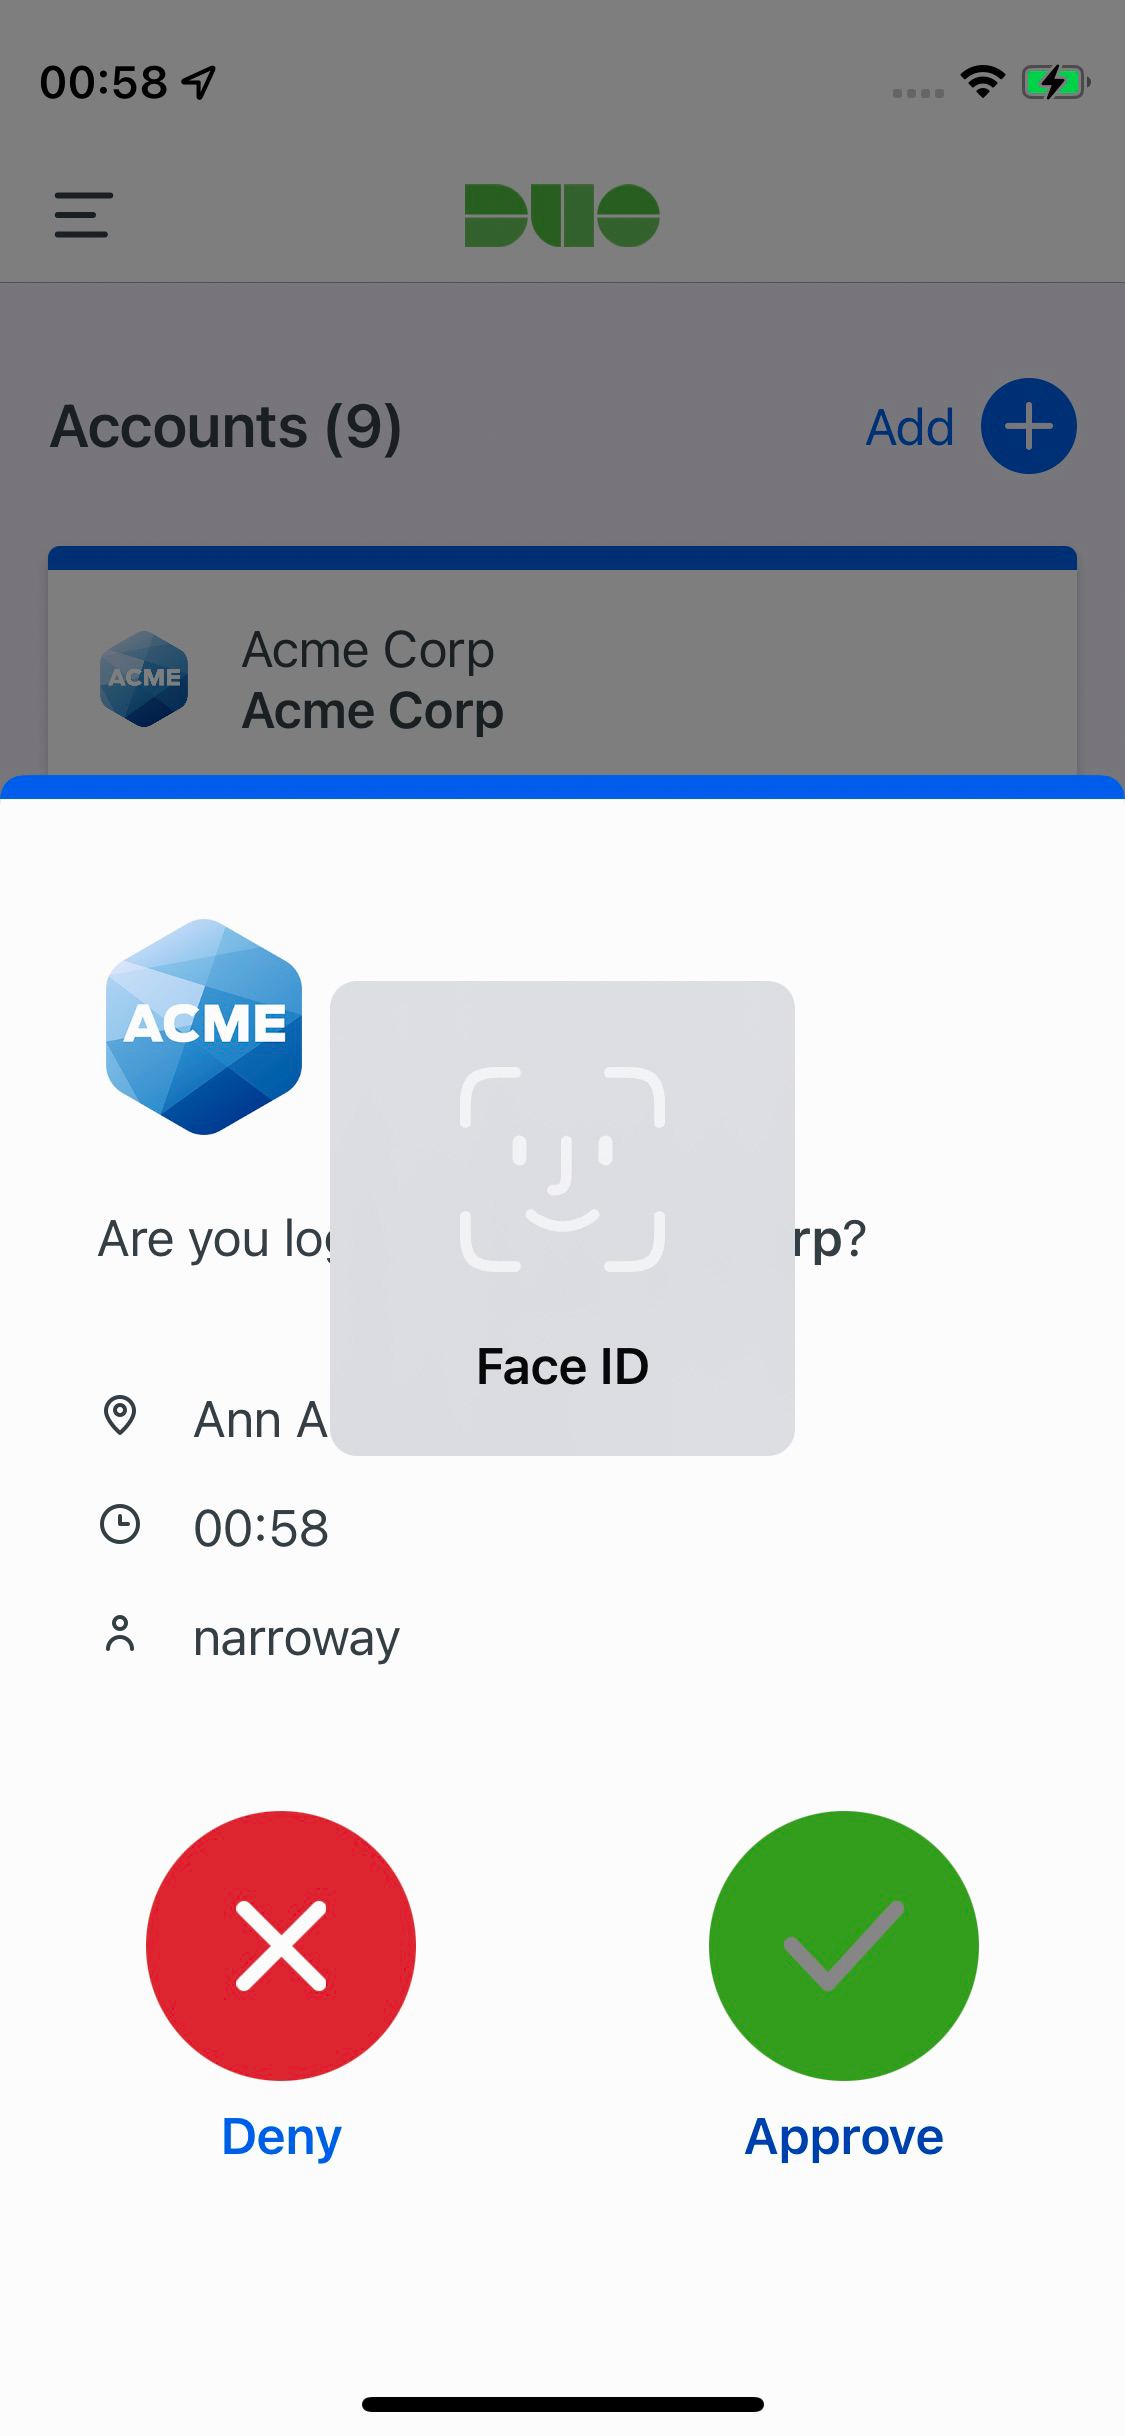
Choose which passwordless authenticator type to register. The options shown here correspond to the access device authenticators you enabled in your passwordless policy. In this example the policy allows platform, roaming, and Duo Push authenticators and the access device is a MacBook with Touch ID.
Follow the on-screen prompts to set up that device for Duo Passwordless. Depending on the type of authenticator you're registering, you will need to scan your fingerprint or face, enter a PIN, or tap a device. Continuing the Touch ID example, you'll tap the Touch ID reader when prompted.
When you receive confirmation that you've registered the passwordless authenticator successfully, you can continue on to the application.
The next time you log into the SSO application from that access device, you will enter your email and then interact with your registered authenticator instead of typing in your password.
Duo Push Authenticator
Duo Passwordless uses a "known device" browser cookie to enforce strong channel binding. Duo sets this browser cookie after a user completes a successful 2FA authentication on a specific device. We then check for that browser cookie in later authentication attempts for that user. This approach ensures that only previously authorized devices can use a passwordless push, preventing scenarios where an unauthorized user could log in with just an email address and a push.
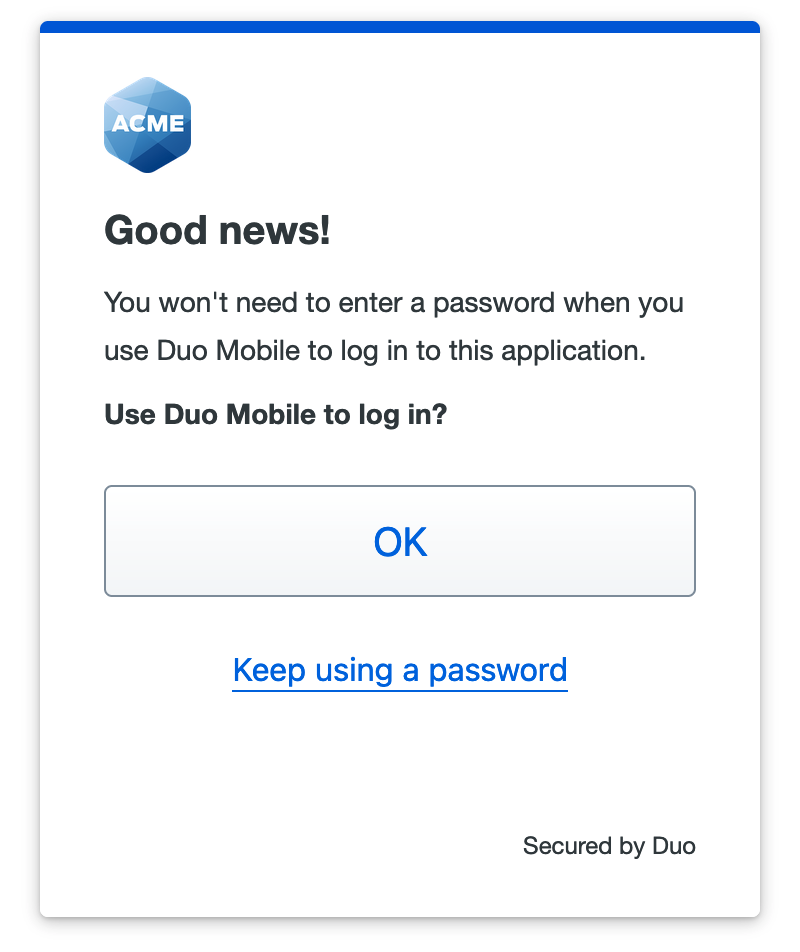
If you previously activated Duo Mobile for two-factor authentication and do not have an existing passwordless roaming or platform authenticator enrolled then your existing Duo Push device is automatically enabled as an authenticator for Duo Passwordless when you log into the SSO application with your username and password and use Duo Push to perform Duo two-factor authentication.
The next time you log into that application from the same access device and browser you'll see a notification that you can now use Duo Mobile to log in without a password.
When you opt to use Duo Push for passwordless login for the first time you will be shown a six-digit verification code in the Duo browser prompt. Enter this code into the Duo Mobile login request on your Android or iOS device.
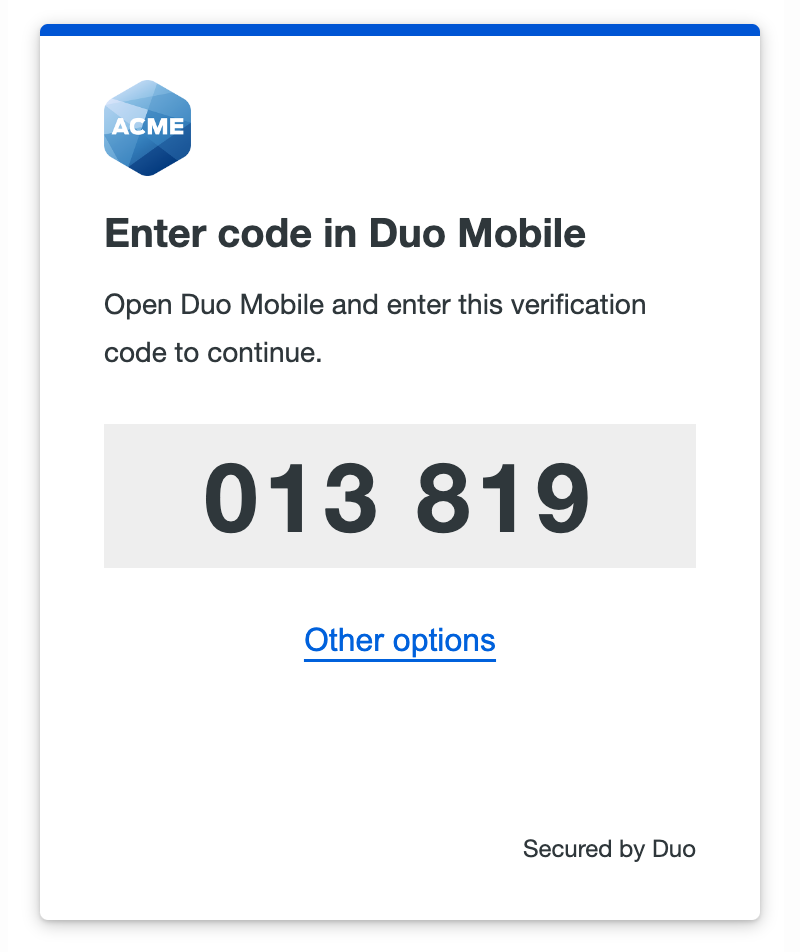
Next, you'll need to perform an additional verification step when approving the push request. After you enter the code from the browser prompt in Duo Mobile and tap Verify on the authentication request, perform Face ID verification or scan your enrolled finger at the Touch ID or Android fingerprint prompt to confirm the authentication approval. If you are unable to authenticate with a biometric factor you can fall back to your device's PIN or passcode.
When you successfully approve the Duo Push authentication with verification code and device biometric or PIN/passcode approval, you have the opportunity to remember your current browser. If you remember the browser now then next time you use Duo Push as the passwordless authenticator from that browser you will not need to enter the six-digit verification code; just complete device biometric or PIN/passcode verification while approving the Duo Push request. If you don't remember the browser, future passwordless Duo Push authentication requests will require both the six-digit verification code from the Duo Universal Prompt and device verification to approve the login request.

Note that if you have platform authenticators enabled in your policy and your access device has a WebAuthn platform authenticator available (like Touch ID), or if you have enabled WebAuthn roaming authenticators in your policy, then Duo prefers these more secure methods over Duo Push. You'll see the beginning of the WebAuthn device setup process for Duo Passwordless.
After you complete registration of your WebAuthn passwordless authenticator your existing Duo Push device is also enabled as a fallback authenticator for Duo Passwordless in that browser for that access device (but you won't see a message saying that you can now use Duo Mobile to log in to the application).
When you log in again to the application, Duo Passwordless selects your enrolled platform or roaming authenticator by default, but you can cancel the request in progress and click Show other options to select Duo Push for this passwordless application login.
If you clear the "known-device" cookie from your access device's browser, log in from an Incognito or private browsing session that does not share or store cookies, use a different browser on the same access device, or switch to a different access device, then Duo Push won't be offered for passwordless authentication. You'll need to provide your password and approve a two-factor authentication request to repeat the process of enabling Duo Push for Passwordless for the browser you're now using.
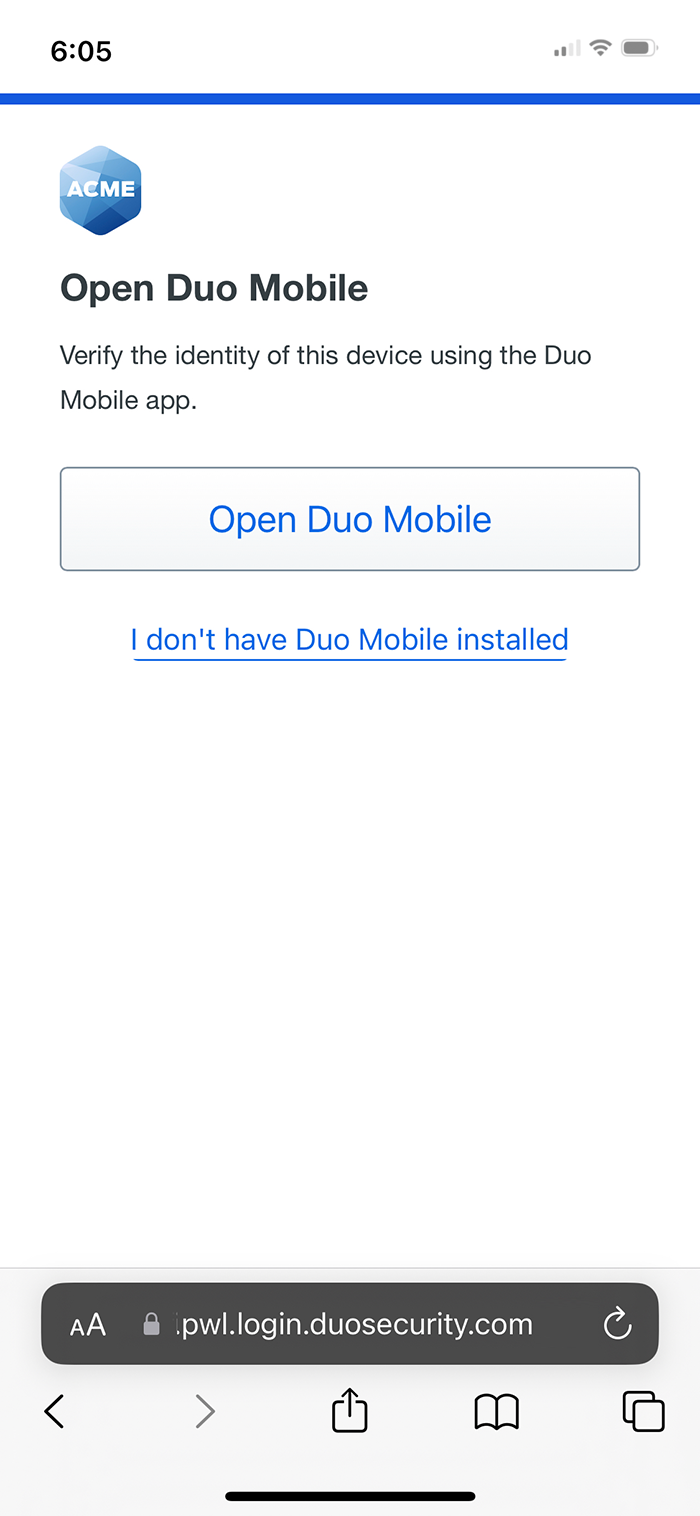
Device Verification with Duo Mobile
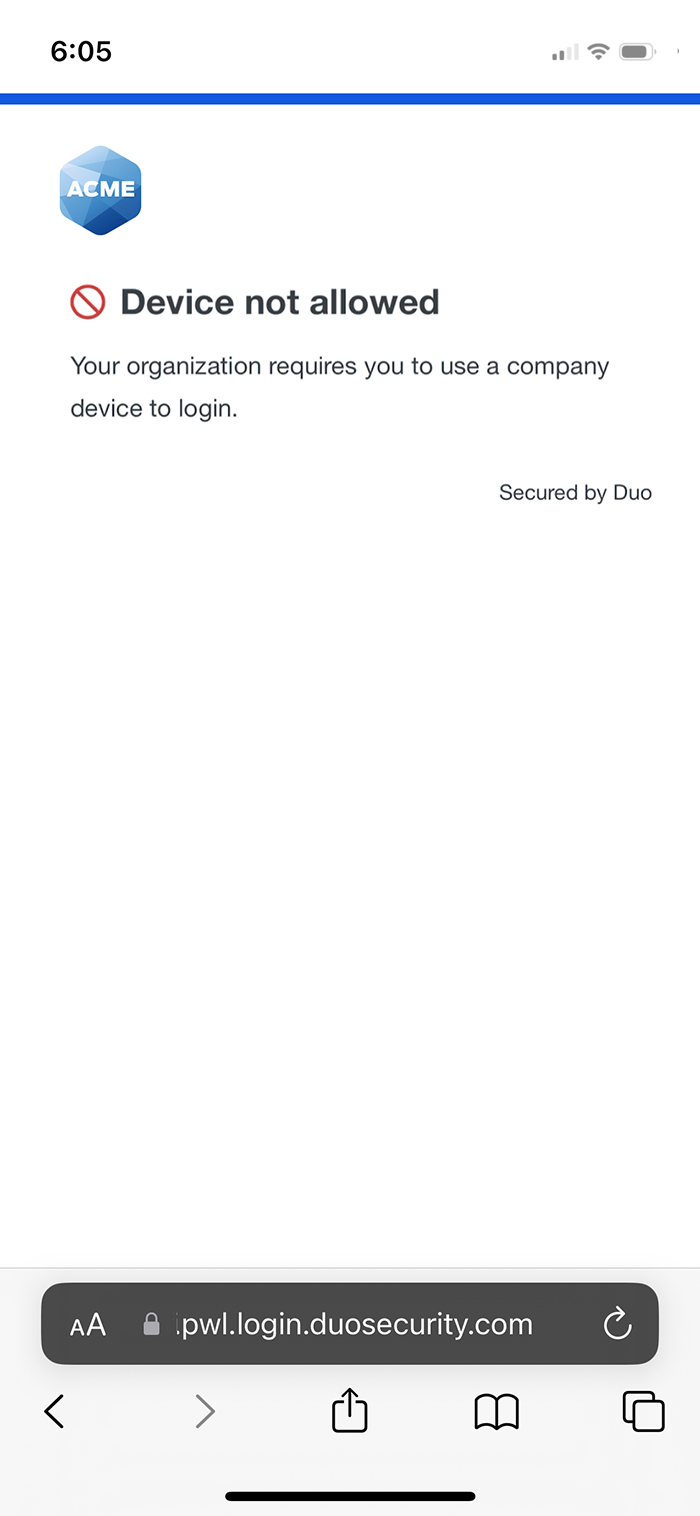
When the effective trusted devices policy requires a trust check, and you log in from a mobile device, Duo prompts you to verify your device identity with Duo Mobile. Tap Open Duo Mobile, which opens the Duo Mobile app on your phone for the device check. After device verification succeeds you can then use a platform or roaming authenticator or Duo Push to log in to the application.
If you do not have Duo Mobile on your mobile device you can tap I don't have Duo Mobile installed. This lets you complete Duo Passwordless authentication, but if your organization policy blocks access from unverified devices you cannot access the application.
If you do have Duo Mobile installed but not activated for Duo Push then you can tap My account isn't activated to skip directly to Duo Passwordless authentication, but may still be blocked by the trusted device check.
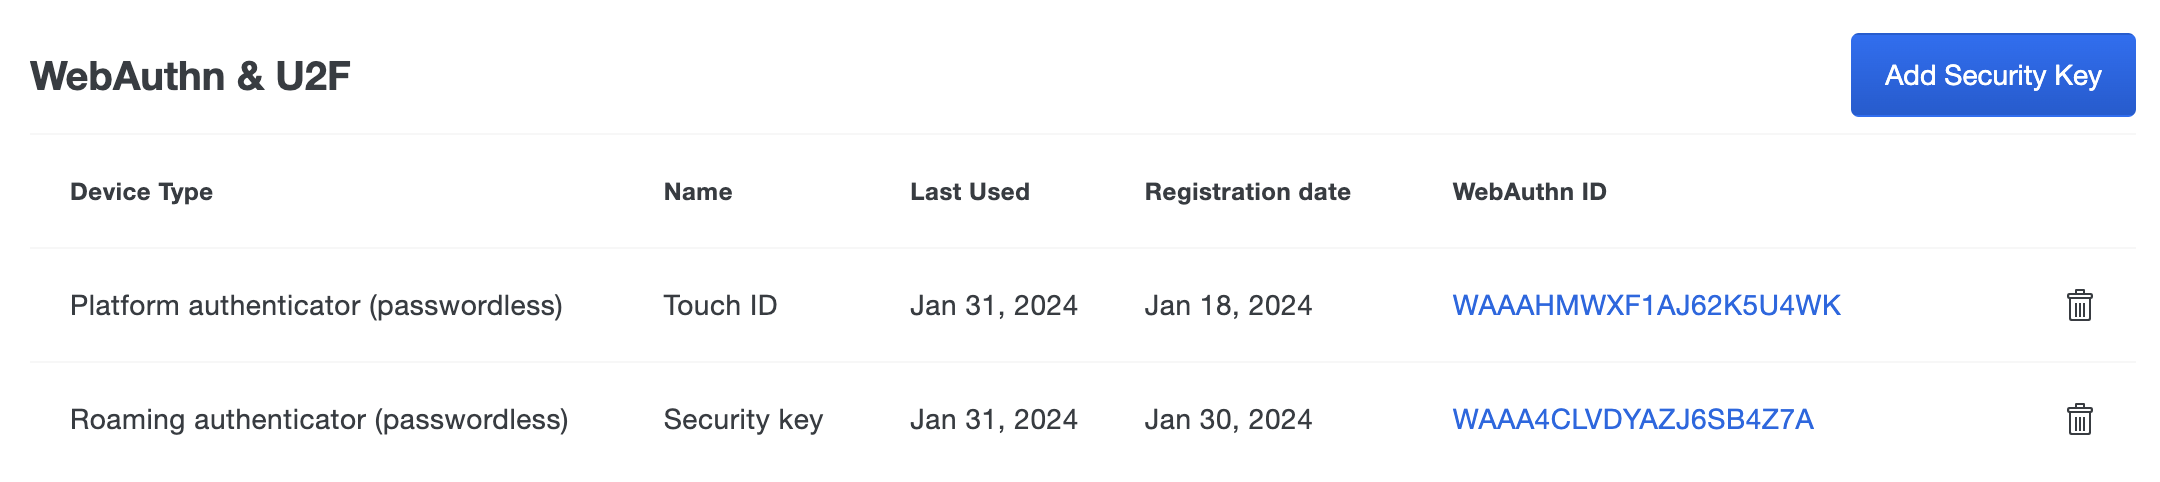
Managing Passwordless Authenticators
You can view and delete a user's registered platform and roaming passwordless authenticators from the Duo Admin Panel.
-
Log in to the Duo Admin Panel and search for the user from the search bar at the top of the page. You can also click Users in the left sidebar and then select a user by clicking their username.
-
Scroll down to the WebAuthn & U2F table on the user's details page. Any passwordless authenticators registered by the user contain "(passwordless)" in the device type information.
-
To delete a user's passwordless authenticator, click the trash icon to the right of the device's information in the table.
When you delete the authenticator, the user will need to use a different registered passwordless authenticator to log in to applications. If no more passwordless authenticators remain registered for the user they will log in with their password, or Duo Push as a passwordless authenticator enabled in the access device browser if they have a phone with Duo Mobile activated for 2FA.
Because Duo Push as a passwordless authenticator is enabled at the access device via browser cookie, Duo Push authenticators aren't shown as a passwordless authenticator when viewing the user's properties. Removing the user's Android or iOS device which has Duo Mobile activated from the 2FA "Phones" section effectively removes it as a possible Duo Push passwordless authenticator as well.
Tracking Passwordless Adoption
You can view passwordless enrollment status across your organization with a CSV export of your users:
-
Log in to the Duo Admin Panel and click Users in the left sidebar.
-
Click the Export button in the upper right side of the log display and select CSV to download a list of users. If you've filtered your current view (like by entering search text in box), the report only includes the filtered results.
-
Open the CSV file and look for the "Passwordless Enabled" value: "true" for users who have enrolled a platform or roaming passwordless authenticator or "false" for users who have not yet done so. Because Duo Push as a passwordless authenticator is enabled at the access device via browser cookie, Duo Push authenticators aren't included in this report.
If you export the users list in JSON format, the passwordless status is the last value in the array for each user.
Passwordless Reporting
View authentication reporting for passwordless logins in the Authentication Log. The "Authentication Method" information shown will include "passwordless" when a WebAuthn or Duo Push passwordless authentication method was used.
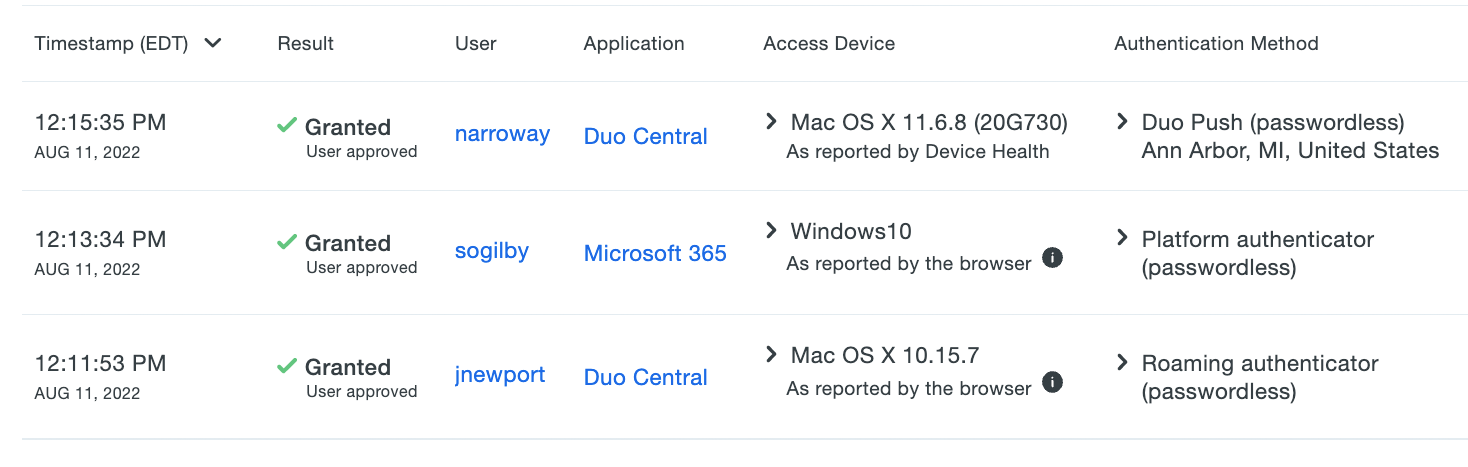
Passwordless access of SAML applications is also found in the Single Sign-On Log, as a new primary authentication session with no second factor listed and "Passwordless" plus the WebAuthn credential's key or the phone ID value if Duo push was used in the expanded information view for the "Authentication Method".

Troubleshooting
Need some help? Take a look at our passwordless Knowledge Base articles or Community discussions. For further assistance, contact Support.
All Duo customers have access to Level Up, our online learning platform offering courses on a variety of Duo administration topics. To access Level Up content, sign in with the same email address you use to sign in to the Duo Admin Panel.