
Contents
Duo offers a variety of methods for adding two-factor authentication and flexible security policies to Microsoft 365 SAML 2.0 logins with Duo Single-Sign On. Our cloud-hosted SSO identity provider offers inline user enrollment, self-service device management, and support for a variety of authentication methods — such as passkeys and security keys, Duo Push, or Verified Duo Push — in the Universal Prompt.
Overview
As business applications move from on-premises to cloud hosted solutions, users experience password fatigue due to disparate logons for different applications. Single sign-on (SSO) technologies seek to unify identities across systems and reduce the number of different credentials a user has to remember or input to gain access to resources.
While SSO is convenient for users, it presents new security challenges. If a user's primary password is compromised, attackers may be able to gain access to multiple resources. In addition, as sensitive information makes its way to cloud-hosted services it is even more important to secure access by implementing two-factor authentication and zero-trust policies.
Video Overview
About Duo Single Sign-On
Duo Single Sign-On (SSO) is our cloud-hosted SSO product which layers Duo's strong authentication and flexible policy engine on top of Microsoft 365 logins. Duo SSO acts as an identity provider (IdP), authenticating your users using existing on-premises Active Directory (AD) and prompting for two-factor authentication before permitting access to Microsoft 365.
Once you federate a custom domain your Microsoft Online tenant with Duo Single Sign-On, all Microsoft 365 applications will redirect those federated users to Duo when they sign in, while cloud-only (non-federated) users continue to log in using the Microsoft Online sign-in form.
Duo Single Sign-On satisfies Entra ID MFA requirements as of February 24, 2022. Microsoft 365 domains federated to Duo SSO after February 24th automatically have MFA support for their federated domain enabled. Microsoft domains federated with Duo SSO on or before February 24, 2022 must update the federation configuration following the steps in Duo Knowledge Base article 7538.
Duo Single Sign-On is available in Duo Premier, Duo Advantage, and Duo Essentials plans, which also include the ability to define policies that enforce unique controls for each individual SSO application. For example, you can require that Salesforce users complete two-factor authentication at every login, but only once every seven days when accessing Microsoft 365. Duo checks the user, device, and network against an application's policy before allowing access to the application.
If you're interested in a Duo solution for Microsoft 365 that doesn't require installing any on-premises Duo components and allows Duo to be applied per Microsoft 365 application (i.e. required for SharePoint but not Yammer), see our instructions for Duo for Entra ID Conditional Access.
Configure Single Sign-On
Before configuring Microsoft 365 you'll first need to enable Duo Single Sign-On for your Duo account and configure a working Active Directory authentication source.
Prepare your Microsoft Tenant for Federation
Add Custom Domains to Microsoft 365
In order to federate your Microsoft 365 tenant with an external identity provider (like Duo Single Sign-On) you must have added a custom domain to Microsoft 365. You cannot federate your "onmicrosoft.com" domain. Additionally, the custom domain you have added to Microsoft 365 cannot be set as the default domain.
Enable Directory Synchronization in Microsoft 365
Microsoft 365 requires that users are already provisioned inside Microsoft 365 when an authentication attempt happens. You will need to sync users from your Active Directory to your Microsoft 365 account.
If you previously configured directory synchronization between your on-premises AD domain and Microsoft 365, skip these steps and proceed to Create the Microsoft 365 Application in Duo.
However, if you have already configured AD to Entra ID synchronization and did not select the mS-DS-ConsistencyGuid attribute as the Source Anchor note that you cannot modify the selected Source Anchor attribute and must uninstall and reinstall Azure AD Connect in order to change it.
-
Log in to the Office Admin portal as the tenant administrator and open the Sync users from your Windows Server Active Directory setup action. Click Get Started to begin setup and step through the guided prompts.
-
On a computer joined to your AD domain open PowerShell and run
Install-Module MSOnlineas described here under Step 1, substep 2. to install the Microsoft Azure Active Directory Module for Windows PowerShell. -
When prompted to download and run Azure AD Connect on the same computer as the step above, do not use the "Express Settings" and instead select Customize to perform a Custom installation of Azure Active Directory Connect.
-
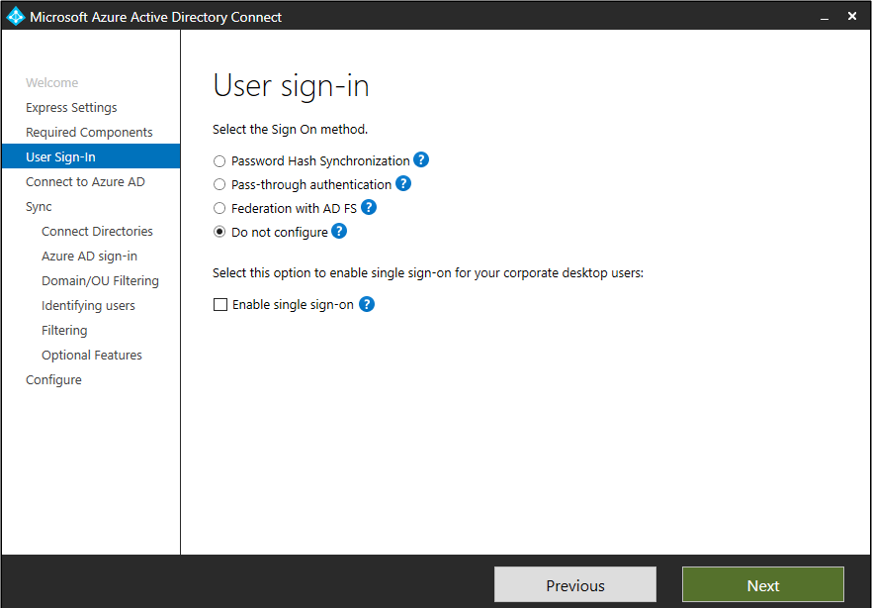
When on the "User sign-in" page of the Microsoft Azure Active Directory Connect tool select Do not configure as the "Sign On method". When on the "Identifying Users" page select mS-DS-ConsistencyGuid from the "Source Anchor" drop-down.
Note: If you've configured your Active Directory authentication source to communicate with your domain controllers over Global Catalog ports you will need to update the Global Catalog to replicate the attribute you chose as your Source Anchor.
Enable replication of the Source Anchor attribute to Global Catalog like this:
-
Open up "Active Directory Schema" MMC snap-in as a domain administrator. Navigate to the "Attributes' section.
-
Locate and double-click on the attribute name used for the Source Anchor, in the pop-up check the box "Replicate this attribute to the Global Catalog".
-
Click Apply and OK.
-
-
Verify successful Active Directory Synchronization and activate Office 365 licensing for unlicensed synchronized users.
Create the Microsoft 365 Application in Duo
-
Log on to the Duo Admin Panel and navigate to Applications.
-
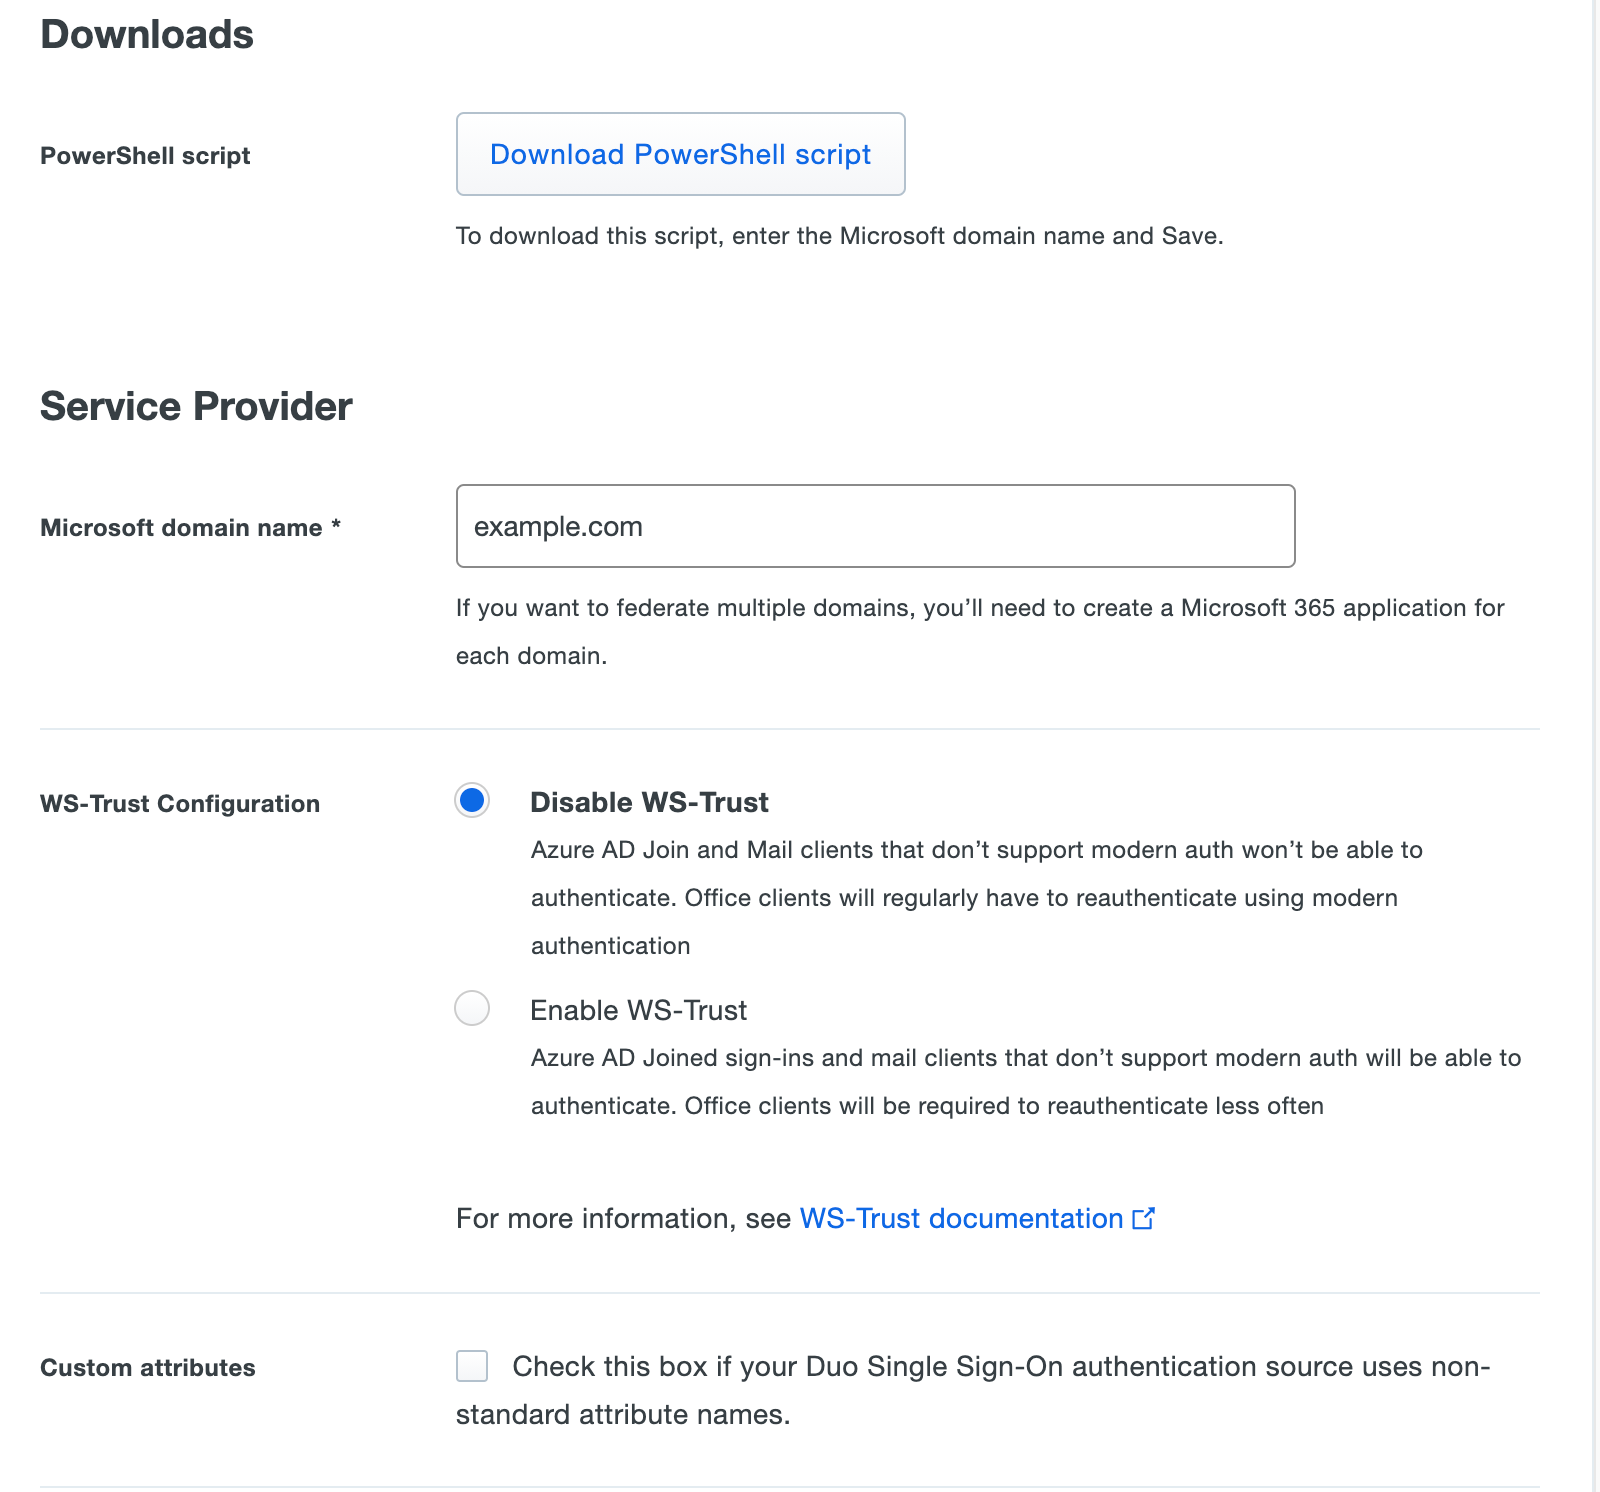
Click Protect an Application and locate the entry for Microsoft 365 with a protection type of "2FA with SSO hosted by Duo (Single Sign-On)" in the applications list. Click Protect to the far-right to start configuring Microsoft 365. See Protecting Applications for more information about protecting applications in Duo and additional application options. You'll need the information on the Microsoft 365 page under Downloads later.
-
The Microsoft domain name is the custom domain you have verified in Microsoft 365 and the domain at the end of your users' email addresses. You will need to create a separate Microsoft 365 application in the Duo Admin Panel for each custom domain. Each custom domain will need to be added to the SSO Permitted Domains.
-
You can optionally select Enable WS-Trust next to "WS-Trust Configuration" if you have users that log in with Entra ID joined machines or mail clients that do not support modern authentication. Office clients will also be required to reauthenticate less often when WS-Trust is enabled. When this option is configured users logging in with WS-Trust will bypass Duo 2FA. If this option is not chosen, any mail client that does not support modern auth will not be able to log in and some other clients may be required to reauthenticate more frequently.
The user's status in Duo and the effective enrollment policy of the Microsoft 365 application will be checked against Duo before authentication completes. If the effective New User policy for the Microsoft 365 Duo application is one that enforces enrollment (like "Require enrollment" or "Deny Access"), then any user logging in with WS-Trust authentication must exist in Duo even though 2FA approval isn't required during Microsoft 365 WS-Trust authentication. If your Duo Single Sign-On Active Directory authentication source has the "Duo username attribute" populated, the value of this attribute is what Duo will check.
Ensure that users logging in with WS-Trust authentication through Duo are not also required to complete Entra ID MFA. If a policy applied to the WS-Trust authentication users enforces Entra ID MFA, WS-Trust authentication fails, preventing access.
You can restrict access to WS-Trust authentications by using the settings below:
-
Host-based Access Control allows you to limit which IP addresses can use WS-Trust authentication. You can configure to either "Allow all IPs", "Allow only these IPs", or "Deny only these IPs". You can specify a block of IP addresses, IP ranges, or CIDRs as a comma-separated list.
-
Agent-based Access Control allows you to limit which services can authenticate with WS-Trust. You can "Allow all user agents" or "Permit only certain user agents". When permitting only certain user agents you'll be asked to choose which user agents to permit, you can select "Allow legacy mail clients" and "Allow Azure AD Join computer logins"
-
Group-Based Access Control allows you to restrict WS-Trust authentication by Duo groups. Check the box next to Restrict WS-Trust to specific Duo Groups. A new text field appears where you can select Duo groups. Only Duo users that are members of these groups can perform WS-Trust authentications.
An incoming WS-Trust connection must satisfy all three of these configured settings; otherwise Duo SSO blocks the authentication attempt.
-
-
Microsoft 365 uses the Mail attribute and Source Anchor attribute when authenticating.
We've mapped Mail attribute and Source Anchor attribute to Active Directory source attributes as follows:
Duo Attribute Active Directory Mail attribute userPrincipalName Source Anchor attribute mS-DS-ConsistencyGuid If you are using non-standard Mail or Source Anchor for your Entra ID sync, check the Custom attributes box and enter the name of the AD attributes you wish to use instead.
-
You can adjust additional settings for your new Microsoft 365 application at this time — like changing the application's name from the default value, enabling self-service, or assigning a group policy.
-
Scroll to the bottom of the page and click the Save button.
-
Under the "Downloads" section next to "PowerShell script" click Download PowerShell script. You'll need this file later.
Duo Universal Prompt
The Duo Universal Prompt provides a simplified and accessible Duo login experience for web-based applications, offering a redesigned visual interface with security and usability enhancements.
| Universal Prompt | Traditional Prompt |
 |
 |
We've already updated the Duo Microsoft 365 application hosted in Duo's service to support the Universal Prompt, so there's no action required on your part to update the application itself. You can activate the Universal Prompt experience for users of new and existing Duo Microsoft 365 applications from the Duo Admin Panel.
Before you activate the Universal Prompt for your application, it's a good idea to read the Universal Prompt Update Guide for more information about the update process and the new login experience for users.
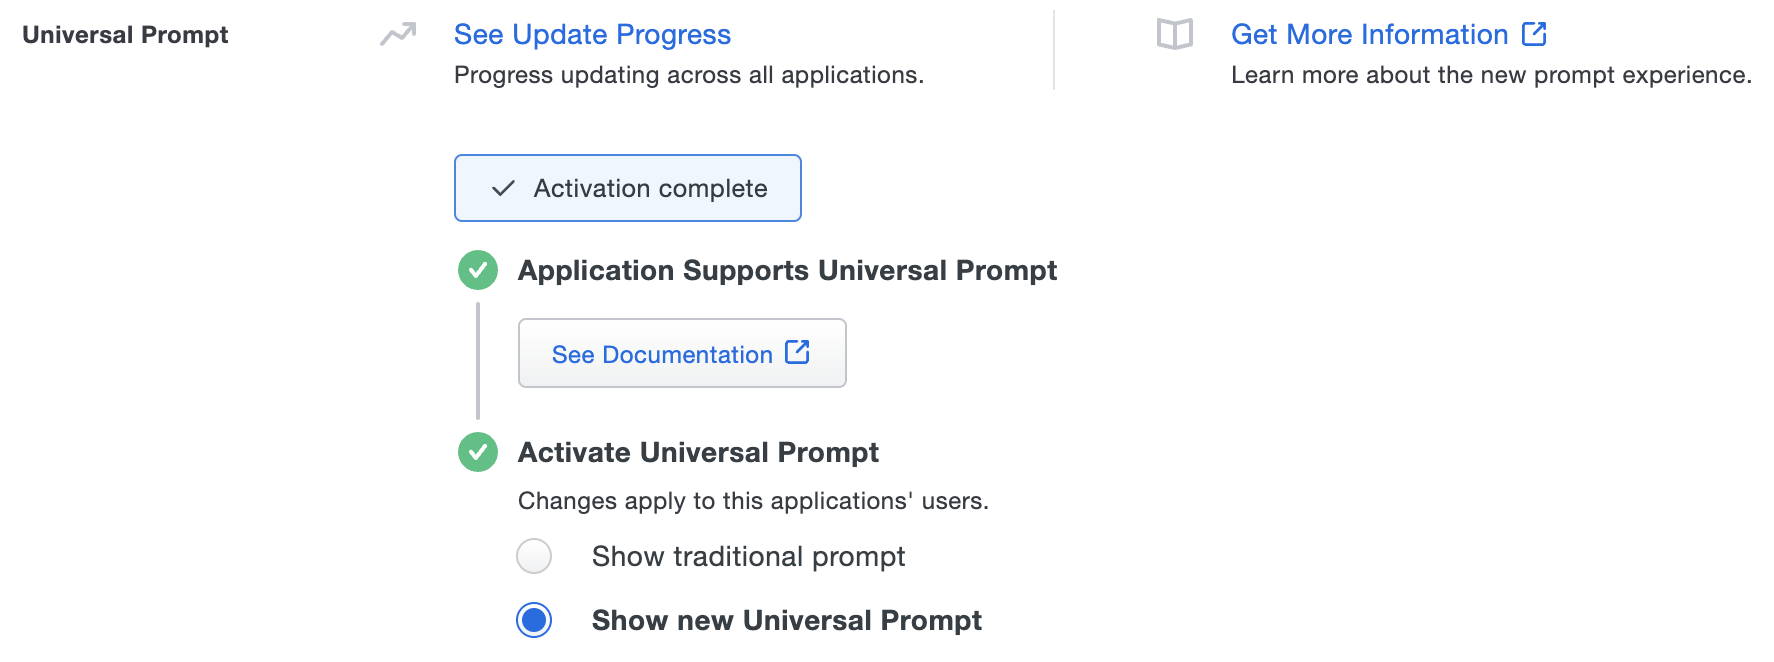
Activate Universal Prompt
Activation of the Universal Prompt is a per-application change. Activating it for one application does not change the login experience for your other Duo applications.
The "Universal Prompt" area of the application details page shows that this application is "Ready to activate", with these activation control options:
- Show traditional prompt: (Default) Your users experience Duo's traditional prompt via redirect when logging in to this application.
- Show new Universal Prompt: Your users experience the Universal Prompt via redirect when logging in to this application.
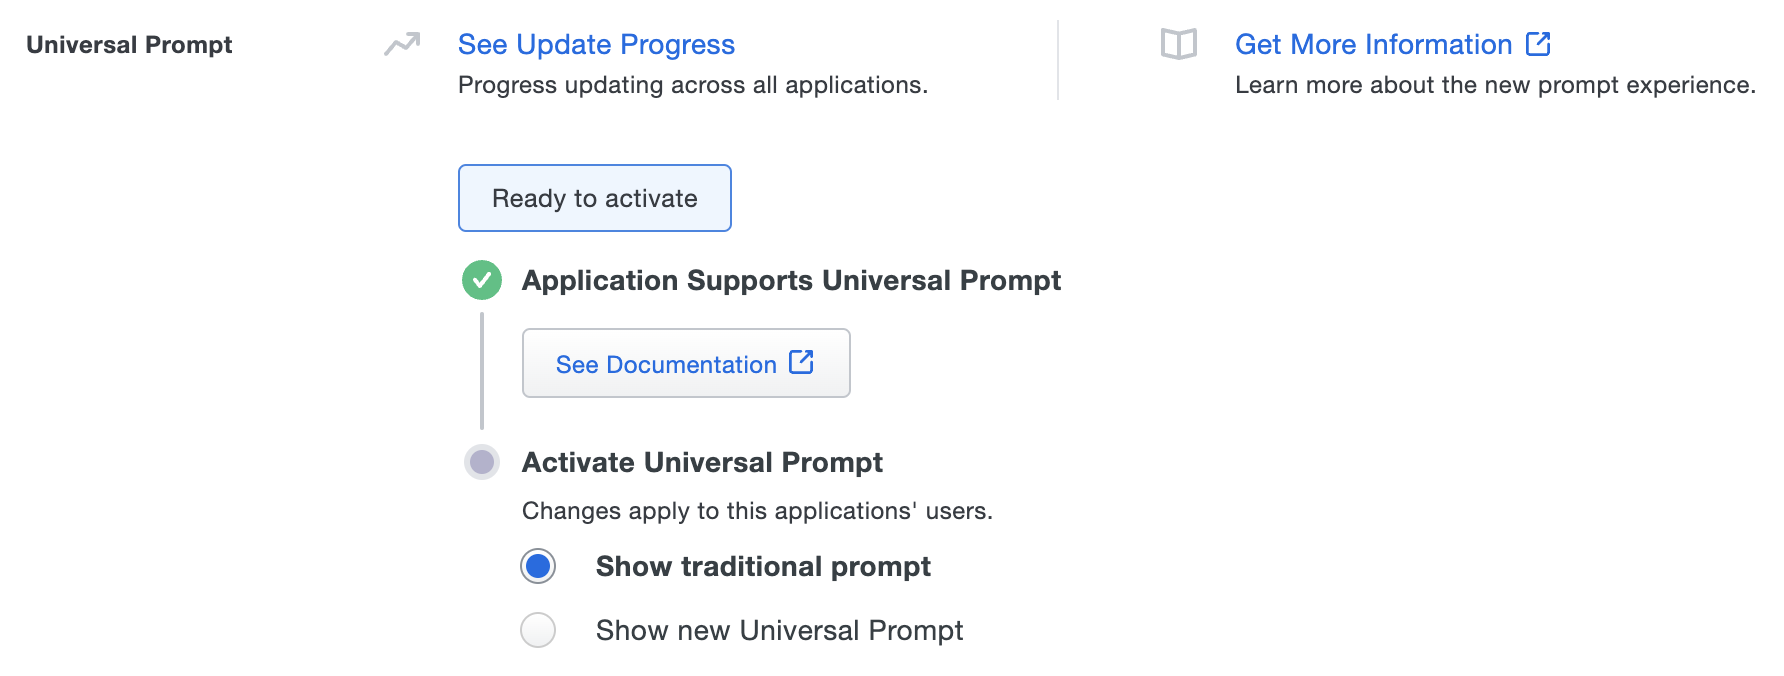
Enable the Universal Prompt experience by selecting Show new Universal Prompt, and then scrolling to the bottom of the page to click Save.
Once you activate the Universal Prompt, the application's Universal Prompt status shows "Activation complete" here and on the Universal Prompt Update Progress report.
Should you ever want to roll back to the traditional prompt, you can return to this setting and change it back to Show traditional prompt. However, this will still deliver the Duo prompt via redirect, not in an iframe.
Universal Update Progress
Click the See Update Progress link to view the Universal Prompt Update Progress report. This report shows the update availability and migration progress for all your Duo applications. You can also activate the new prompt experience for multiple supported applications from the report page instead of visiting the individual details pages for each application.
Update Your Search Attributes in Duo
-
While logged into the Duo Admin Panel navigate to Single Sign-On.
-
On the "Single Sign-On" page click on the name of your Active Directory authentication source.
-
On your Active Directory authentication source page scroll down to Email attributes. Click Add attribute, a new text field will appear.
-
If you left the Mail attribute in the last section configured to be
userPrincipalNameenter userPrincipalName into the field, otherwise enter the value you configured. -
Scroll to the bottom of the page and click Save.
Enable AD Federation to Microsoft 365 Using Duo SSO
The transition of your Microsoft 365 tenant from "managed" to "federated" is typically quick but Microsoft states that it can take two hours or more. Please plan accordingly when enabling federation (or restoring your existing federation configuration back to managed to switch from a previous solution to Duo SSO), as the transition may temporarily impact your users' login access.
See the Duo Knowledge Base article How do I defederate Office 365 from Duo SSO, Duo for AD FS, or Duo Access Gateway? if you need to defederate Office 365 from Duo SSO.
-
Log on to the domain-joined computer where you installed the Microsoft Azure Active Directory Module for Windows PowerShell, and the Azure AD Connect tool.
-
Copy the PowerShell file you downloaded earlier onto this computer.
-
Launch Windows PowerShell as an administrator.
-
Navigate to the directory the PowerShell file is located in and paste the command below into the PowerShell terminal swapping out "Microsoft 365 - Single Sign-On.ps1" with the name of your PowerShell file. The PowerShell script is unsigned when downloaded from Duo, so specifying
-ep ByPassgrants a one-time exception to your PowerShell execution policy in order to run the script.powershell -ep ByPass "&'.\Microsoft 365 - Single Sign-On.ps1'" -
The PowerShell script will start to run. It will inform you of the steps it will take and ask for your confirmation along the way. Follow the prompts to federate your domain to Duo Single Sign-On. You'll be required to provide a tenant administrator username and password during the flow to complete the federation. If you are running this script on a Windows Server operating system and Internet Explorer Enhanced Security Mode is enabled you may need to add websites used during the authentication process to your trusted sites.
IMPORTANT: Once you federate a given Microsoft 365 domain with an external identity provider, like Duo SSO, you may no longer create new users in that domain from the Entra ID or Microsoft/Office 365 consoles. You will need to create the users in your source Active Directory and have Azure AD Connect sync them from the on-premises directory into the cloud. See additional explanation on this topic in the Microsoft troubleshooting article You can't assign a federated domain to a user in the Microsoft 365 Admin Center.
See the Single Sign-On Roadmap at the Microsoft TechNet site for more information about configuring SSO for Microsoft 365 for federation.
Verify SSO
Navigate to https://login.microsoftonline.com and enter your Microsoft 365 email address that matches your federated custom domain (with no password). This redirects you to Duo Single Sign-On to begin authentication.
Active Directory Login
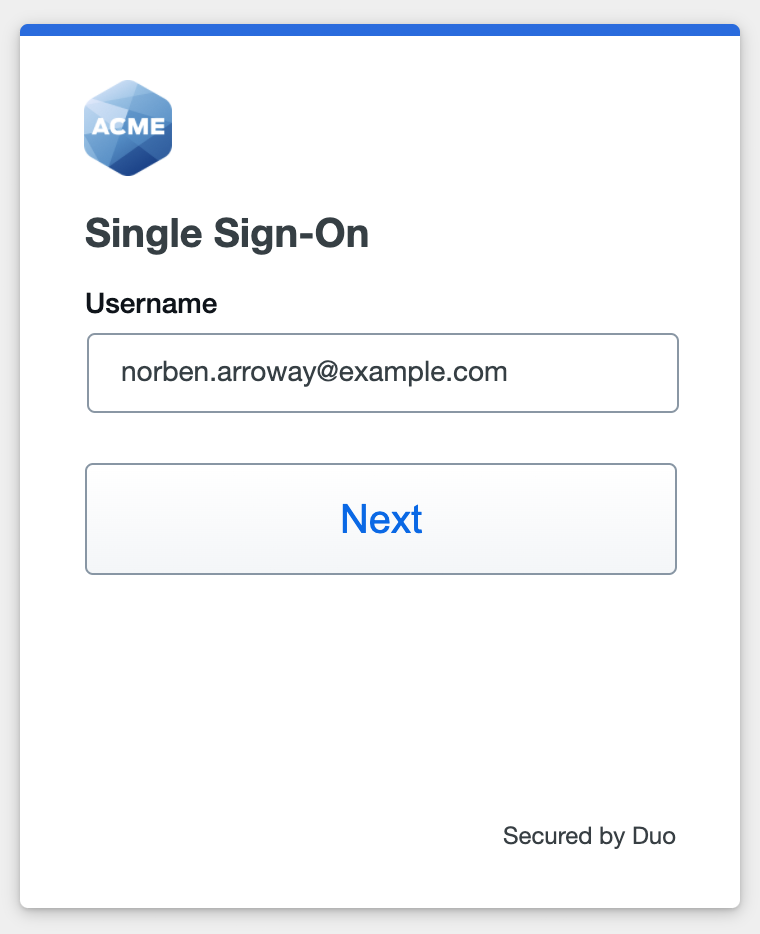
With Active Directory as the Duo SSO authentication source, enter the primary username (email address) on the Duo SSO login page and click or tap Next.
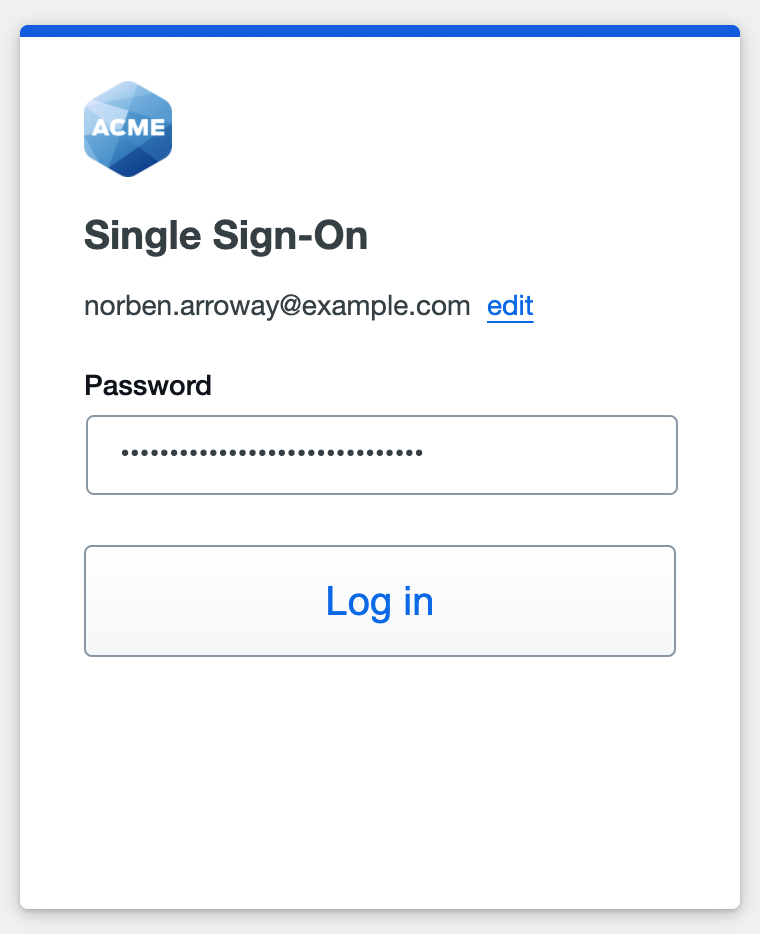
Enter the AD primary password and click or tap Log in to continue.
Duo Authentication
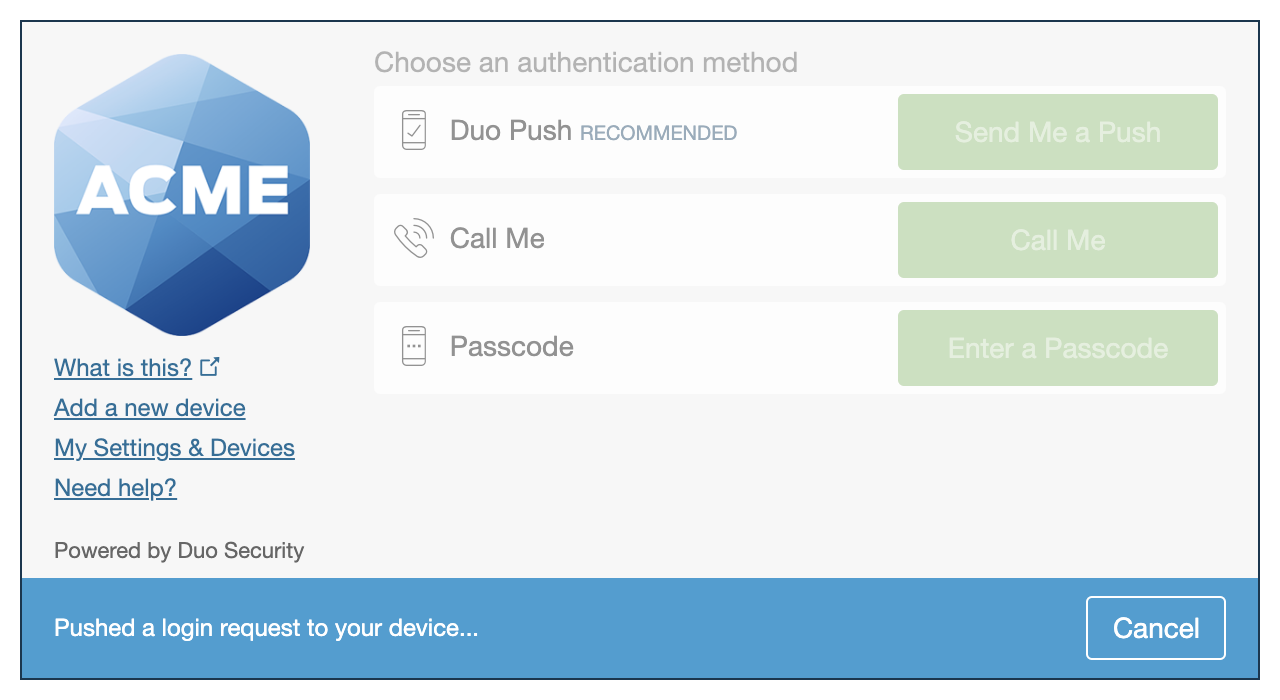
Successful verification of your primary credentials by Active Directory redirects back to Duo. Complete Duo two-factor authentication when prompted and then you'll return to Microsoft 365 to complete the login process.
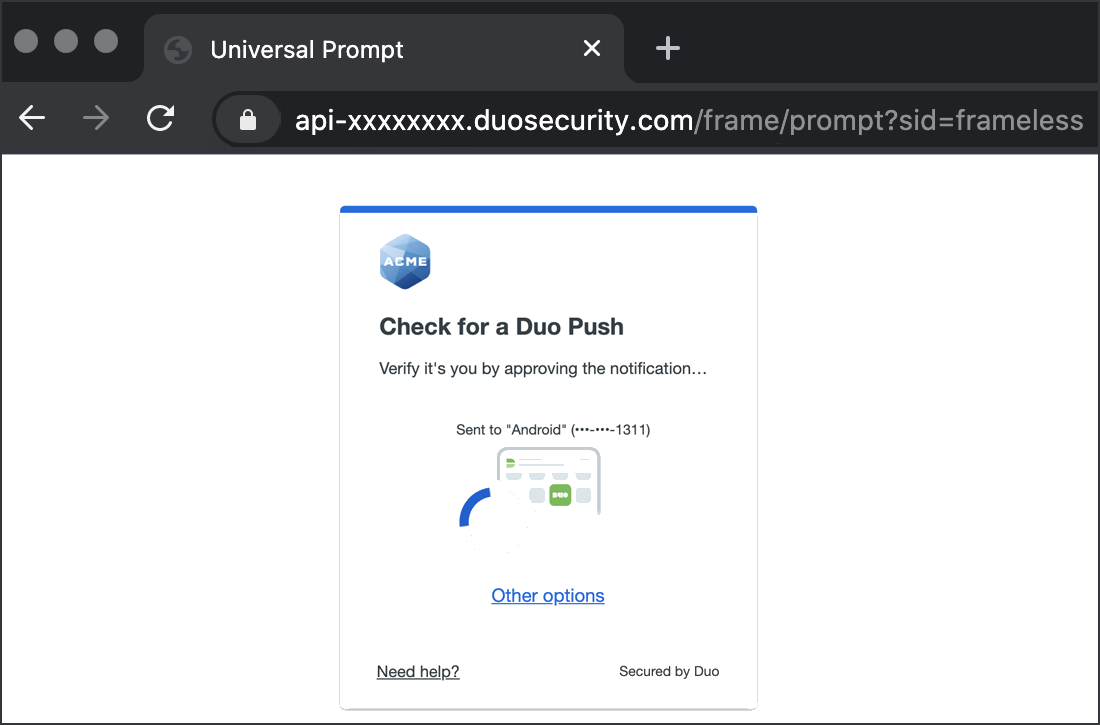
*Universal Prompt experience shown.
You can also log into Microsoft 365 using Duo Central, our cloud-hosted portal which allows users to access all of their applications in one spot. Link to Microsoft 365 in Duo Central by adding it as an application tile. Once the tile has been added, log into Duo Central and click the tile for IdP-initiated authentication to Microsoft 365.
Congratulations! Your Microsoft 365 users now authenticate using Duo Single Sign-On.
See the full user login experience, including expired password reset (available for Active Directory authentication sources) in the Duo End User Guide for SSO.
Enable Remembered Devices
To minimize additional Duo two-factor prompts when switching between Microsoft 365 and your other Duo Single Sign-On applications, be sure to apply a shared "Remembered Devices" policy to your applications.
Federating Additional Domains
Please note that M365 custom domains not federated with Duo SSO will perform an Entra ID cloud-only login, will not redirect to Duo SSO, and will not complete Duo two-factor authentication. To add Duo protection to additional M365 custom domains, you can federate each domain inside of your Microsoft 365 tenant, except for your default domain and your "onmicrosoft.com" domain.
Repeat the following steps for each additional domain:
- Create the Microsoft 365 Application in Duo
- Enable AD Federation to Microsoft 365 using Duo SSO
- Verify SSO
If you have more than one Microsoft 365 application added in Duo you'll see a message at the top of Microsoft 365 application pages in the Duo Admin Panel informing you to assign permitted groups to your applications.
This is recommended if you're using Duo Central because by default every user can see every application in Duo Central unless permitted groups are applied.

Office Client Access
When you log in to Microsoft 365 for the first time after federation using an Office application, you'll see the Duo Single Sign-On primary login page within the Office application, followed by the Duo authentication prompt.
Office 2013 and later desktop applications (including Outlook and Skype for Business) can connect to Microsoft 365 after federation with Duo SSO only if modern Authentication is enabled for your Microsoft 365 tenant. More information about modern authentication, including a list of Office applications that support modern authentication, is available at the Office Blog.
- Modern authentication may already be enabled on your Microsoft 365 tenant, as Microsoft has enabled it by default on new tenants since 2017. Follow these instructions to verify or enable modern authentication on your Exchange Online tenant and these instructions to do the same for your Skype for Business Online tenant.
- Apply registry updates for Office 2013 (Office 2016 and later applications and Skype for Business natively support modern authentication).
Important: If users had a preexisting Microsoft 365 Outlook profile before federating with Duo they might not be able to log in with modern authentication after federation and may then need to delete the existing Microsoft 365 client credentials in order to log in with modern authentication. If you encounter this, learn how to delete Microsoft 365 client credentials and more about M365 mail client behavior with Duo.
Mail Clients and Entra ID Join
Mail clients that do not support modern authentication such as Thunderbird or Android Mail will not be able to log in unless the WS-Trust setting is enabled in the Create the Microsoft 365 Application in Duo section. This is because those clients are unable to display a browser to allow users to log in and must instead log in using only an email address and password via IMAP, POP3, and SMTP logins. If the option is enabled users will continue to log into their mail clients using only their email address and password.
Entra ID Joined devices use WS-Trust to refresh the Primary Refresh Token (PRT) that lets it communicate and authenticate with Entra ID. If WS-Trust is not enabled these devices may need to log in with modern authentication frequently to refresh the PRT.
Service Accounts
If you use service accounts to send e-mails from devices that don't support modern authentication, such as copiers, printers, or scanners, you can use the WS-Trust setting in the Create the Microsoft 365 Application in Duo section to allow those accounts to continue to send e-mail. You will need to create Duo user accounts for the service accounts.
Troubleshooting
Need some help? Take a look at our Microsoft 365 Knowledge Base articles or Community discussions. For further assistance, contact Support.