Duo Administration - Enroll Users
Last updated:
Overview
Users — and their passkeys, phones, tablets, or hardware tokens — must be enrolled into Duo before they can start authenticating. Your users' Duo enrollment experience may include all or some of these tasks, depending on the choices you make for your organization:
- Setting a password in Duo.
- Registering one or more devices for multifactor or passwordless authentication.
- Installing and activating Duo Mobile on their phone or tablet
- Installing Duo Desktop on their computer.
Duo enrollment takes just a few minutes, and each user only needs to do it once to start logging in with Duo.
Duo administrator accounts are only used to log on to the Admin Panel. They can't be used to access devices or applications using Duo two-factor authentication. Be sure to also enroll your Duo admins as users if they need to log on to Duo protected services.
Users (identified by their usernames) are shared between applications, so a user only needs to complete enrollment and activation in Duo once to gain access to multiple applications. User access can be restricted to specific applications through permitted groups for individual applications.
A "fully-enrolled" Duo user is an end user who accesses Duo-protected services or applications, who exists in Duo as a user with an associated authentication method. A partially-enrolled user is one who exists in Duo with a username but has no authentication methods registered. These users still need to complete device enrollment and activation to fully use Duo.
These enrollment options can save you the time and effort of manually adding your Duo users by adding groups of users at a time and then sending them enrollment emails or activation links that the user follows to complete their enrollment. Users are created in Duo immediately.
- Active Directory sync: For customers who already rely on an Active Directory (AD) domain. Learn how to use AD sync.
- OpenLDAP sync: For customers who use an OpenLDAP directory for authentication. Learn how to use OpenLDAP sync.
- Entra ID sync: For customers using a Microsoft Entra ID domain as their user identity store. Learn how to use Entra ID sync.
- Google sync: For customers using Google Workspace or cloud directory as their user identity store. Learn how to use Google sync.
- Okta import via SCIM: For customers using Okta as their user identity store. Learn how to import users from Okta.
- Import users from CSV: Admin can create detailed entries for each user with a simple CSV file. See more information about importing users.
- Bulk Enroll: Administrators create new users in Duo without any 2FA devices and sends an enrollment link to the users via email in a single operation.
Other enrollment options include:
- Manual enrollment: Admins manually add individual users and send enrollment emails, enrollment codes, or Duo Mobile activation links.
- Inline self-enrollment: Features an interactive setup process for registering a 2FA device that is seamlessly integrated with the user's next login to a protected application. Inline self-enrollment is available for applications featuring browser-based logins as well as Duo Unix.
Duo Premier and Duo Advantage Plan Users: Global Policy settings affect access to the enrollment portal used by bulk self-enrollment. Do not apply any global restrictions that could prevent user enrollment. For example, if you configure the User Location policy setting to deny access to a country, then the policy will also block any of your users who attempt to enroll in Duo from that country via a bulk enrollment link.
Supported Identity Stores
Your user enrollment strategy should consider where your user identities are stored, and which types of applications you will protect with Duo.
Duo Directory as your Primary Identity Provider
Use Duo as your directory store if you do not have an existing identity provider (IdP) or are looking to migrate from your existing IdP to a more secure, easier to use solution: Duo Directory. Duo-hosted directory users can authenticate with a password stored in Duo, or as passwordless users for extra identity security.
Duo Directory supports authentication for Duo Single Sign-On (SSO) authentication flows used by SAML or OIDC applications federated with Duo SSO as their identity source.
Duo Directory does not support the following primary application authentication scenarios:
- RADIUS or LDAP device or application authentications. You will need to have a supported alternative source of primary user authentication, such as Active Directory.
- Duo applications which add two-factor authentication to operating system logins, like Duo Authentication for Windows Logon, Duo Authentication for macOS, or Duo Unix.
- 2FA-only application authentication. These are applications that verify user credentials themselves against an internal user database, or which you have configured to check login credentials against an existing identity store. You might install a Duo plugin on a local server, or you might be using a cloud application that has Duo 2FA built in to it.
For these applications Duo solely provides two-factor authentication, and does no other credential verification. Examples of applications like this are Duo for Wordpress, Duo for NetScaler Web using OAUTH, Duo Two-Factor Authentication for Microsoft Entra ID External Authentication Methods (EAM), and Duo Two-Factor Authentication for 1Password.
While Duo-hosted directory users can complete two-factor authentication when logging into those types of applications, those applications can't verify a primary password or credential against Duo directly, so you must have an alternative identity store against which those applications can perform primary authentication.
Breached Password Checking
When users enter a Duo password — whether during login or while setting a new one — we check the password against a regularly-updated database of breached passwords. Users may not set a new password found in the breached password database. If we find a user's current password value among the compromised password lists, then the user must set a new, safe password before continuing to the application.

Duo Single Sign-On with an External Authentication Source
If you have an existing Active Directory domain or SAML identity provider, you can configure Duo Single Sign-On (SSO) to perform primary credential verification against your existing identity store as an external authentication source, further secured by Duo two-factor authentication. When you use Active Directory as the external authentication source you have the option of passwordless authentication as well.
Similar to Duo directory as your primary IdP, Duo Single Sign-On (SSO) with an external authentication source supports authentication flows used by SAML or OIDC applications federated with Duo SSO as their identity source.
Duo SSO with an external authentication source also can't provide primary credential verification for the same applications as Duo Directory, requiring that you have an alternative identity store these apps can use:
- RADIUS or LDAP device or application authentications. You will need to have a supported alternative source of primary user authentication, such as Active Directory.
- Duo applications which add two-factor authentication to operating system logins, like Duo Authentication for Windows Logon, Duo Authentication for macOS, or Duo Unix.
- 2FA-only application authentication. These are applications that verify user credentials themselves against an internal user database, or which you have configured to check login credentials against an existing identity store. You might install a Duo plugin on a local server, or you might be using a cloud application that has Duo 2FA built in to it.
For these applications Duo solely provides two-factor authentication, and does no other credential verification. Examples of applications like this are Duo for Wordpress, Duo for NetScaler Web using OAUTH, Duo Two-Factor Authentication for Microsoft Entra ID External Authentication Methods (EAM), and Duo Two-Factor Authentication for 1Password.
Duo as a Two-Factor Authentication Provider
When Duo acts as a 2FA-only authentication service for an application, the application is responsible for primary authentication against whichever identity stores it supports. Examples of these apps include:
- RADIUS or LDAP device or application authentications. You will need to have a supported alternative source of primary user authentication, such as Active Directory.
- Duo applications which add two-factor authentication to operating system logins, like Duo Authentication for Windows Logon, Duo Authentication for macOS, or Duo Unix.
- 2FA-only application authentication. These are applications that verify user credentials themselves against an internal user database, or which you have configured to check login credentials against an existing identity store. You might install a Duo plugin on a local server, or you might be using a cloud application that has Duo 2FA built in to it.
For these applications Duo solely provides two-factor authentication, and does no other credential verification. Examples of applications like this are Duo for Wordpress, Duo for NetScaler Web using OAUTH, Duo Two-Factor Authentication for Microsoft Entra ID External Authentication Methods (EAM), and Duo Two-Factor Authentication for 1Password.
Enrollment Policy
In the past, the same set of policies controlled both Duo’s enrollment and self-service experiences and Duo access and authentication. This has presented confusion and challenges for customers who may want to define these experiences separately.
You can now define distinct user enrollment and account management policies which determine the experience and options available to Duo users during enrollment, such as selecting whether users must set a Duo password, or which authentication methods they can register.
Please see Duo Administration - User Enrollment & Account Management for more information and instructions for creating and assigning enrollment policies.
Enrollment Experience for Users
If you create your new users in Duo before they access any Duo-protected applications, they may receive an enrollment link via an email sent from Duo, or you might copy the enrollment link or a unique enrollment code and communicate them to users via a different method. This applies to:
Inline self-enrollment will create new users in Duo when MFA authentication method enrollment occurs during Duo-protected application access after primary credentials have been verified by an existing external identity store or by the authenticating application itself. If a user accessing a Duo-protected application exists in Duo without any authentication devices, they also may complete inline self-enrollment of MFA authentication methods.
Self-Enrollment for a Duo-hosted user
A Duo-hosted user accesses the enrollment portal using a link emailed by Duo. The enrollment policy requires the user to set a password before starting authentication method enrollment. This user chose to enroll a security key roaming authenticator.

Inline Self-Enrollment
A user accesses a Duo-protected application and enters the self-enrollment process after primary authentication. This user chose to enroll a security key roaming authenticator.

Directory Sync
Role required: Owner, Administrator, or User Manager.
Since many large organizations already rely on on-premises Active Directory (AD) or OpenLDAP directories, or a cloud-hosted identity provide like Entra ID, Okta, or Google to manage their users, Duo offers tools to import users and groups from those identity stores into Duo, with the options of importing phones from those external directories as authentication devices, or automatically sending an enrollment email containing a link to your enrollment portal to every user imported without an attached phone who has a valid email address.
See the instructions for Active Directory, OpenLDAP, Entra ID, Google, or Okta.
Import Users
Role required: Owner, Administrator, or User Manager.
Duo provides an Import Users feature that can import user information from a properly formatted CSV (comma-separated values) file. The import users feature differs from bulk enrollment in that it allows the admin to supply additional user details (e.g., entries can be created already populated with a phone number and device platform, group memberships, multiple devices, etc.). Also, users imported via CSV be managed from the Duo Admin Panel right away.
Although the import users function is primarily intended to add users, you can also use it to update information for existing users and to delete Duo users whose accounts are no longer needed.
Unlike bulk enrollment, the import users tool does not automatically send enrollment emails to users. Follow the Activating Duo Mobile After Enrollment instructions below to send activation links to your imported users.
Inline Self-Enrollment
Role required: Owner, Administrator, or Application Manager.
With inline self-enrollment, users enter a self-registration portal the first time they access a Duo-protected application, where they can set up their authentication methods. The user does not need to exist in Duo; completing enrollment creates their new Duo user account. Once they add a valid authentication method, they'll immediately complete Duo authentication to continue to the application.
Inline self-enrollment is available for web-based applications that show the Duo Prompt in a browser: Duo Single Sign-On applications, AD FS, Outlook Web Access, WordPress, etc., as well as Duo Unix applications (Duo Unix users are given an enrollment link by the application that they can copy and paste into a web browser).
You can enable inline self-enrollment for an application by applying a policy with New User Policy set to "Require enrollment".
See the Universal Prompt Enrollment Guide for a complete walkthrough of the self-enrollment experience for users.
Bulk Enroll
Role required: Owner, Administrator, or User Manager.
If your application type doesn't support inline self-enrollment (as is the case with OpenVPN, RDP and RDGateway, certain VPN clients, and some others), then you can use bulk enrollment to send enrollment links to your users via email. If your organization uses email filtering, be sure to allow the sender no-reply@duosecurity.com.
-
Log into the Duo Admin Panel and navigate to Users → Bulk Enroll Users in the left sidebar. Otherwise, click the Bulk Enroll Users link near the top of the Users page.
-
Type or paste in a CSV (comma-separated value) set of usernames and email addresses. The "Bulk Enroll Users" tool won't send a new enrollment email to an existing enrolled user.

-
You now have a chance to review and customize the self-enrollment email message sent to your users. Check the box to save this custom email and subject line for future use. You can choose whether your users to see the traditional prompt or Universal Prompt by changing your "Enrollment Email" settings. When satisfied with the email message and subject line, click the Send Enrollment Links button at the bottom of the page.

The sent message will have a non-editable header added, informing the user it's an automated message sent by Duo and to contact their organization's Duo admins or IT support group with any questions.
-
Users receive custom links via email which will allow them to complete self-enrollment. The enrollment link expires after thirty days.

Users appear listed in the "Users" section of the Duo Admin Panel as soon as you send the enrollment link.
The Pending Enrollments table shows which users created by bulk enrollment or directory sync have not yet completed enrolling their 2FA devices in Duo, along with the user's email address and the expiration date for the current enrollment link.
If you need to send the user another copy of the enrollment link email, click the Resend button, or click Resend All to send the email again to all users with outstanding enrollment links. Resending the email does not change the current enrollment link's expiration date. The email message gets sent to the current email address for the user, not the address that was used when the original enrollment was sent if it's been changed since then.
Click Delete to remove a pending enrollment. Deleting a pending enrollment immediately invalidates any unexpired enrollment link previously sent to that user. The user associated with the pending enrollment remains in Duo, so you can send them a new enrollment link via email.

Manual Enrollment
Role required: Owner, Administrator, or User Manager.
Admins can add individual users and phones from the Duo Admin Panel. To add a new user manually:
-
Log into the Duo Admin Panel.
-
From the Home page you can click the Add New... button in the top right and then click User. Otherwise, navigate to Users → Users in the left sidebar and click the Add User button.
-
Type information about the new user. You must enter a Username value for the new user. A Duo username should match the user's primary authentication username. Duo usernames are not case-sensitive and are normalized to lowercase.
Other user information — Display Name, Email Address, First Name, and Last Name — is optional. You must provide an email address for the user if you want to email them enrollment links or Duo Mobile activation links.

To ease the integration of your systems and Duo, different application types allow for varying degrees of username normalization. Username normalization preferences are set on the properties page for each application.
-
If you entered an email address for the user you can click the Send email button in the "Device enrollment" section of the user's details page, under "Send an enrollment email", to send your new user a message from Duo that contains a link they can use to set a password (if your enrollment policy requires it) and register their authentication devices. If your organization uses e-mail filtering, be sure to allow the sender no-reply@duosecurity.com.
If you don't want to email the enrollment link to your new user, you can click Generate code under "Generate an enrollment code". Copy that code and the enrollment portal link and communicate them to the new user directly. They will need to enter the same email address value that exists for them in Duo and the unique enrollment code to begin enrollment.

If you choose not to perform any enrollment actions when creating the new user, you can return to the new user's details page later to send enrollment emails or generate enrollment codes.
Add Devices to the New User
Optionally, you can add a phone, security key, or hardware token to the user now. If you attach an authentication device to the new user, then the "Device enrollment" section of the page disappears, indicating the user no longer needs to complete first-time device enrollment.
See the Duo device administration documentation to learn how to attach a phone to a user and activate it for use with Duo Mobile, add a security key to a user, assign a hardware token to a user, and more.
Send Enrollment Emails to Existing Users
Role required: Owner, Administrator, User Manager, Security Analyst, or Help Desk (when permitted in the "Help Desk" global setting).
When a user already exists in Duo with an email address present in the user's details, but has yet to set their Duo password or register any authentication devices, you can send an enrollment email to the user from the Admin Panel. If an enrollment email was already sent to the user by any method (manually by a Duo admin, automatically as part of directory sync, etc.) but the user did not receive it or deleted it without enrolling, you can resend the email.
If your organization uses e-mail filtering, be sure to allow the sender no-reply@duosecurity.com.
-
Log into the Duo Admin Panel.
-
Search for the user using the search bar at the top of the page, or navigate to Users → Users in the left sidebar and locate the user to which you want to send or resend an enrollment email. Click through to the user's details page.
-
In the "Device enrollment" section, scroll to "Send an enrollment email"
-
Click Send email. If the user has no valid email address present in the "Email" field, you'll receive an error. Update the email information for the user (clicking Save when done) and try sending the enrollment email again.

If you need to send the enrollment email to the user again, return to their details page and click Resend email.
Generate Enrollment Codes for Existing Users
Role required: Owner, Administrator, User Manager, Security Analyst, or Help Desk (when permitted in the "Help Desk" global setting).
When a user already exists in Duo with an email address present in the user's details, but has yet to set their Duo password or register any authentication devices, you can send an enrollment code to the user that they can use to enroll in Duo.
-
Log into the Duo Admin Panel.
-
Search for the user using the search bar at the top of the page, or navigate to Users → Users in the left sidebar and locate the user to which you want to send an enrollment code. Click the user name to access the user's details page.
-
In the "Device enrollment" section, scroll to "Generate an enrollment code".
-
Click Generate code. If the user has no valid email address present in the "Email" field, you'll receive an error. Update the email information for the user (clicking Save when done) and try generating the enrollment code again.

-
Copy the enrollment link and new enrollment code from the Admin Panel and provide them to the user in a secure manner so they can complete enrollment. They will need to enter the same email address value that exists for them in Duo and the unique enrollment code to begin enrollment.
After you generate the enrollment code, you can invalidate it by clicking on the Invalidate button.

If you invalidate the enrollment code, you can generate another code by clicking on the Regenerate code button.
The enrollment code expires by default 24 hours after generation. You can change the enrollment code expiration value from the Settings page.
Send a Temporary Duo Password to a User
If you use Duo as your identity store, you may require that your users set a Duo password. If your enrollment policy has the Require users to create a password for use with Duo option enabled, then your users will set a Duo password when they enroll from an emailed enrollment link or from the enrollment portal link provided by you with an enrollment code (i.e. https://example.login.duosecurity.com/enroll).
If you have a user who has already enrolled authentication devices for use with Duo-protected MFA applications, and you want that already-enrolled MFA user to set a Duo password, you can send them a temporary password they can use create their first Duo password.
-
Log into the Duo Admin Panel.
-
Search for the user using the search bar at the top of the page, or navigate to Users → Users in the left sidebar and locate the user to which you want to send an enrollment code. Click the user name to access the user's details page.
-
The "Password" section will show the user has no password set. Click Create temporary password to generate one.

-
The "Temporary password" screen shows you the user's new temporary password. This password is valid for thirty days. Be sure to copy the temporary password now to provide to the user, as you won't be able to view it again once you click Close and permanently hide the password.

-
Communicate the temporary password to the user via a secure method.
The user will be prompted to set their Duo password while logging in to Duo Single Sign-On — at your organization's Duo Central link or while logging into a Duo SSO application — and entering the temporary password. While they have a temporary password, Duo ignores any effective status or policy calculation that would allow them to bypass Duo authentication. After verifying their identity with one of their registered 2FA authentication methods they may set a new login password.
Learn how to manage Duo-hosted user passwords and help users with password resets in the Duo user management documentation.
Activating Duo Mobile After Enrollment
Role required: Owner, Administrator, User Manager, Security Analyst, or Help Desk.
Send Duo Mobile activation texts or emails to users created via automatic and manual enrollment methods with an attached phone from the Duo Admin Panel. If your organization uses e-mail filtering, be sure to allow the sender no-reply@duosecurity.com.
-
Log into the Duo Admin Panel and navigate to Users → Users in the left sidebar.
-
You'll see a notification bar at the top of the page indicating that some users who have an attached smartphone or tablet device have not yet activated Duo Mobile.

Note: A user's device must be assigned the type "Mobile" with a known device platform (i.e., any platform other than "Unknown") before that user can be sent an activation link. Users without a known platform associated with their device cannot be sent activation links. If you know that a user has a smartphone, but don't know which kind it is, choose Generic Smartphone as the device platform.
-
Click on Click here to send them activation links in the notification bar to send activation links to your remaining unactivated users. You have the option of sending the activation links to users by either SMS or email. When you choose Email then the Duo users with email addresses who are not activated and who have a smartphone device attached are shown. If you choose SMS, all unactivated users with attached smartphones are shown.

Select which users will receive activation links by checking the box next to their usernames. To select all users, check the box next to the "Username" column header.
After selecting the desired users, you can customize the message they will receive. When finished selecting users and customizing the email, click the Send Email to Selected Users button.
Note: Users who have recently been sent activation links from the Duo Admin Panel cannot be sent a new link until the existing links expire (by default, 24 hours after sending).
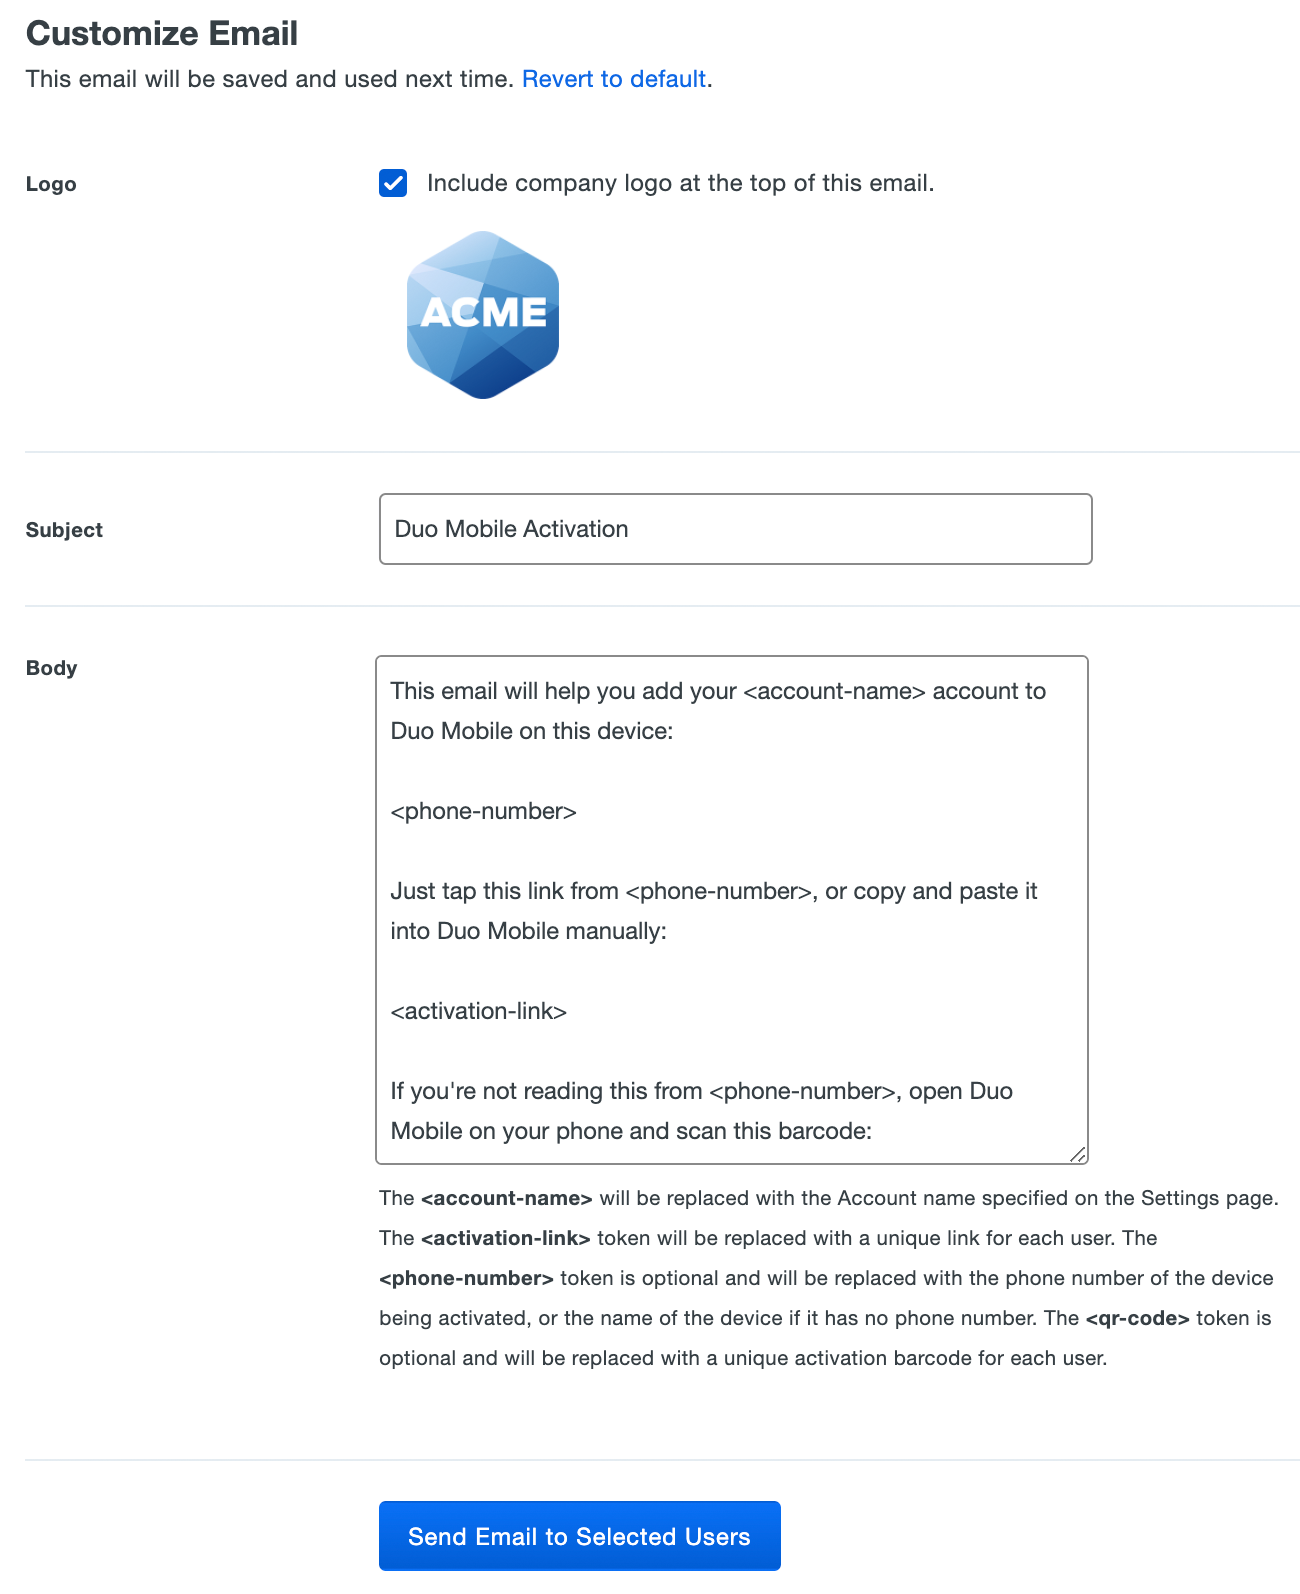
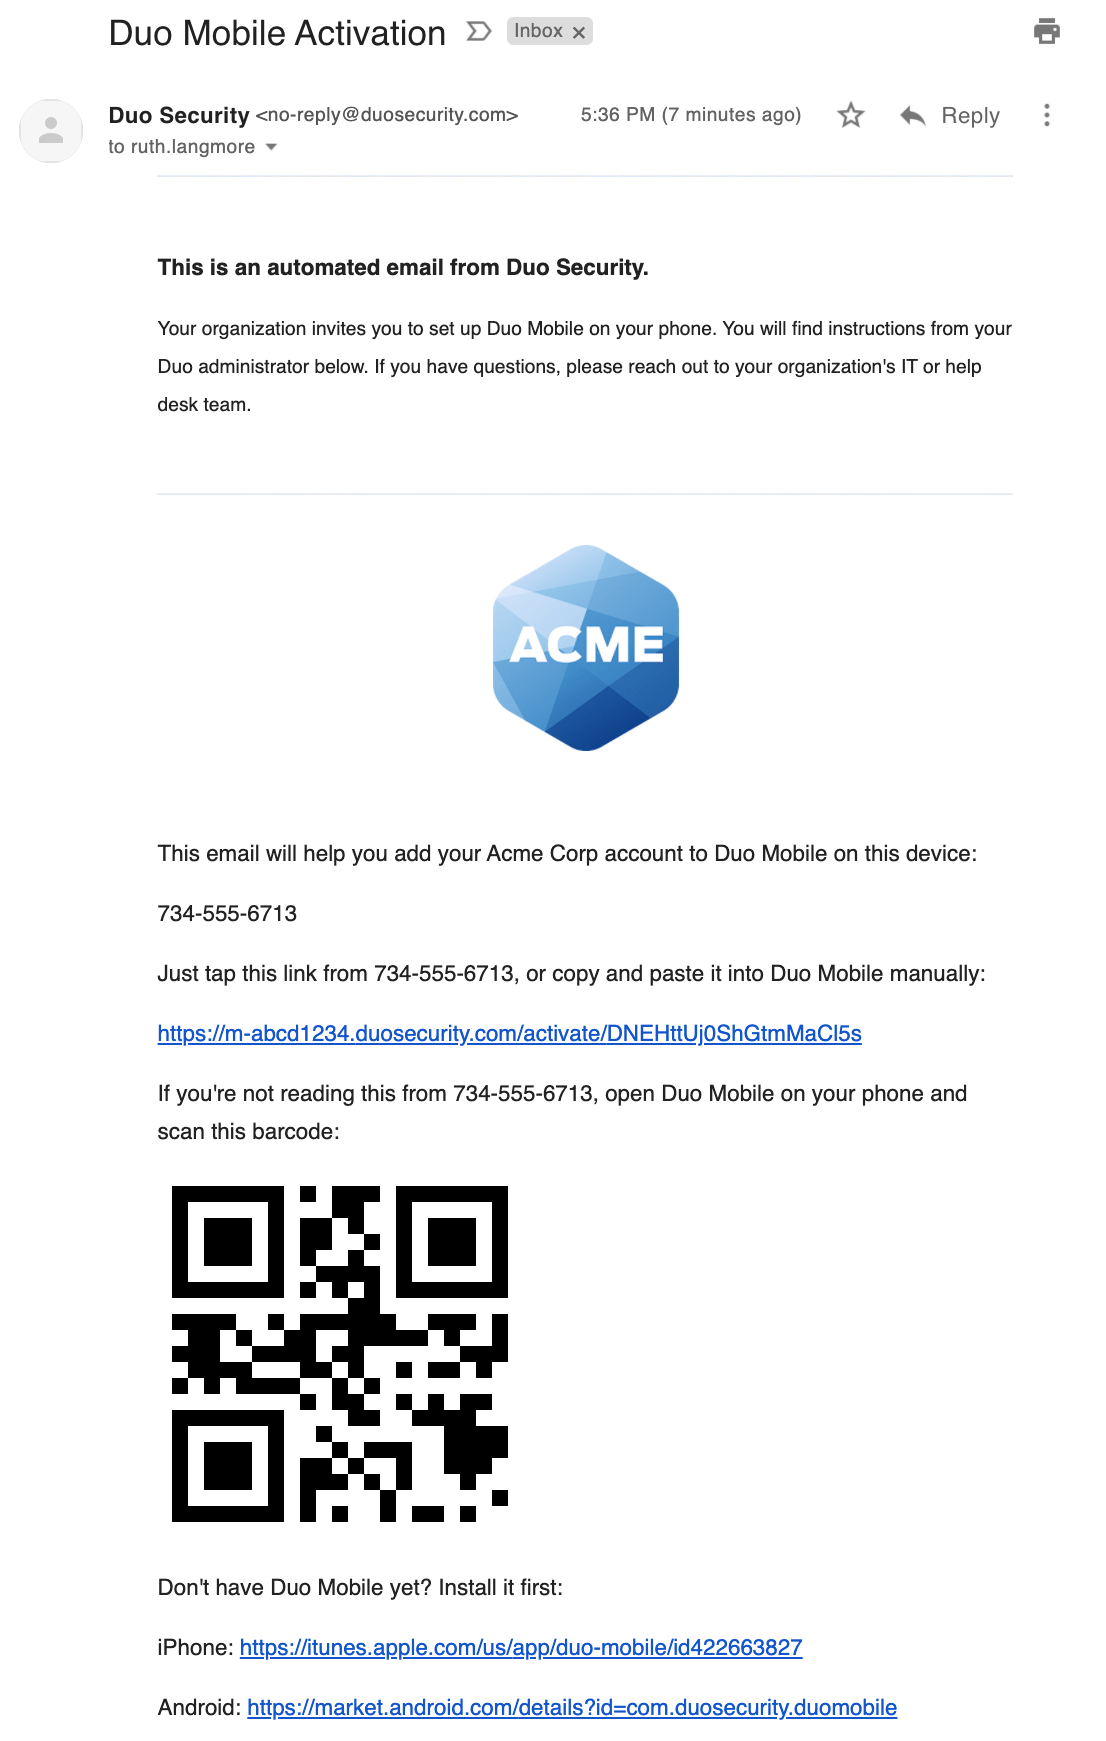
The sent message will have a non-editable header added, informing the user it's an automated message sent by Duo and to contact their organization's Duo admins or IT support group with any questions.
-
The selected users receive an SMS or email message with an activation link and QR code. Once a user opens the link on their device, or scans the QR code with the Duo Mobile app or phone camera, the Duo account is added and the user is fully activated.
APIs
Advanced customers can use Duo's Admin API to programmatically create users and devices, associate users to devices, and generate Duo Mobile activation links.
Troubleshooting
Need some help? Try searching our Knowledge Base articles or Community discussions. For further assistance, contact Support.