
Contents
Overview
Customize your Duo experience by changing global settings in the Duo Admin Panel.
To access the Duo Admin Panel:
-
Navigate to Duo Admin Panel.
-
Enter your Duo administrator account credentials.
-
Complete two-factor authentication.
See Accessing the Duo Admin Panel for detailed Duo Admin Panel login instructions.
The browser used to access the Duo Admin Panel must support TLS 1.2, which most modern browsers do by default. If you have issues accessing the site, please update your browser to a recent version of Chrome, Firefox, Edge, Safari, etc. or check your browser’s SSL implementation here: https://www.ssllabs.com.
Duo no longer supports use of Internet Explorer to access the Admin Panel. Microsoft ended Internet Explorer desktop application support on June 15, 2022. Please use one of Duo's supported browsers.
Changing Global Settings
Role required: Owner or Administrator (Billing role may not access the Settings page, other roles may view but not modify settings).
Administrators may use the Settings page in the Duo Admin Panel to customize global options, like custom branding. To access these features, log in to the Duo Admin Panel and click Settings on the left.
Once on the "Settings" page, use the left side navigation to access different sections on the page. Be sure to click the Save Changes button at the top of the page after updating any settings.
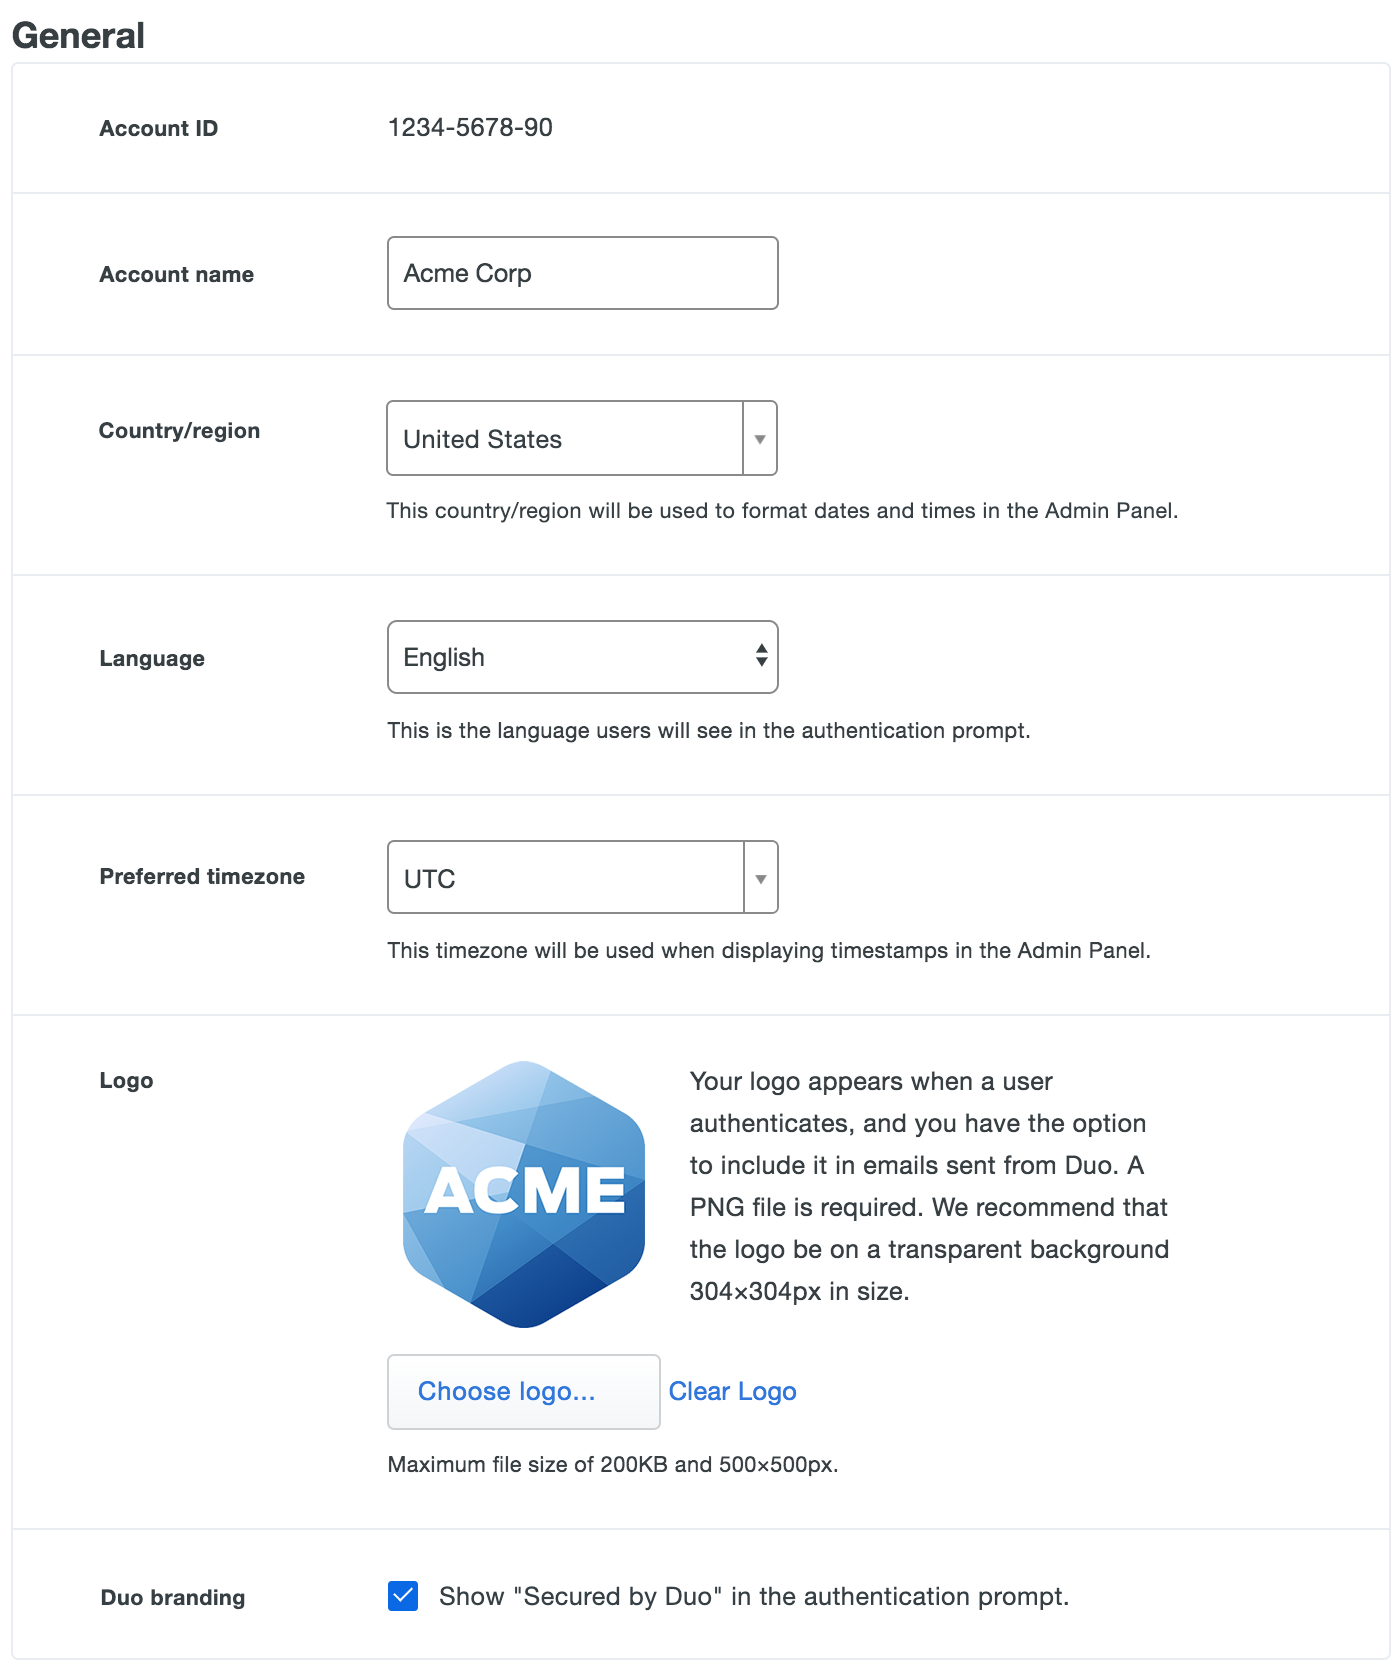
General Settings
Account Information
Your Account ID is a unique identifier for your Duo customer account. You may be asked to provide this if you contact Duo Support.
The Account Name specified here will be displayed in your Duo Admin Panel, and seen by your users during enrollment and via browser in Duo's traditional prompt, as well as shown in the Duo Mobile app.
The Country/region and Preferred timezone selections apply to most dates and timestamps in the Duo Admin Panel.
The Country/region selection also determines the default country code shown for phone enrollments in the traditional prompt only. The Universal Prompt does not use this setting during phone enrollment.
Duo Free General Settings
Language
Duo Premier, Duo Advantage, and Duo Essentials customers: change language options in User Communication settings.
Changing the Language setting from English to French or German causes end-user interactions with Duo's service to use the chosen language. This includes the browser-based traditional Duo Prompt, Duo Mobile activation and SMS passcode text messages, and phone call authentication. This setting is global; users experience the selected language in the traditional authentication prompt no matter their actual location.
Logo
Duo Premier, Duo Advantage, and Duo Essentials customers: change logo and Duo branding options in Custom Branding settings.
Duo Free customers may upload a Logo image in the General settings, which is shown to users in both the Duo traditional and Universal Prompt during enrollment and authentication. The logo image must be in PNG format and not exceed 500 by 500 pixels and 200 KB. We recommend a 304 by 304 pixel logo image with a transparent background for the best results.
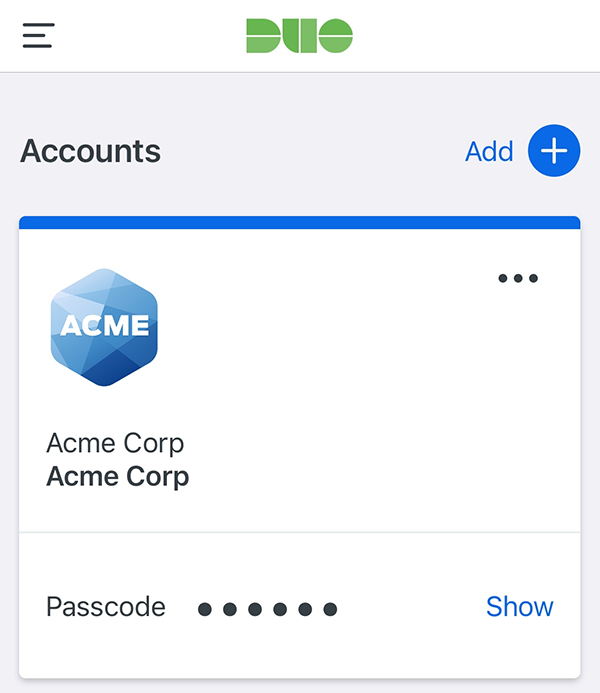
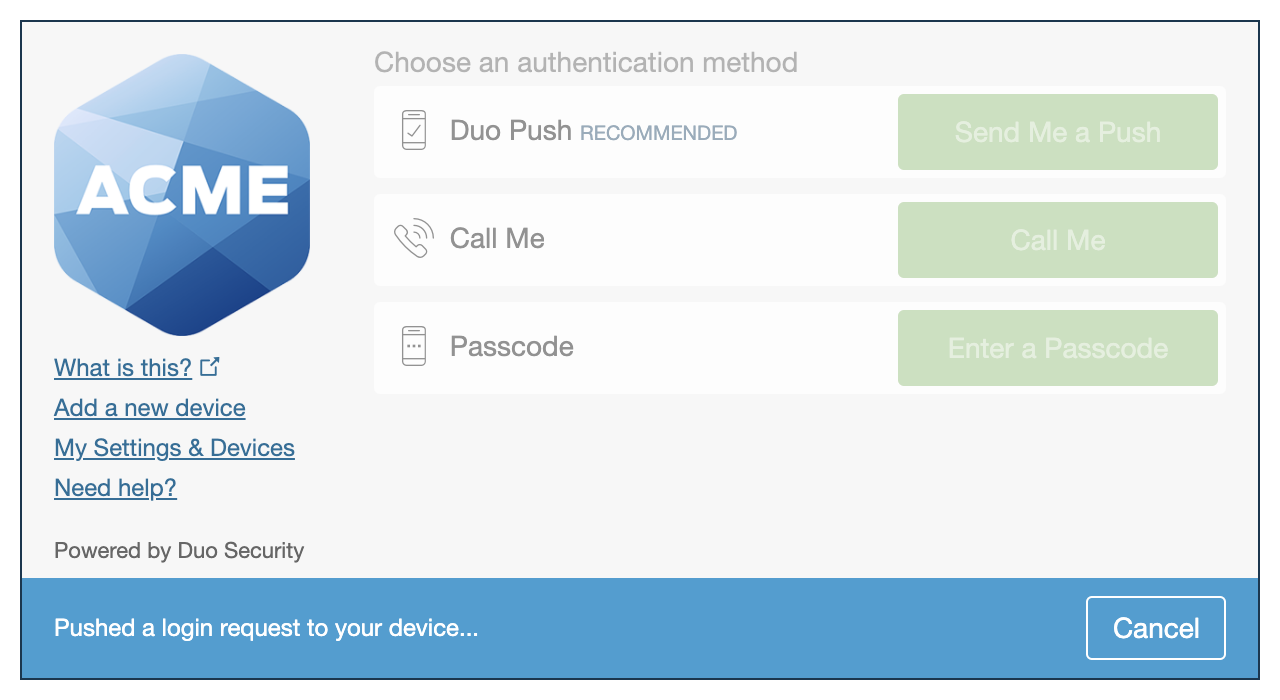
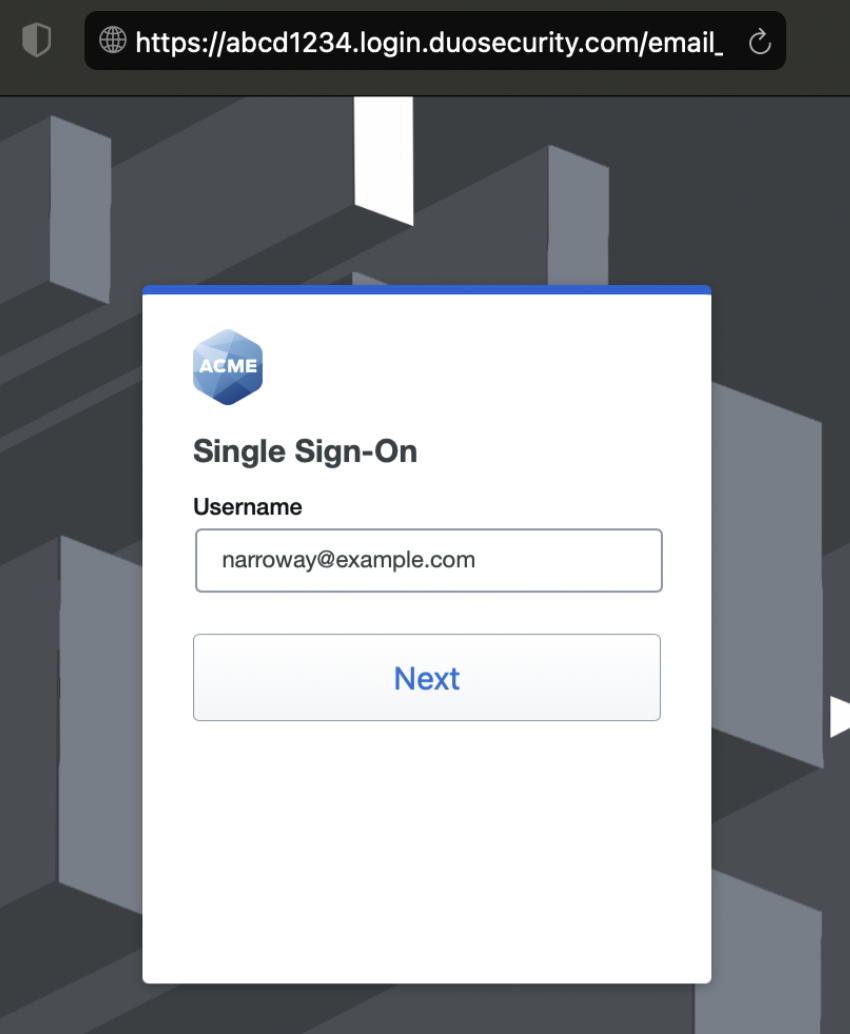
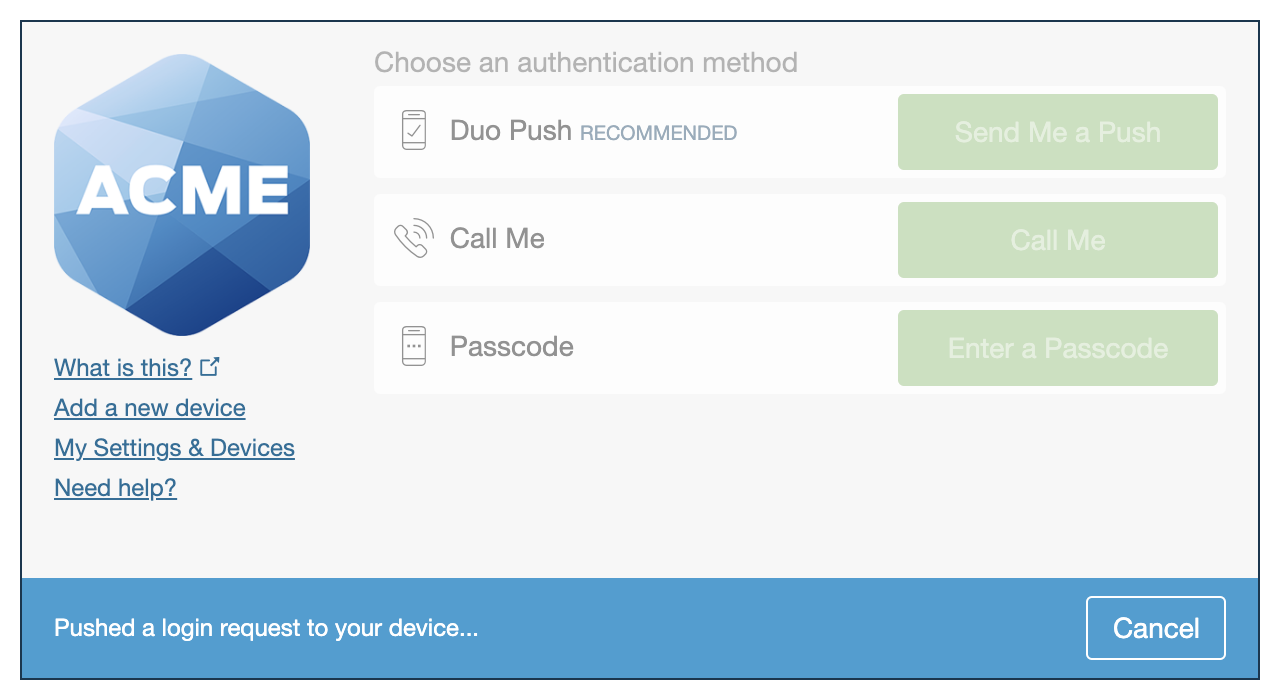
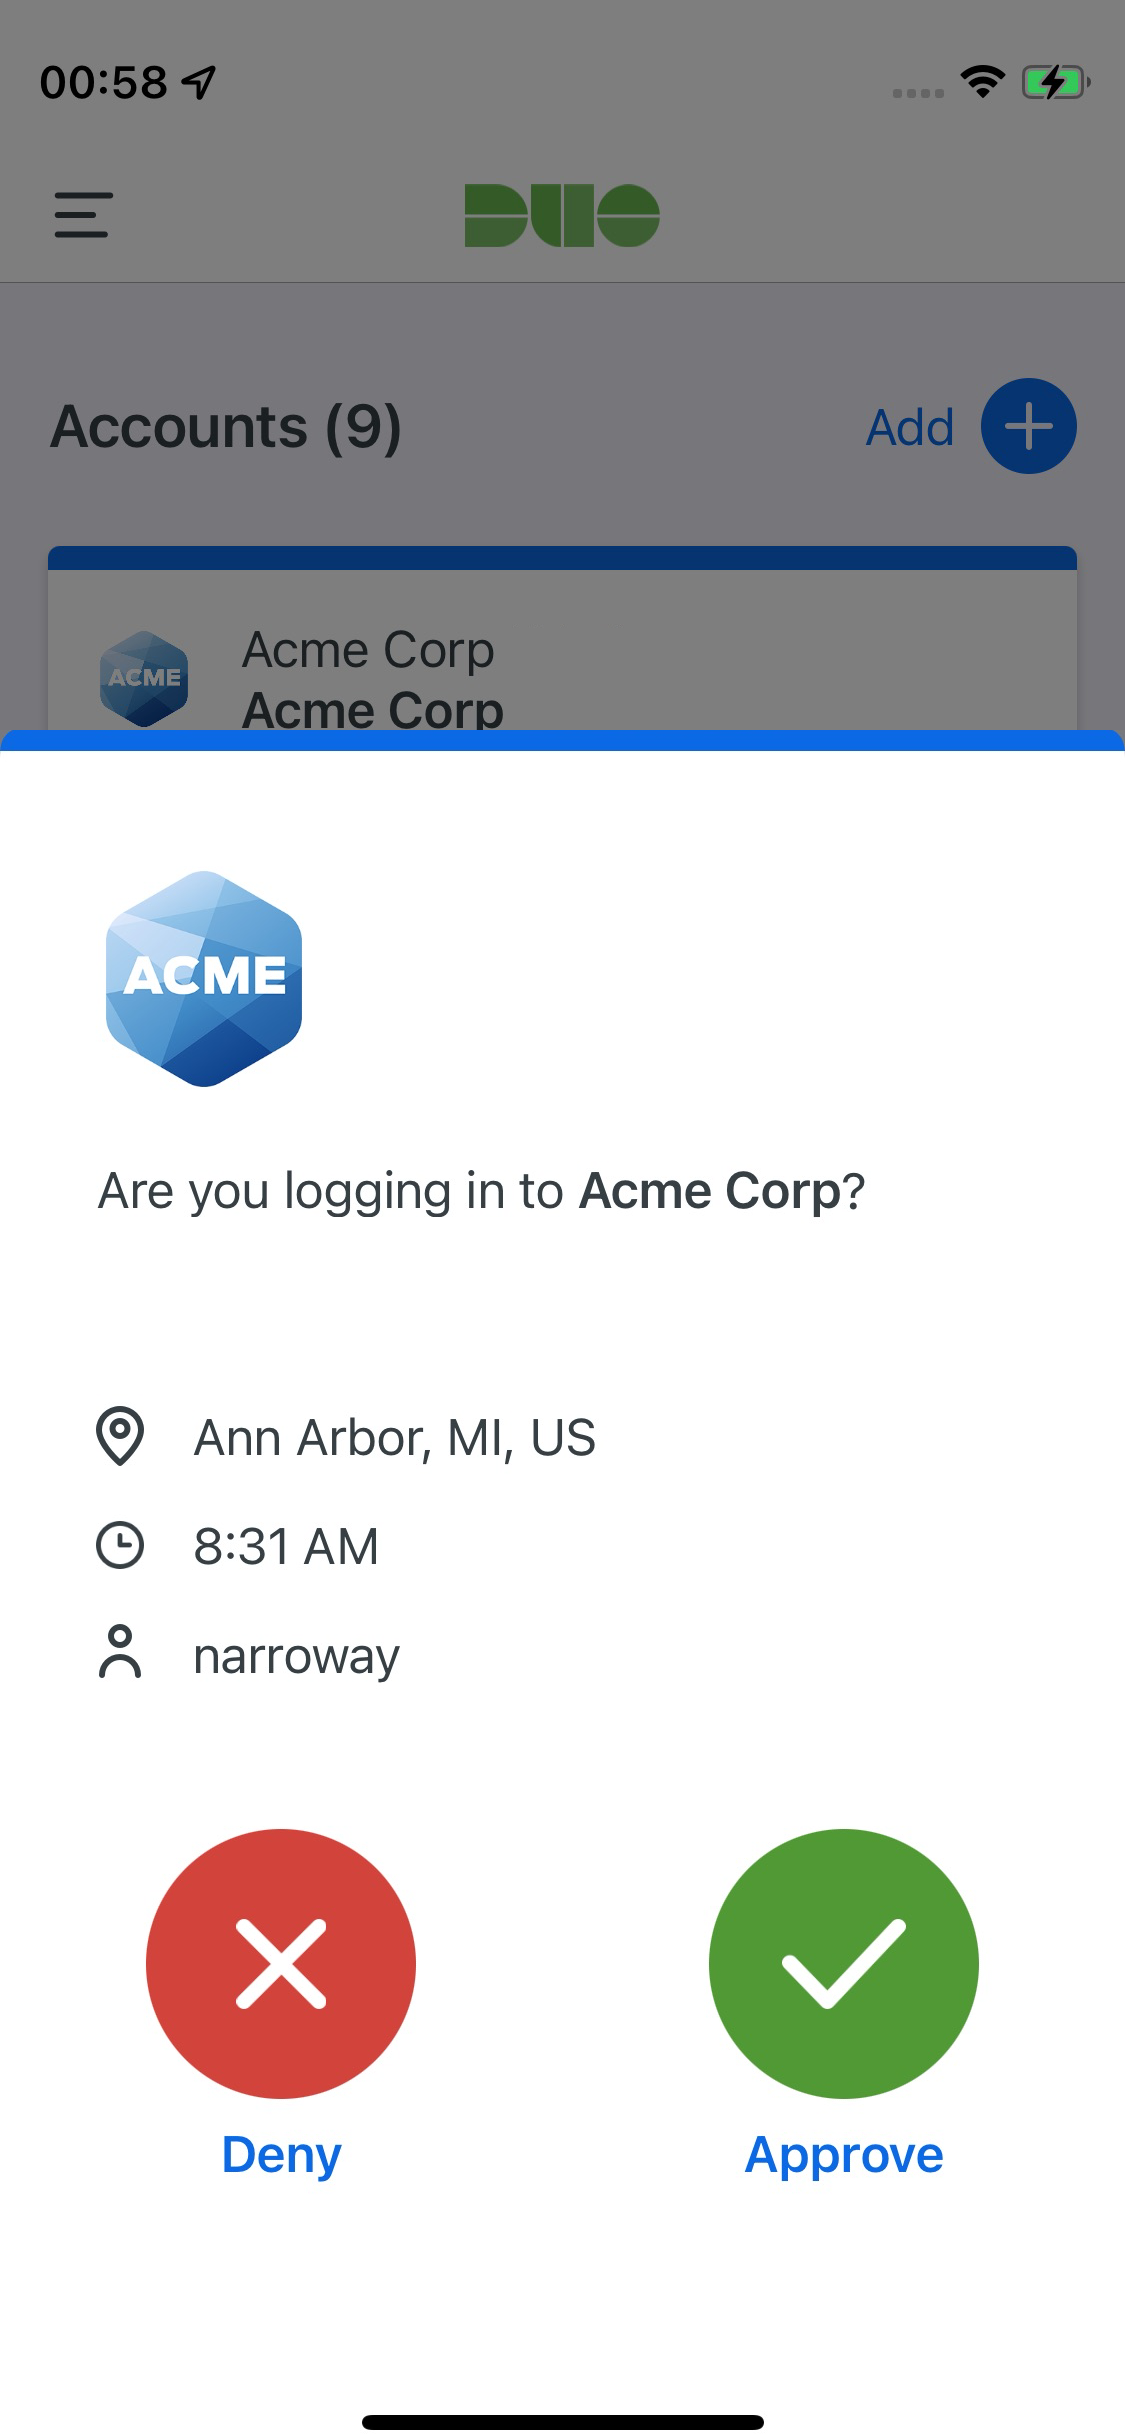
As an example, if you upload a company logo and change the account name to "Acme Corp" like so:
The account appears in Duo Mobile as follows:
The company logo you update here is also shown in the Duo Prompt.
| Universal Prompt | Traditional Prompt |
 |
 |
Duo Branding
The Duo authentication prompt displays the text "Secured by Duo" by default (formerly "Powered by Duo Security"). To remove this statement from your authentication prompt, Duo Free customers should clear the Duo branding General settings option.
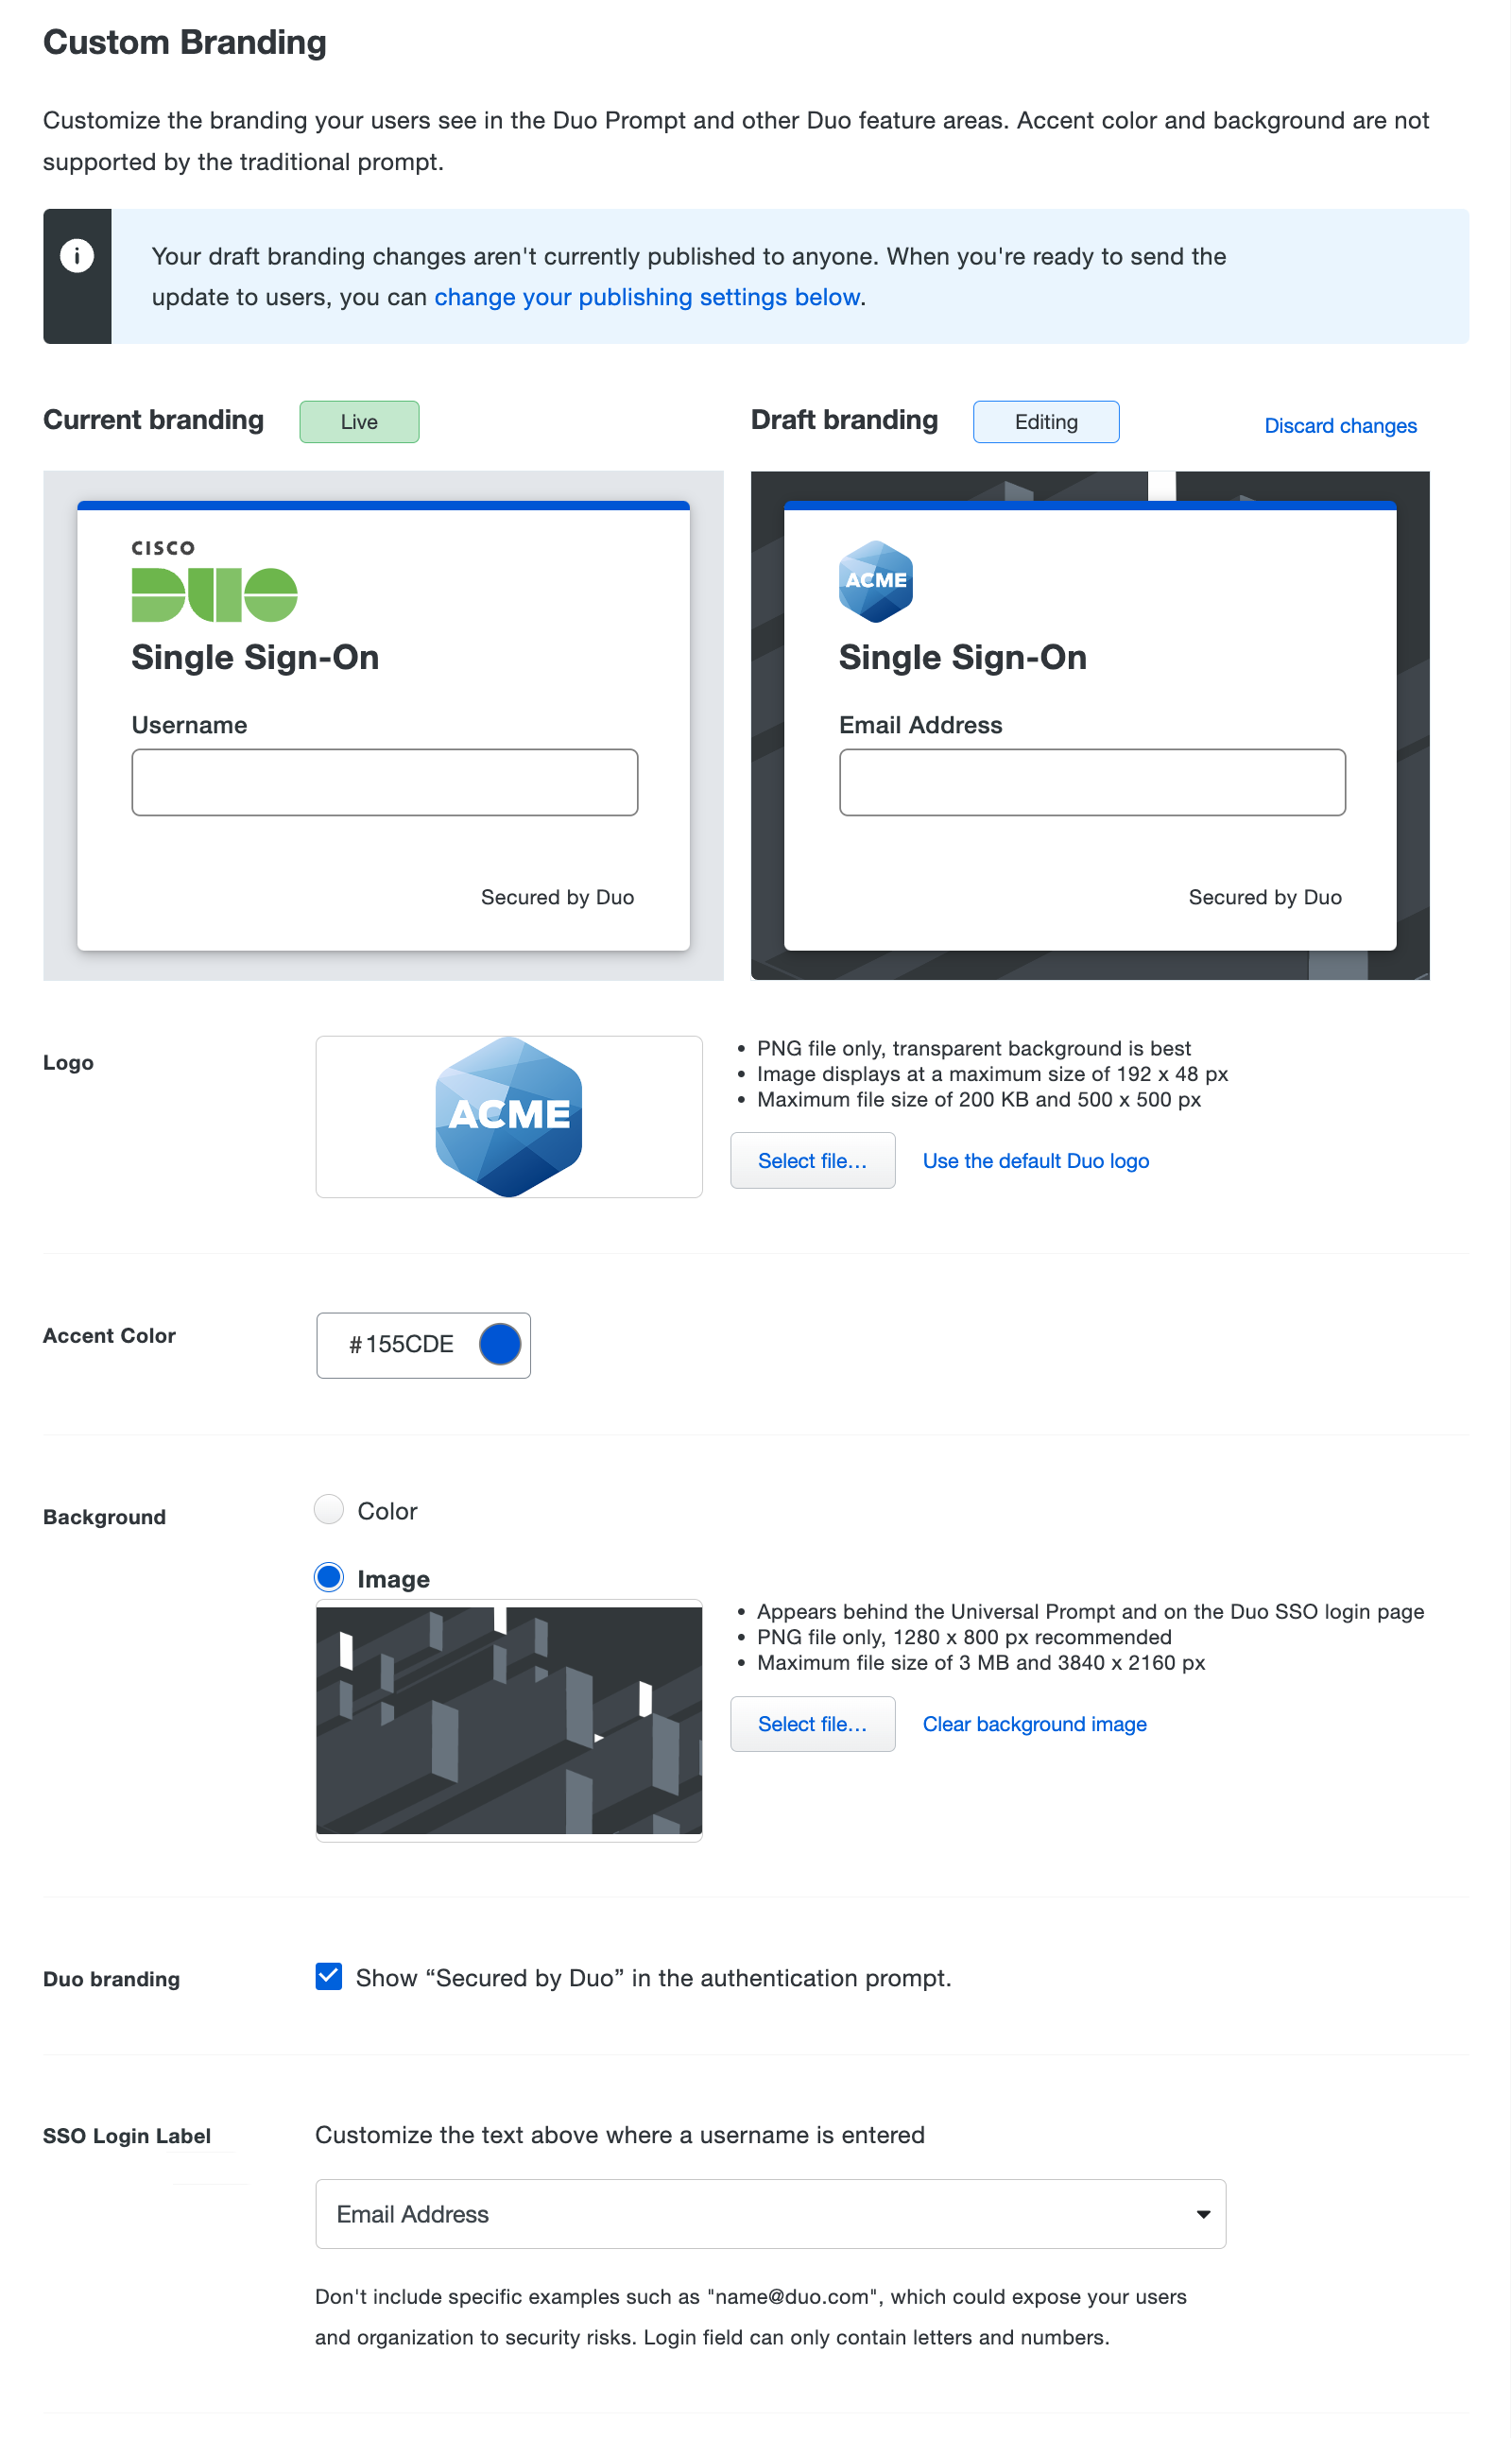
Custom Branding
Duo Essentials, Advantage, and Premier plan customers can customize the user authentication experience with a background image, logo, and accent color.
The custom branding background and accent color options affect the look and feel of the Universal Prompt for two-factor authentication, the Duo Single Sign-On (SSO) login page, and Duo Passwordless, while the logo and Duo branding selections apply to all applications that show the Duo traditional prompt or Universal Prompt in a browser.
None of the custom branding options have any effect on the end-user experience for applications that do not show the Duo prompt in a browser, such as Duo Authentication for Windows Logon or Duo Unix, or LDAP and most RADIUS applications which use Duo Authentication Proxy. The custom branding options do not apply to the Duo Admin Panel login page.
| Branding Option | Universal Prompt | Traditional Prompt | Duo SSO | Duo Mobile | Non-Browser Apps |
|---|---|---|---|---|---|
| Logo | Yes | Yes | Yes | Yes | No |
| Accent Color | Yes | No | Yes | Yes | No |
| Background | Yes | No | Yes | No | No |
| Duo Branding | Yes | Yes | Yes | No | No |
| SSO Login Label | No | No | Yes | No | No |
| Test with some users | Yes | No | No | No | No |
Change Branding Options
Duo's default custom branding features the Duo logo, with a blue accent and no background image. You can customize each of the branding options as follows:
-
Logo: Drag and drop your logo image file into the space provided, or use the Select file... button to browse to your logo image. The logo image must be in PNG format and not exceed 500 by 500 pixels and 200 KB. We recommend a logo image with a transparent background for the best results. Your logo displays in Duo user interfaces at maximum dimensions of 192 by 48 pixels.
-
Accent Color: Use the selector to choose your accent color or type in a hex color code. This alters the solid stripe of color shown at the top of the Duo interactive browser interface. In Duo Mobile version 4.48.0 and later, the accent color will match this value .
-
Background: Use the color selector or upload an image to serve as the background shown behind the Duo interactive browser interface. If you opt for an image, drag and drop your file into the space provided, or use the Select file... button to browse to and select it. If you upload a transparent background image, the background color shows behind that image.
Background images must be in PNG format no larger than 3 MB and 3840 by 2160 pixels. We recommend a 1280 by 800 pixel image for the best results.
-
Duo branding: The Duo interactive browser interfaces show the text "Secured by Duo" by default (formerly "Powered by Duo Security"). Clear this option to remove this statement.
-
SSO Login Label: Enter a custom label or select one from the drop-down to be displayed on the Duo SSO login page. The custom label can only contain letters and numbers (maximum length 100 characters). The default is Email Address. Only visible if Duo SSO is enabled and configured.
As you make changes to the branding options, the Draft branding area shows a preview of your customized user experience. The preview will show the Duo SSO login page if you have Duo Single Sign-On enabled, otherwise it will show the Duo Universal Prompt. At any point you can click Discard changes to revert your selections back to the default values.
Publish Branding Changes
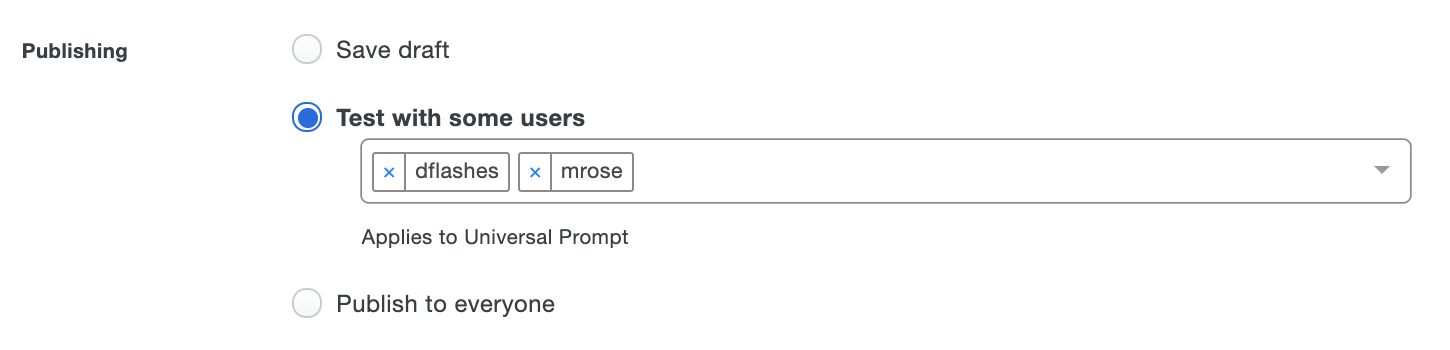
Your customization won't take effect until you publish the change. Choose from these Publishing options:
-
Save draft - Save the branding customizations but do not apply them to user logins. Your users continue experiencing the "Current branding" live settings.
-
Test with some users - Select individual Duo users who will experience the new custom branding. When they log in to web-based applications that have Universal Prompt activated those target users see the new customization. Users not selected for testing continue to see the "Current branding" live settings. Duo Single Sign-On and the traditional prompt will not show the updated logo and Duo branding text customizations to those selected users, and will instead show the customizations previously published to everyone.
-
Publish to everyone - Choose this option to make your branding changes effective for everyone. All users see the new custom branding when logging in to Duo Single Sign-On or other web-based applications if they have Universal Prompt activated. Duo's traditional prompt shows the updated logo and Duo branding text customizations to all users of web-based applications.
Click Save Changes to apply your selected custom branding publishing option.
When published, this is how the branding settings from the example above (logo, colors, background, and Duo branding) look across the Duo products that support customization.
| Universal Prompt | Duo Single Sign-On | Duo Traditional Prompt | Duo Mobile |
 |
 |
 |
 |
Duo's Admin API supports programmatic configuration of custom branding options. See the Admin API reference for more information.
Watch this video for an overview of the custom branding configuration and experience.
User Communication
Default Language
Changing the Language setting from English to French or German causes end-user interactions with Duo's service to use the chosen language. This includes the browser-based traditional Duo Prompt, Duo Mobile activation and SMS passcode text messages, phone call authentication. This setting is global; users experience the selected language in the traditional authentication prompt no matter their actual location.
This language selection also determines the help desk custom message translation shown in the traditional prompt and Duo Desktop. If you want a customized message shown to users in the language you select here, be sure to also enter a translated message for that language in the custom message setting.
The Duo Universal Prompt does not use this global language setting, and instead defers to the user's preferred browser language setting of English, Catalan, Chinese (Simplified), Chinese (Traditional), Czech, Danish, Dutch, Finnish, French, German, Hindi, Indonesian, Italian, Japanese, Korean, Norwegian, Polish, Portuguese (Brazil), Portuguese (Portugal), Spanish (Latin America), Spanish (Spain), Swedish, Thai, Turkish, or Vietnamese for prompt UI text, Duo Mobile activation, and SMS passcode text messages.
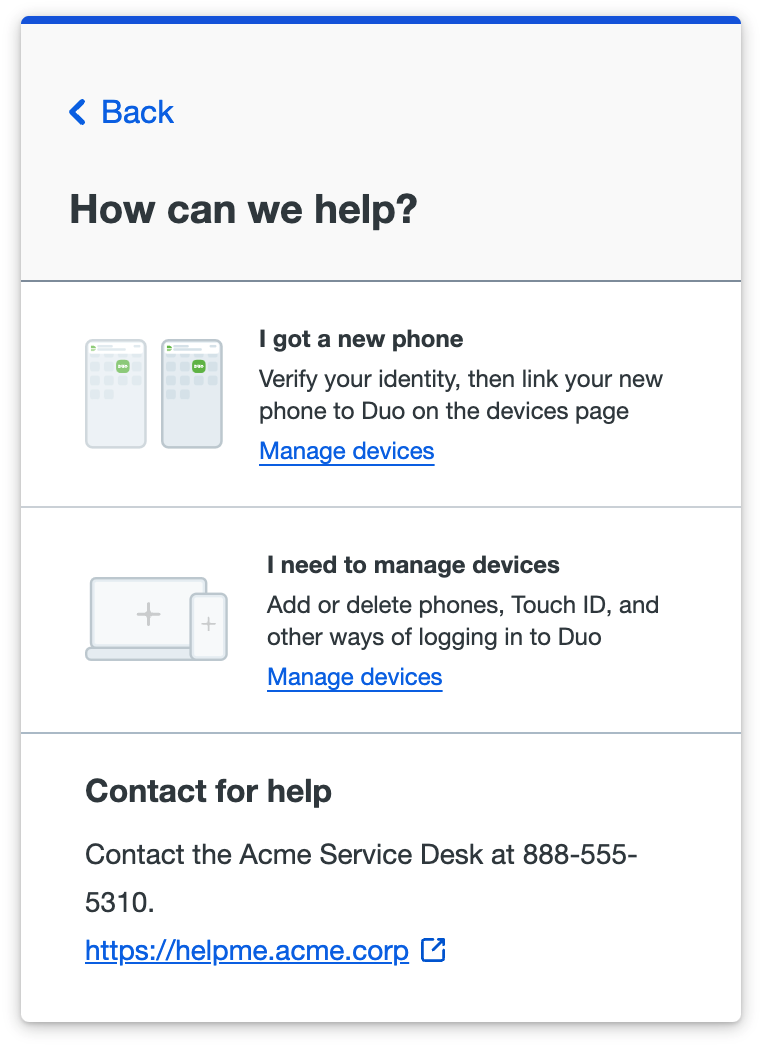
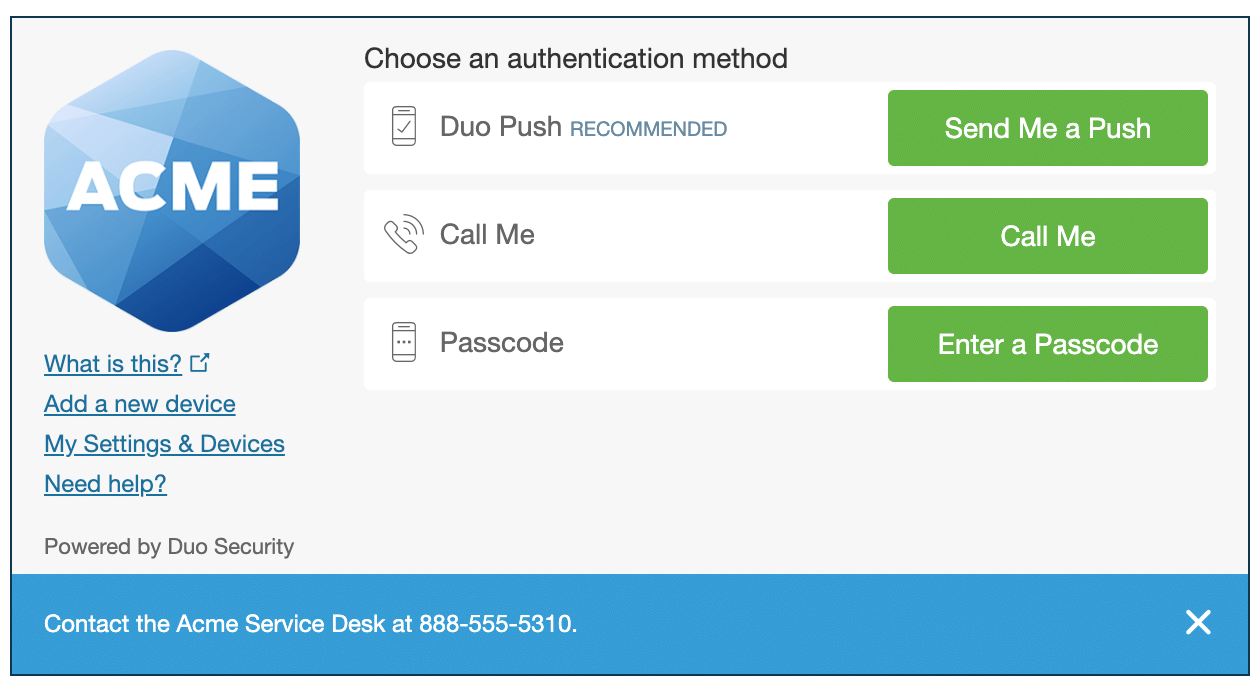
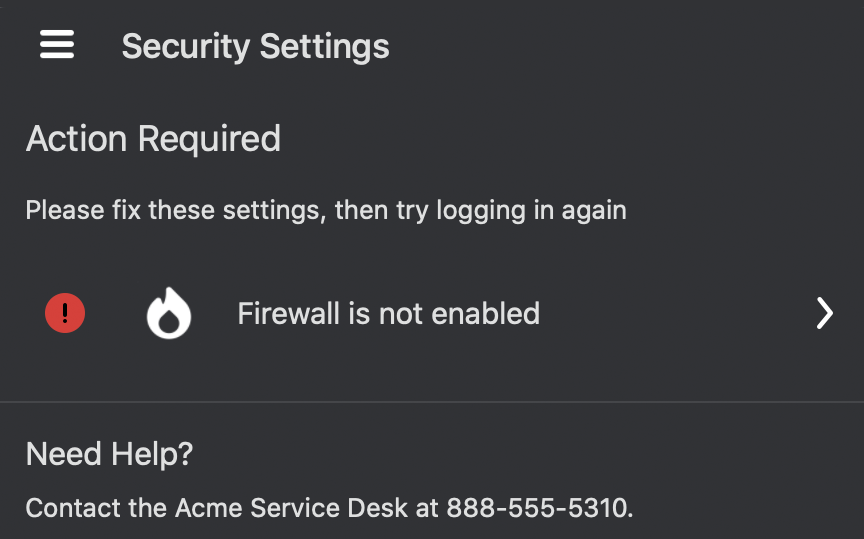
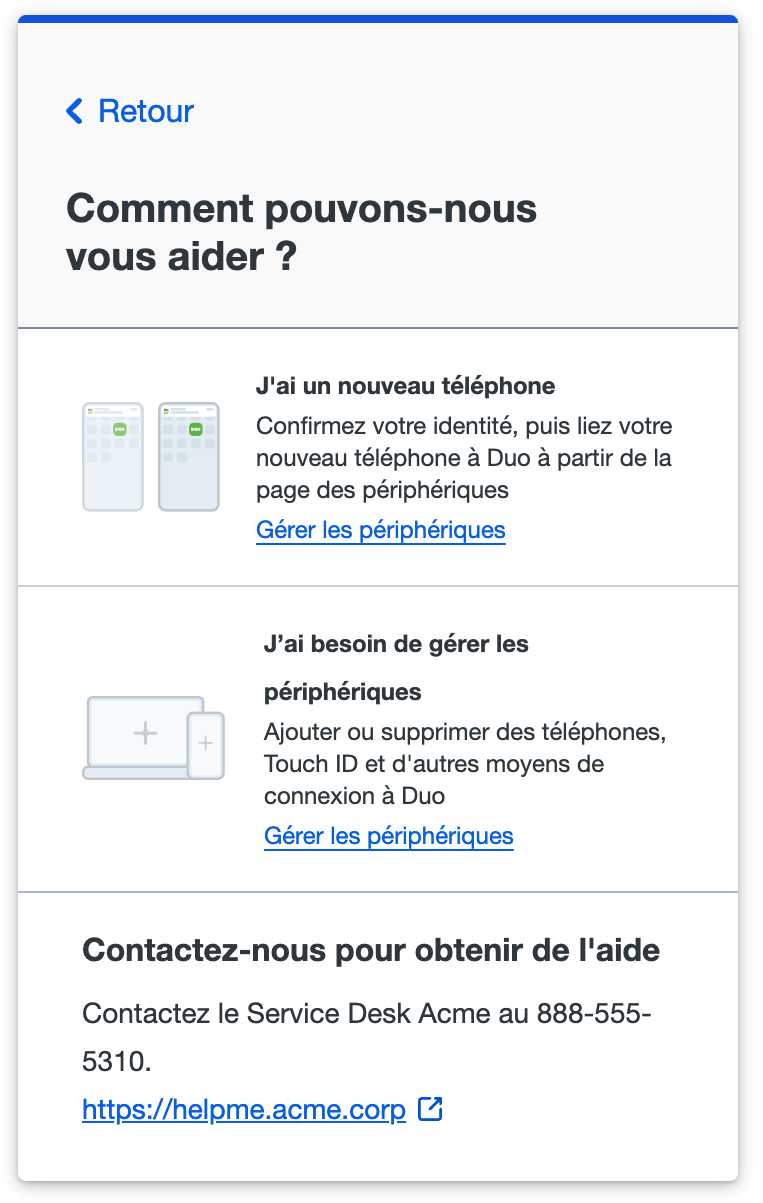
Help Desk Custom Message
Customize the help message shown to your users in the Duo browser prompt and Duo Desktop. Use this field to provide instructions to your users, such as directing them to call or email your organization's support group.
Enter text up to 200 characters; HTML formatting or hyperlinks are not allowed in this message text. You may also add up to two clickable help links in the "Links" area. These URLs must start with http or https. These links only show in the Universal Prompt's help message.
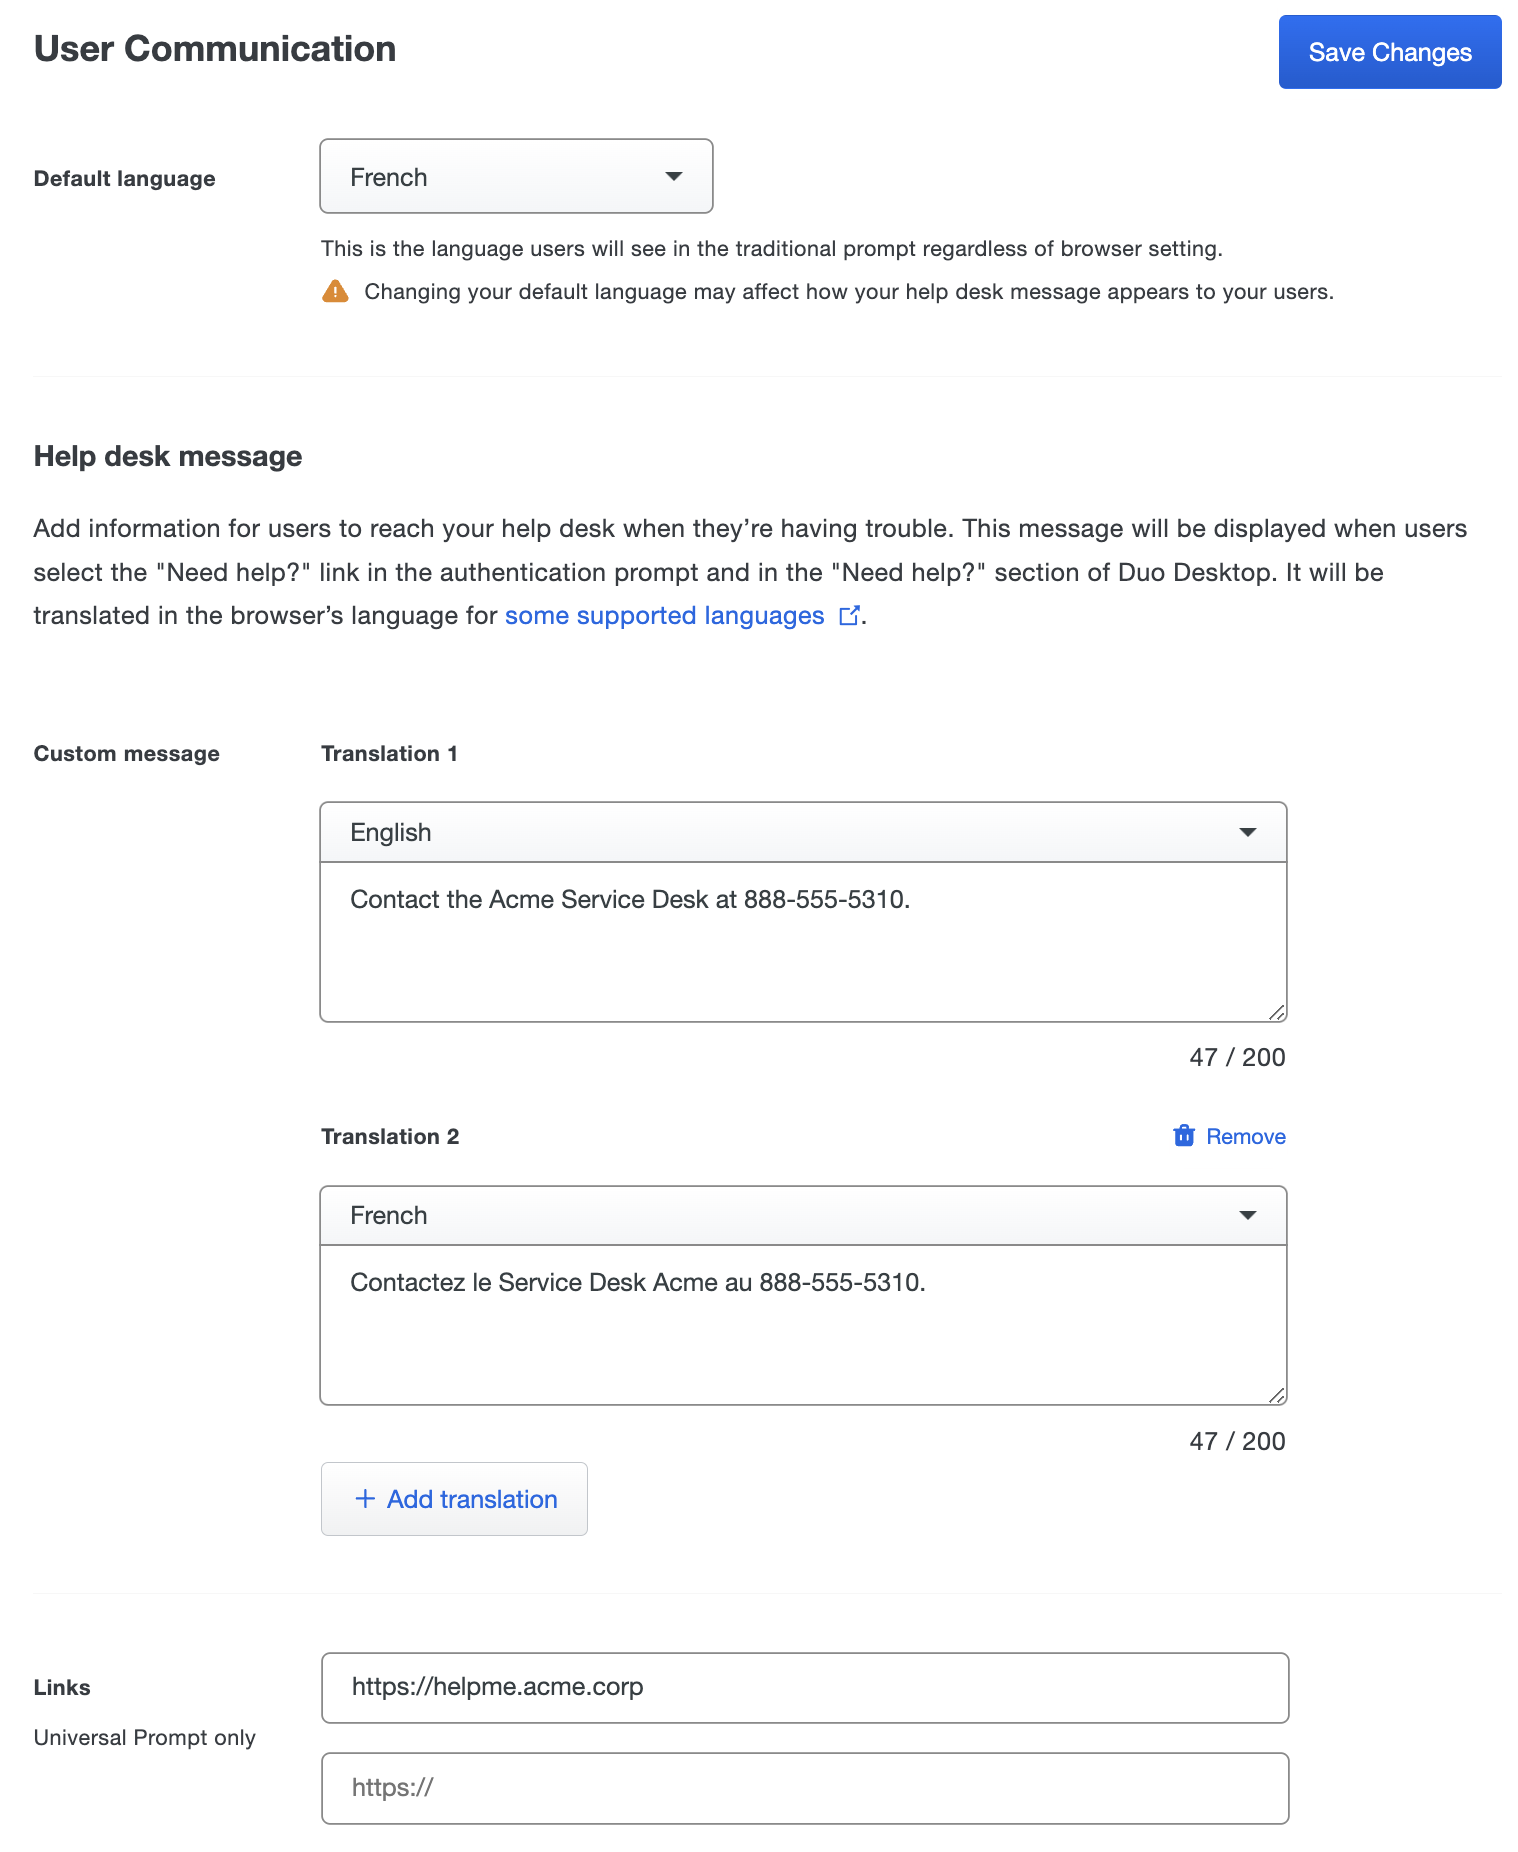
The first translation language shown matches your selection for the "Default Language", and the text you enter here will be shown in the following user interfaces:
-
Duo Universal Prompt authentication when a user clicks the "Need help?" link at the bottom of the prompt. The Universal Prompt shows the custom message text and the custom links as hyperlinks to external sites.
-
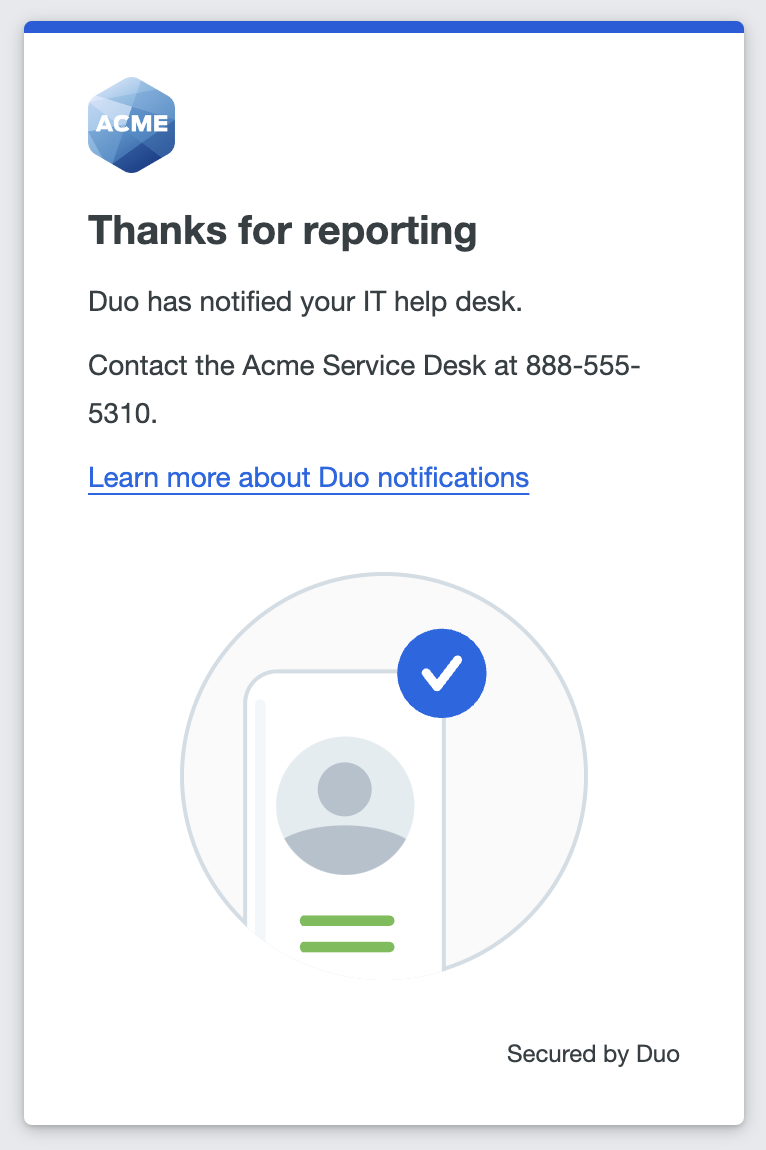
When a user clicks the "No, this wasn't me" link in an email notification.
-
Duo traditional prompt authentication, enrollment, and device management shows the custom message (but not the links) when a user clicks the "Need help?" link on the left side of the prompt.
-
Duo Advantage and Premier customers using Duo Desktop also see the custom message text in the "Need Help?" area of the installed app.
You can add translations of your custom help message in different languages. Any additional translations added after the first one show up in the Duo Universal Prompt only (no other user interface) when the user's preferred language set in their browser is one of Duo's supported languages (Catalan, Chinese (Simplified), Chinese (Traditional), Czech, Danish, Dutch, Finnish, French, German, Hindi, Indonesian, Italian, Japanese, Korean, Norwegian, Polish, Portuguese (Brazil), Portuguese (Portugal), Spanish (Latin America), Spanish (Spain), Swedish, Thai, Turkish, or Vietnamese) and you have defined a translation for that language.
To add additional translations of the custom message for the Universal Prompt, click Add translation, select the desired language from the drop-down, and enter the text for that language. Click the trash can icon to remove any of the translations after the first one.
Both the default language and the first translation default to English. If you change the default language to French or German, then the custom message translations automatically sort the matching language to the first translation.
Please note that Duo Single Sign-On's login pages do not yet support additional languages or custom help messaging text.
Enrollment Email
The "Enrollment Email" setting lets you customize the message sent to users imported from into Duo via Active Directory, OpenLDAP, or Entra ID when the synced directory has the "Send enrollment email to synced users" option enabled. You can choose to include your company logo in the email, which is the same logo image you uploaded in the General or Custom Branding section of the Settings page.
You can also set your "Enrollment experience" to show the traditional prompt or Universal Prompt. Once you have changed this setting, any new enrollment links will be directed to your chosen enrollment experience. For customers who signed up before July 2022, the default is set to show the traditional prompt. For customers who signed up during or after July 2022, the default is set to show the Universal Prompt.
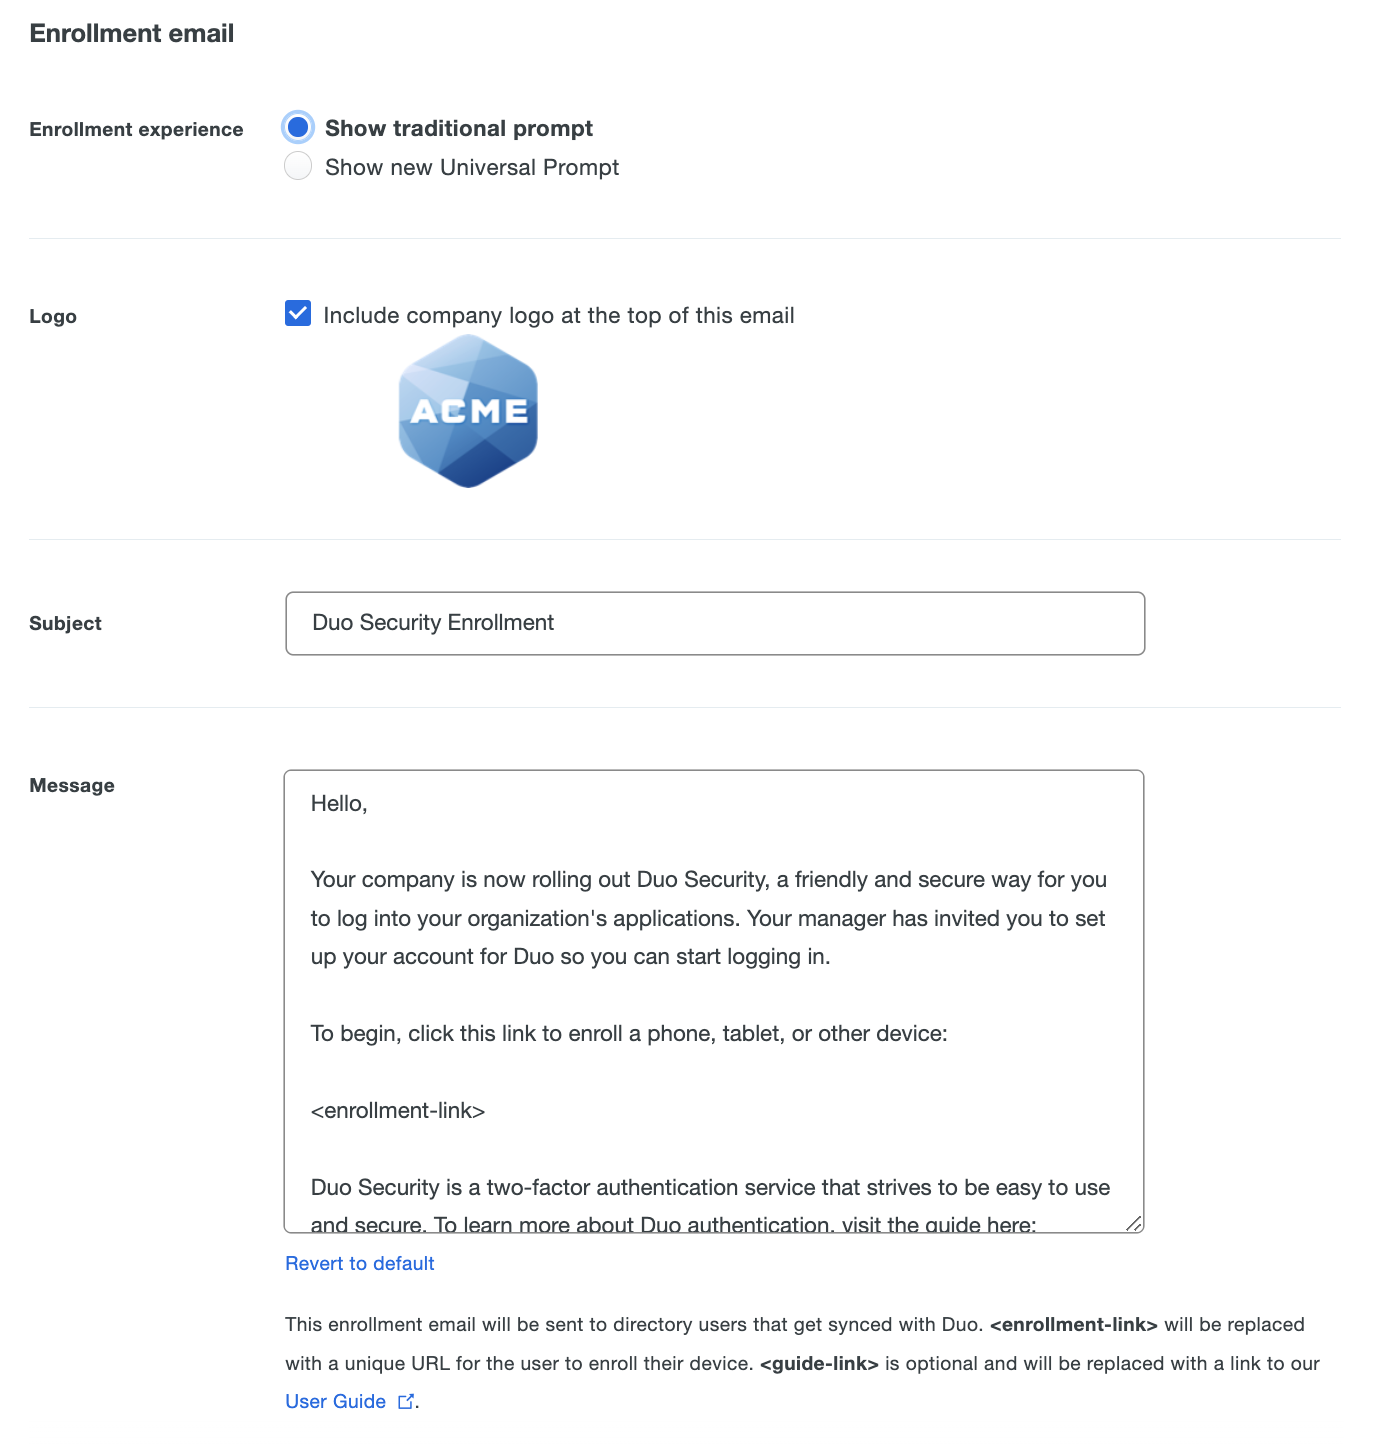
The sent message will have a non-editable header added, informing the user it's an automated message sent by Duo and to contact their organization's Duo admins or IT support group with any questions.
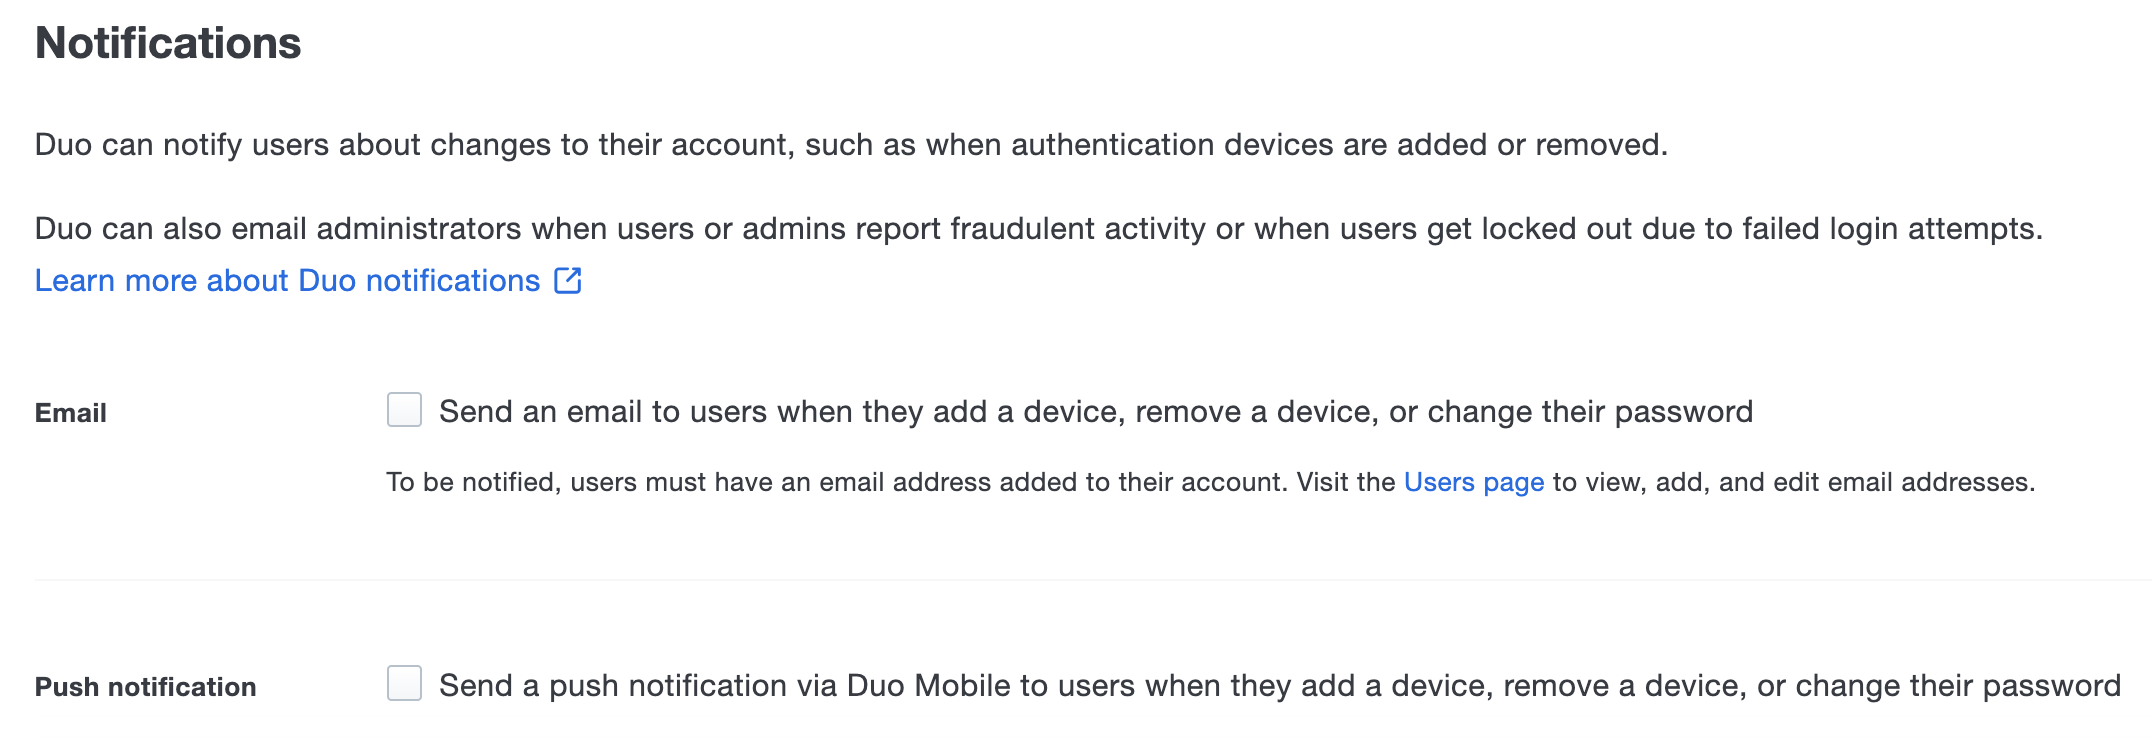
Notifications
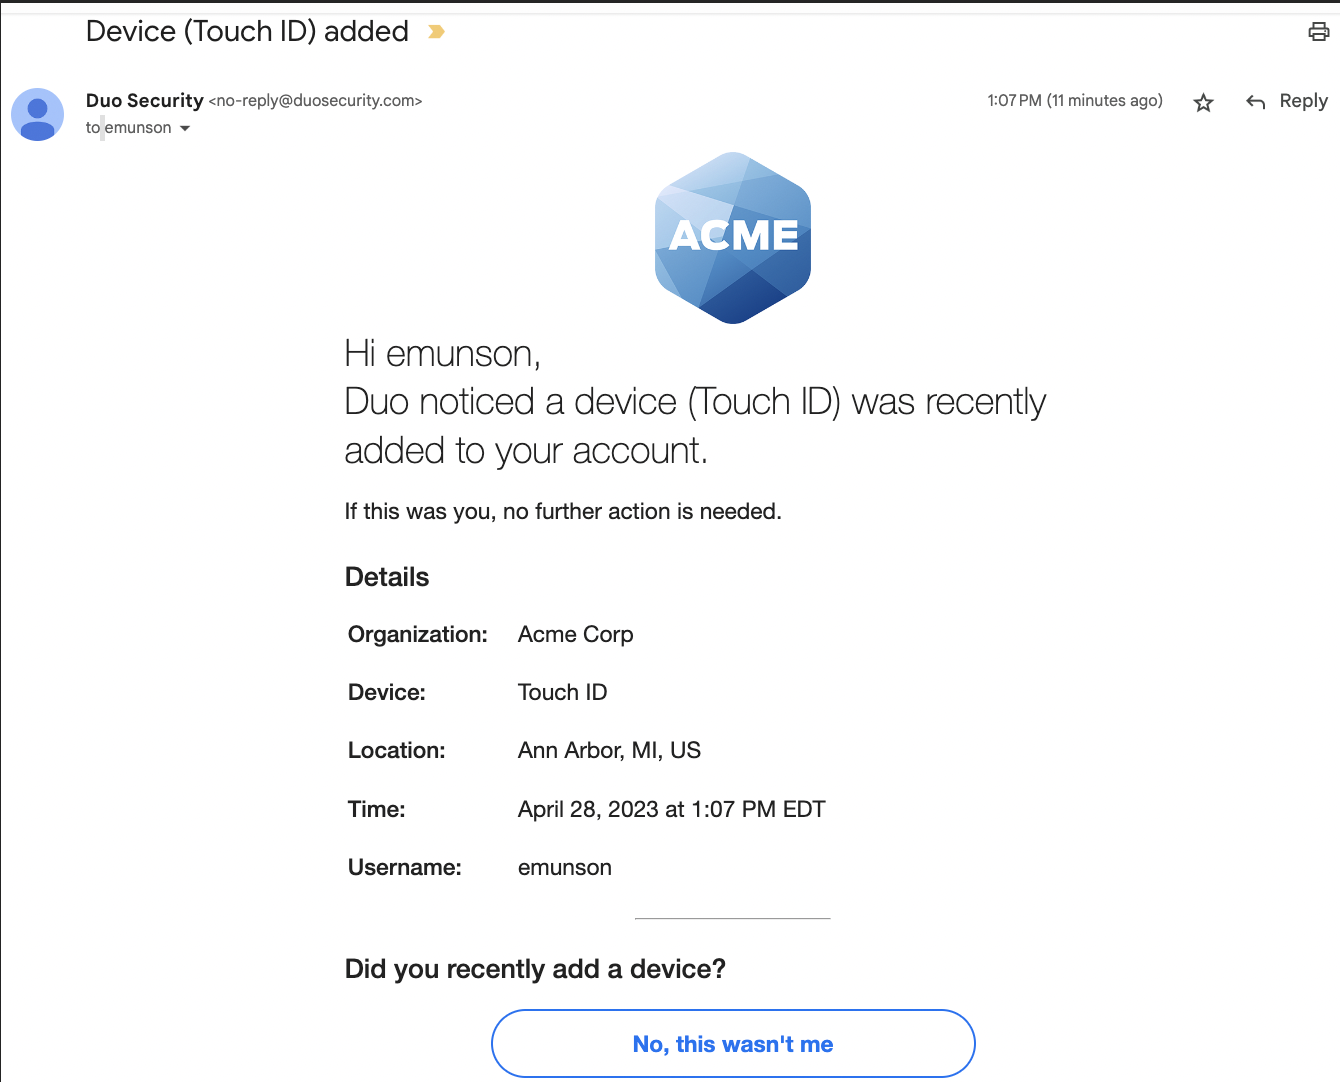
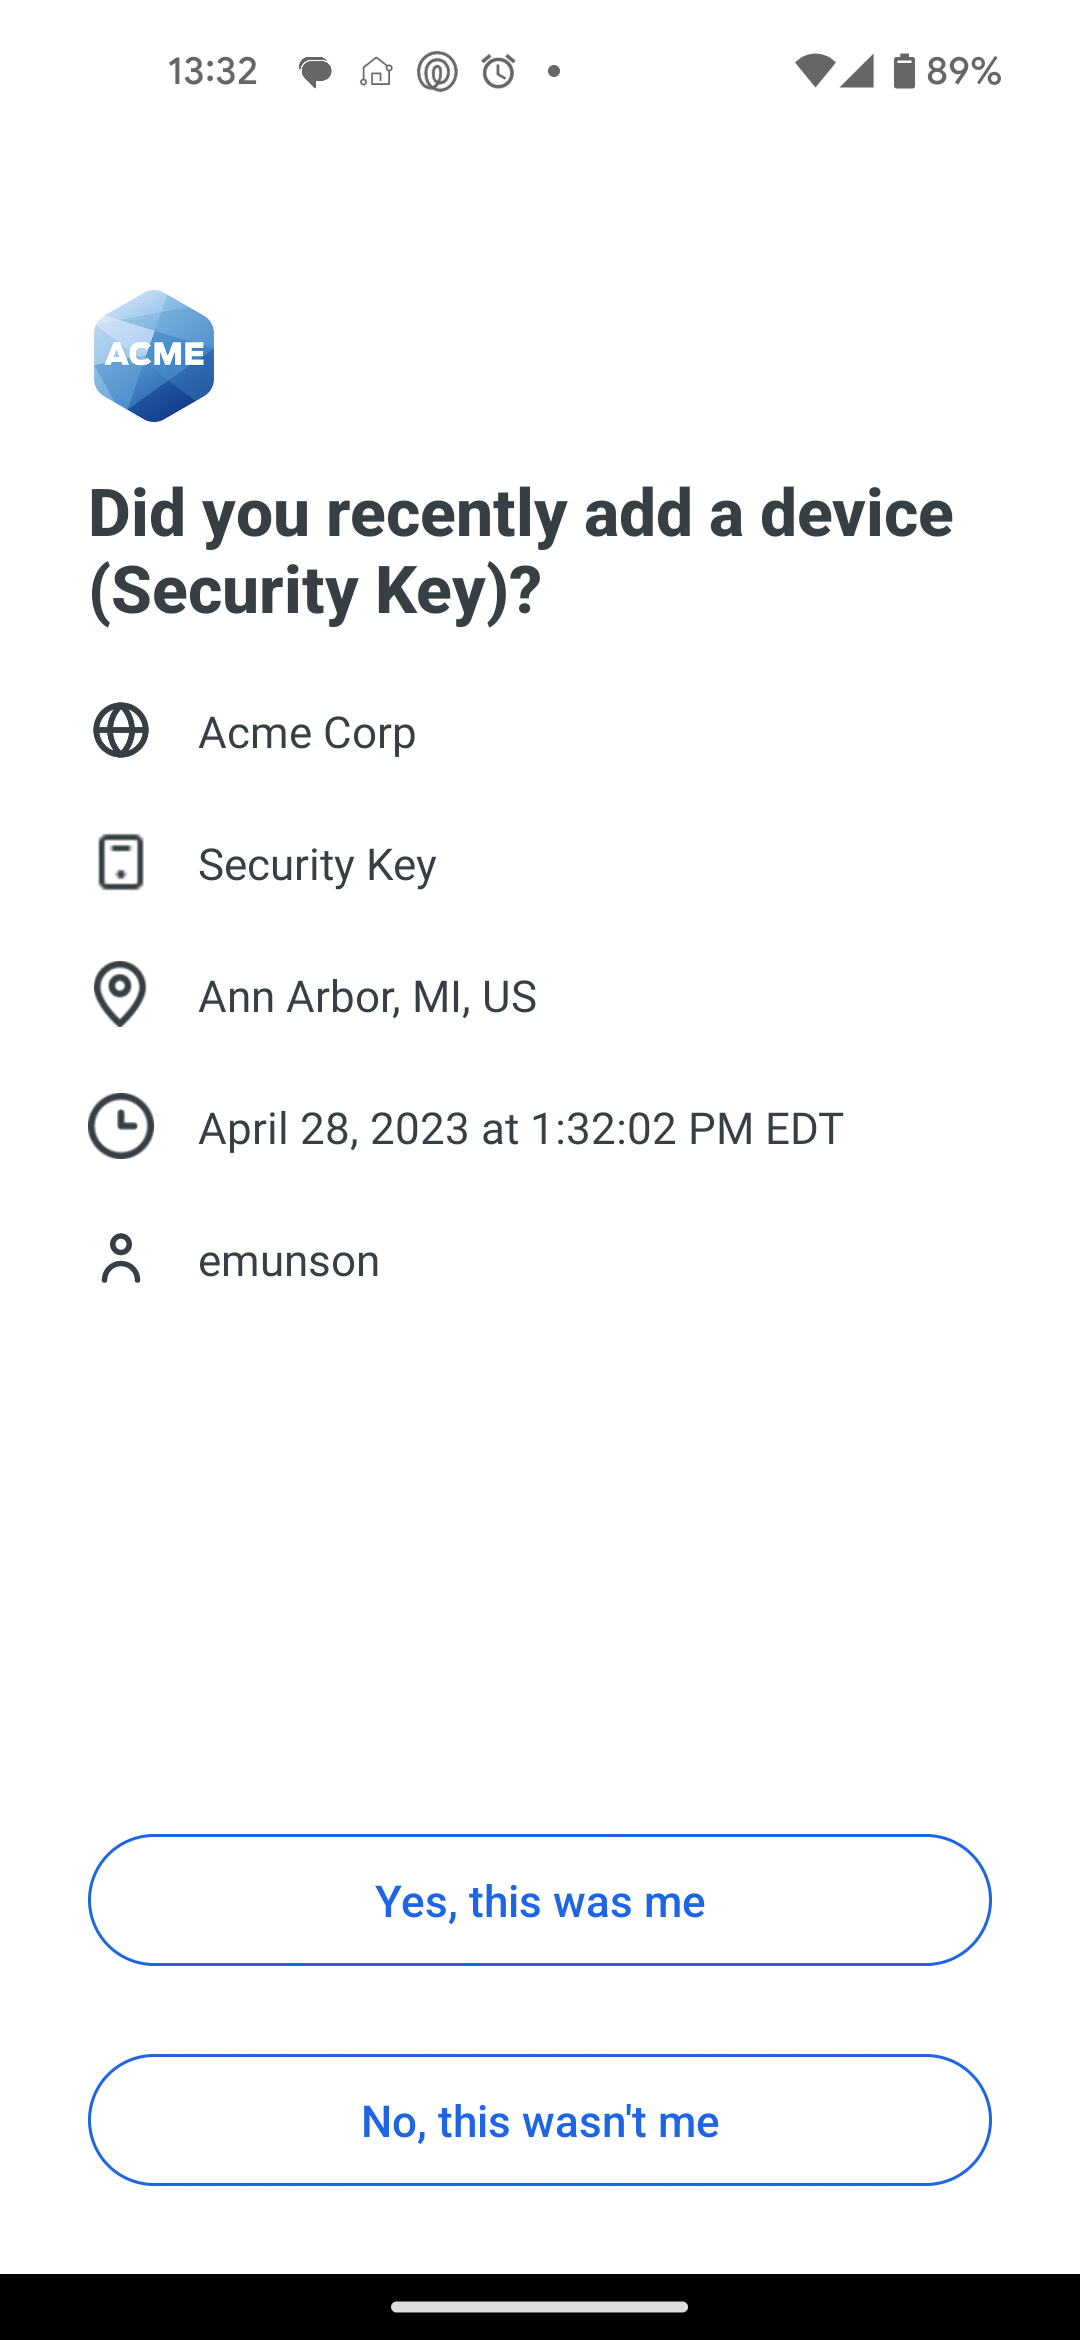
Use the "Notifications" settings to enable email or Duo Mobile app notifications to users about changes to their Duo account, such as when a user changes their password or authentication devices are added or removed. You can enable either or both of the notification options.
Select Send an email to users when they add a device, remove a device, or change their password to send a message to the email address associated with a user whenever they add or remove a Duo authentication device or change their password. If no email address information exists for the user in Duo, then they cannot receive the message.
Select Send a push notification via Duo Mobile to users when they add a device, remove a device, or change their password to send an in-app notification from the Duo user's phone or tablet whenever they add or remove a Duo authentication device or change their password. The user must have already activated Duo Mobile for use with Duo Push to receive the notification.
If you select both notification options then users may receive an email and an in-app notification for the same change.
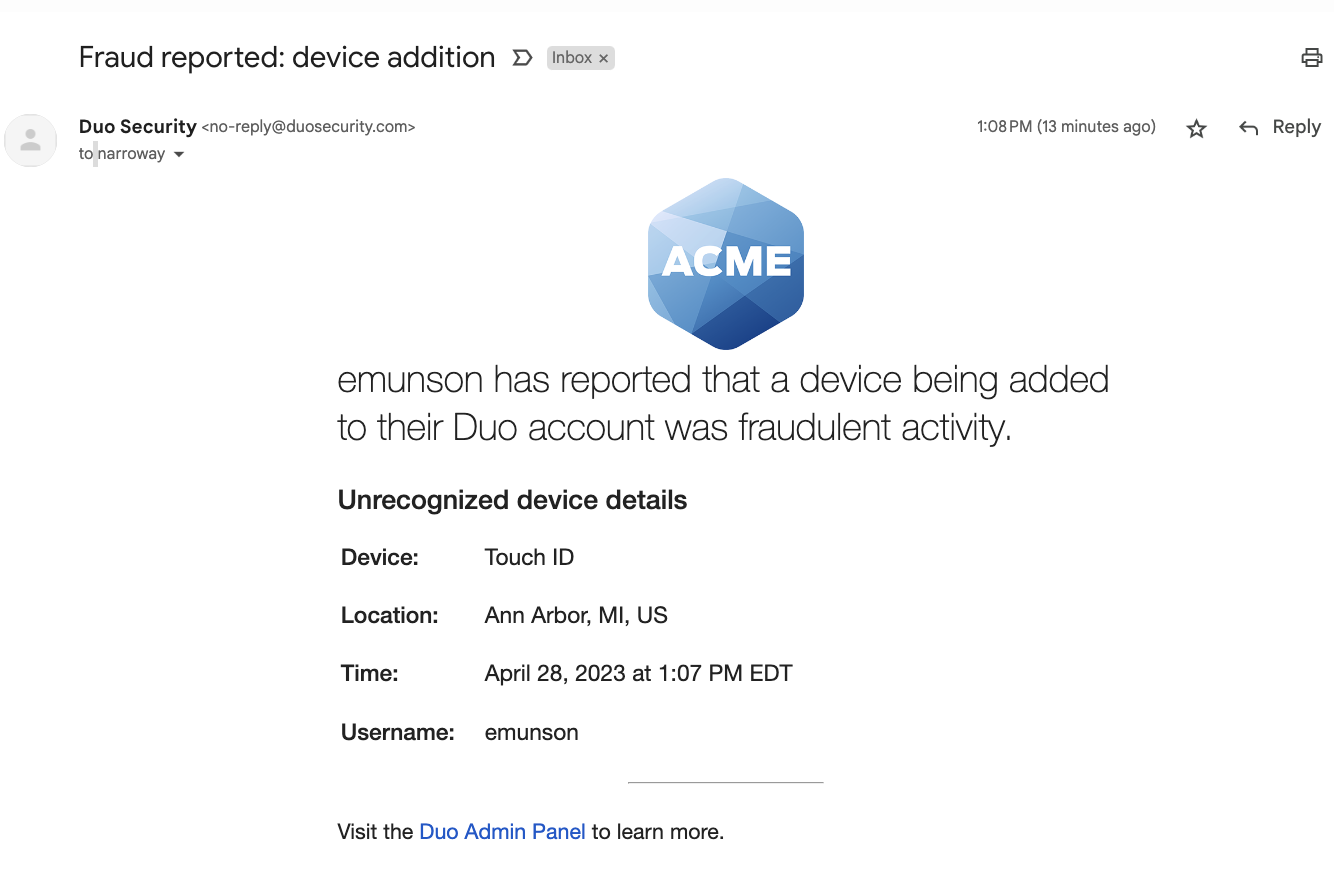
The notifications ask the user if they made the change. If not, they can click or tap No, it wasn't me in the message. This sends an email notification to the recipients configured in the "Notification email" setting in the "Lockout and Fraud" section. If the "Notification email" setting is "Do not notify" then no Duo administrators receive the user's report.
If your organization uses e-mail filtering, be sure to allow the sender no-reply@duosecurity.com. This is the official email address Duo uses to send these types of notifications.
Example: Notification sent via email
Example: Notification sent from Duo Mobile
Example: Notification to Administrator
Admin Role Permissions
Control specific privileges for Duo administrators with a non-Owner role.
User Bypass Status Option for User Managers
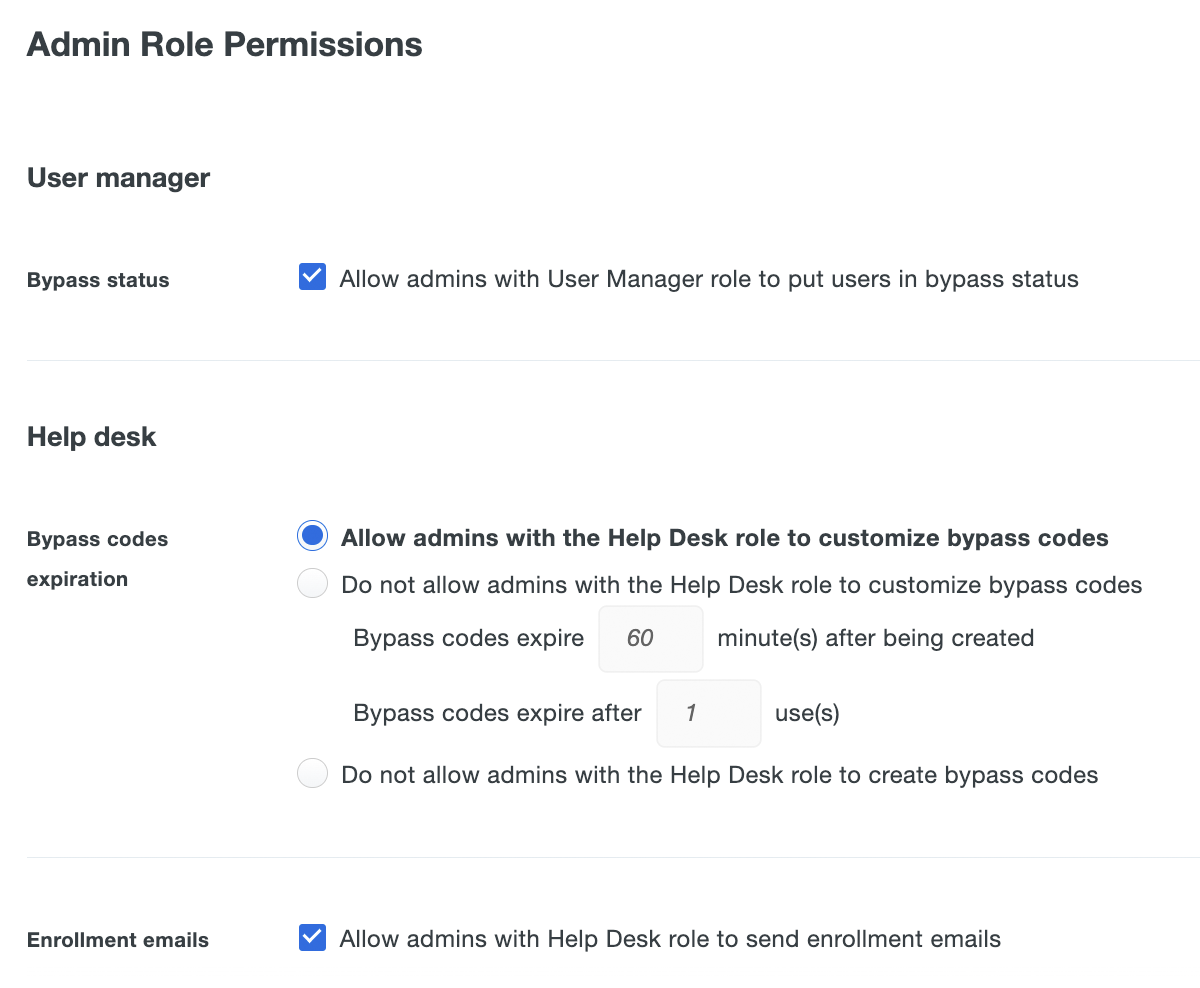
By default, Duo administrators with the User Manager role may apply any of the user status options to a user. Applying "Bypass" status to a user allows that user to skip two-factor authentication when logging in to Duo-protected applications.
Disable the Allow admins with User Manager role to put users in bypass status setting to prevent User Managers from applying "Bypass" status to users
User Managers will still be able to change a user's status from "Bypass" to "Active" or "Disabled" with this restriction in place.
Bypass Code Options for Help Desk Admins
A bypass code is a passcode created as a backup authentication factor when a user's enrolled devices aren't available. Duo admins with the Owner, Administrator, User Manager, or Help Desk roles may create bypass codes for end users.
You may optionally restrict your Help Desk admins' ability to customize bypass codes with the Do not allow admins with the Help Desk role to customize bypass codes setting. Enabling this hides all customization options from the Help Desk, and any bypass codes they create are valid for the number of minutes or uses you specify here.
Prevent your Help Desk admins from issuing bypass codes entirely by enabling the Do not allow admins with the Help Desk role to create bypass codes option under Help Desk settings.
Enrollment Email Option for Help Desk Admins
A user who exists in Duo but has yet to register any two-factor authentication devices must complete enrollment before they can log in to a Duo-protected service or application with 2FA. If your application does not permit inline self-enrollment, Duo administrators with the Owner, Administrator, or User Manager roles can send (or resend) an enrollment email to the user from the Admin Panel.
To permit Duo admins with the Help Desk role to send enrollment emails to users from the Admin Panel as well, enable the Allow admins with Help Desk role to send enrollment emails option under Help Desk settings.
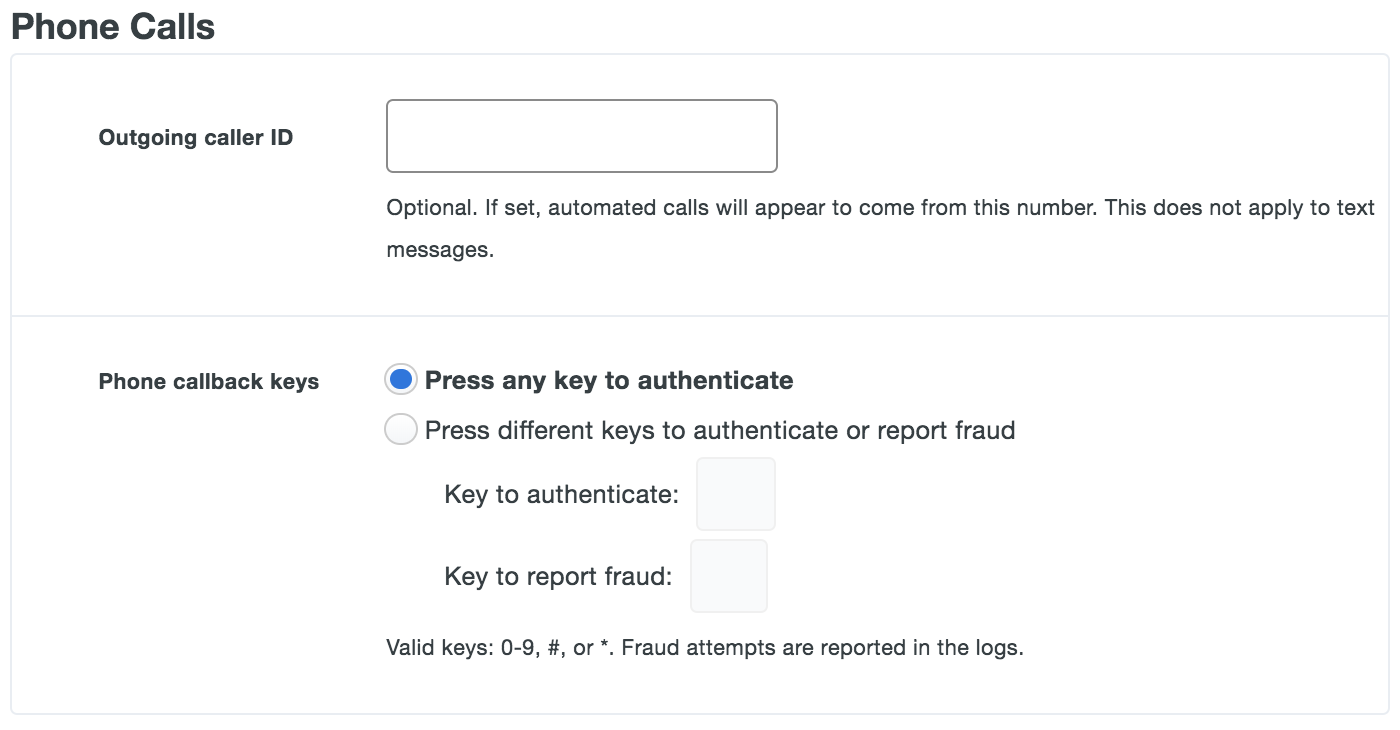
Phone Calls
In the "Phone Calls" section of the Settings page you can customize your users' experience of callback-based second-factor authentication. Set the "Outgoing caller ID" so that automated calls from Duo appear to come from a specific number within your organization (such as main reception or tech support).
Duo's telephony provider partners recognize Duo's callback numbers as legitimate. Be aware that customizing this number from the Duo defaults may cause telephony providers to flag your number as fraudulent and result in failed user authentications.
Due to changes published by the Australian Communications Alliance in publication C661:2020, customizing the outgoing caller ID to reflect your company's phone number is no longer supported in Australia. Avoid configuring a custom caller ID if you have users with Australian phone numbers as calls to these numbers may be blocked and marked as fraudulent.
The default setting allows users to press any key to approve an authentication request. You can customize which keys may be used for authentication approval or reporting fraudulent requests in the "Phone callback keys" section.
SMS Passcodes
In the "SMS Passcodes" section of the Settings page, admins can customize settings related to delivery of Duo SMS text messages to phones.
Customize the message sent to users with SMS passcodes by editing the "SMS message prefix" with your custom text. Anything that is not plain text, like a URL, is stripped from the resulting messages.
Use "SMS batch size" to customize the number of passcodes sent in each batch, up to 10. For additional security, SMS passcodes can be set to expire after a set time with the "SMS expiration" setting.
A new batch can be automatically sent after the last passcode is used or expires, so users are never without an authentication passcode.
Note that when a user requests a SMS passcode from the Universal Prompt it sends a single passcode in the SMS message, regardless of the batch size you set here.
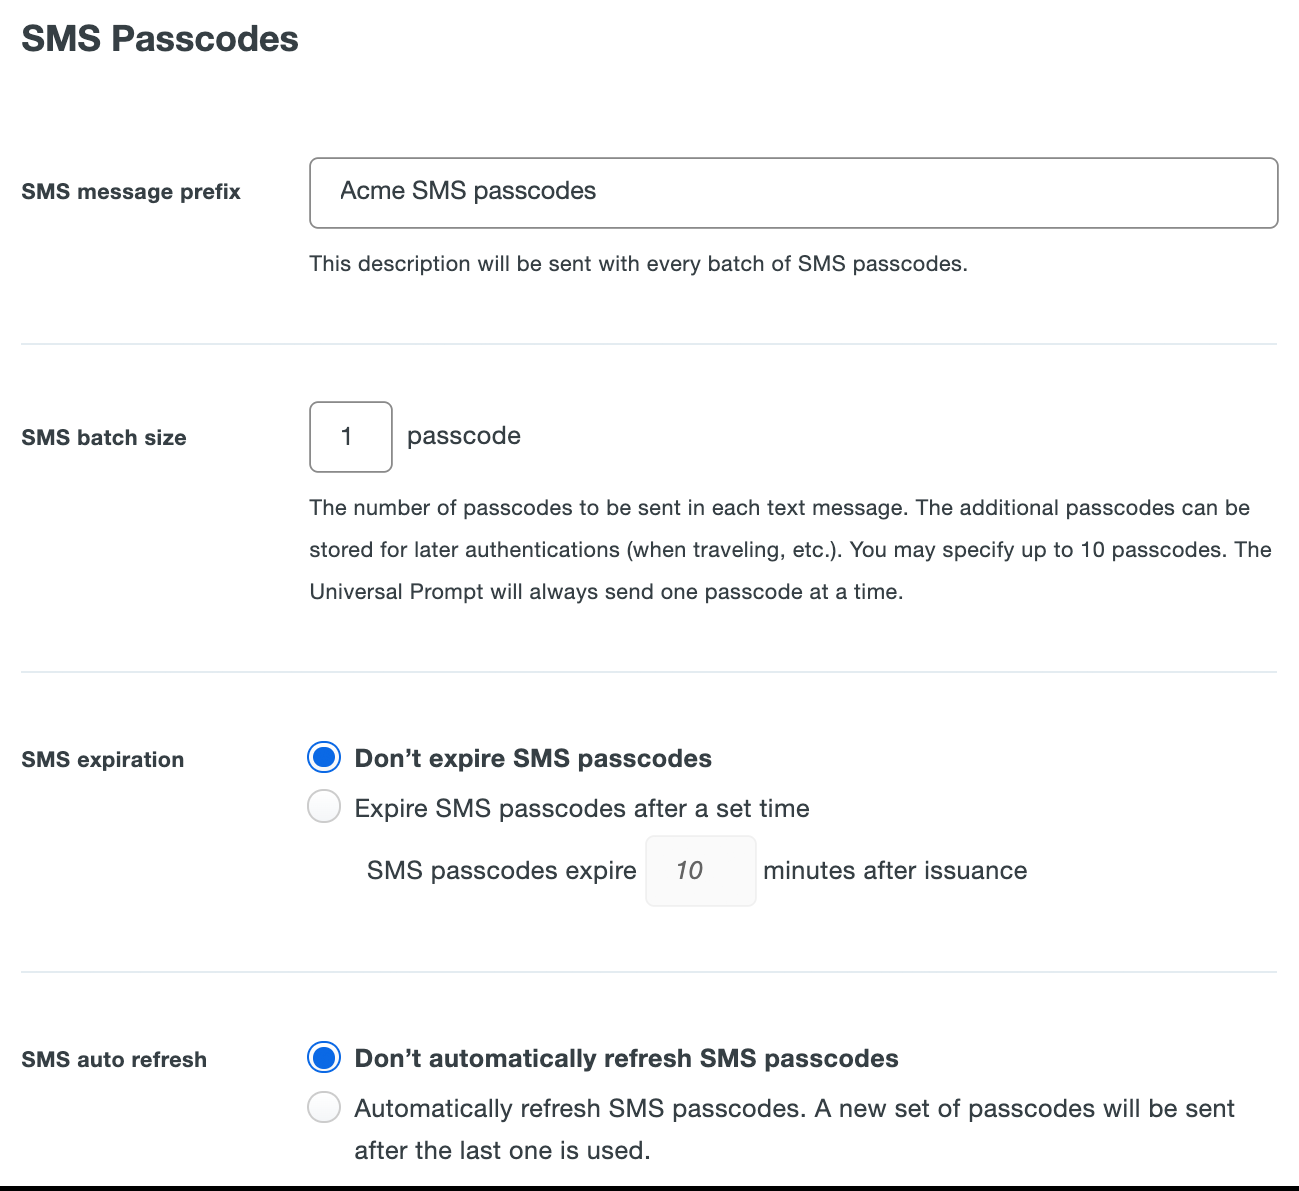
These settings do not affect passcodes used by Duo administrators to log into the Admin Panel.
Lockout and Fraud
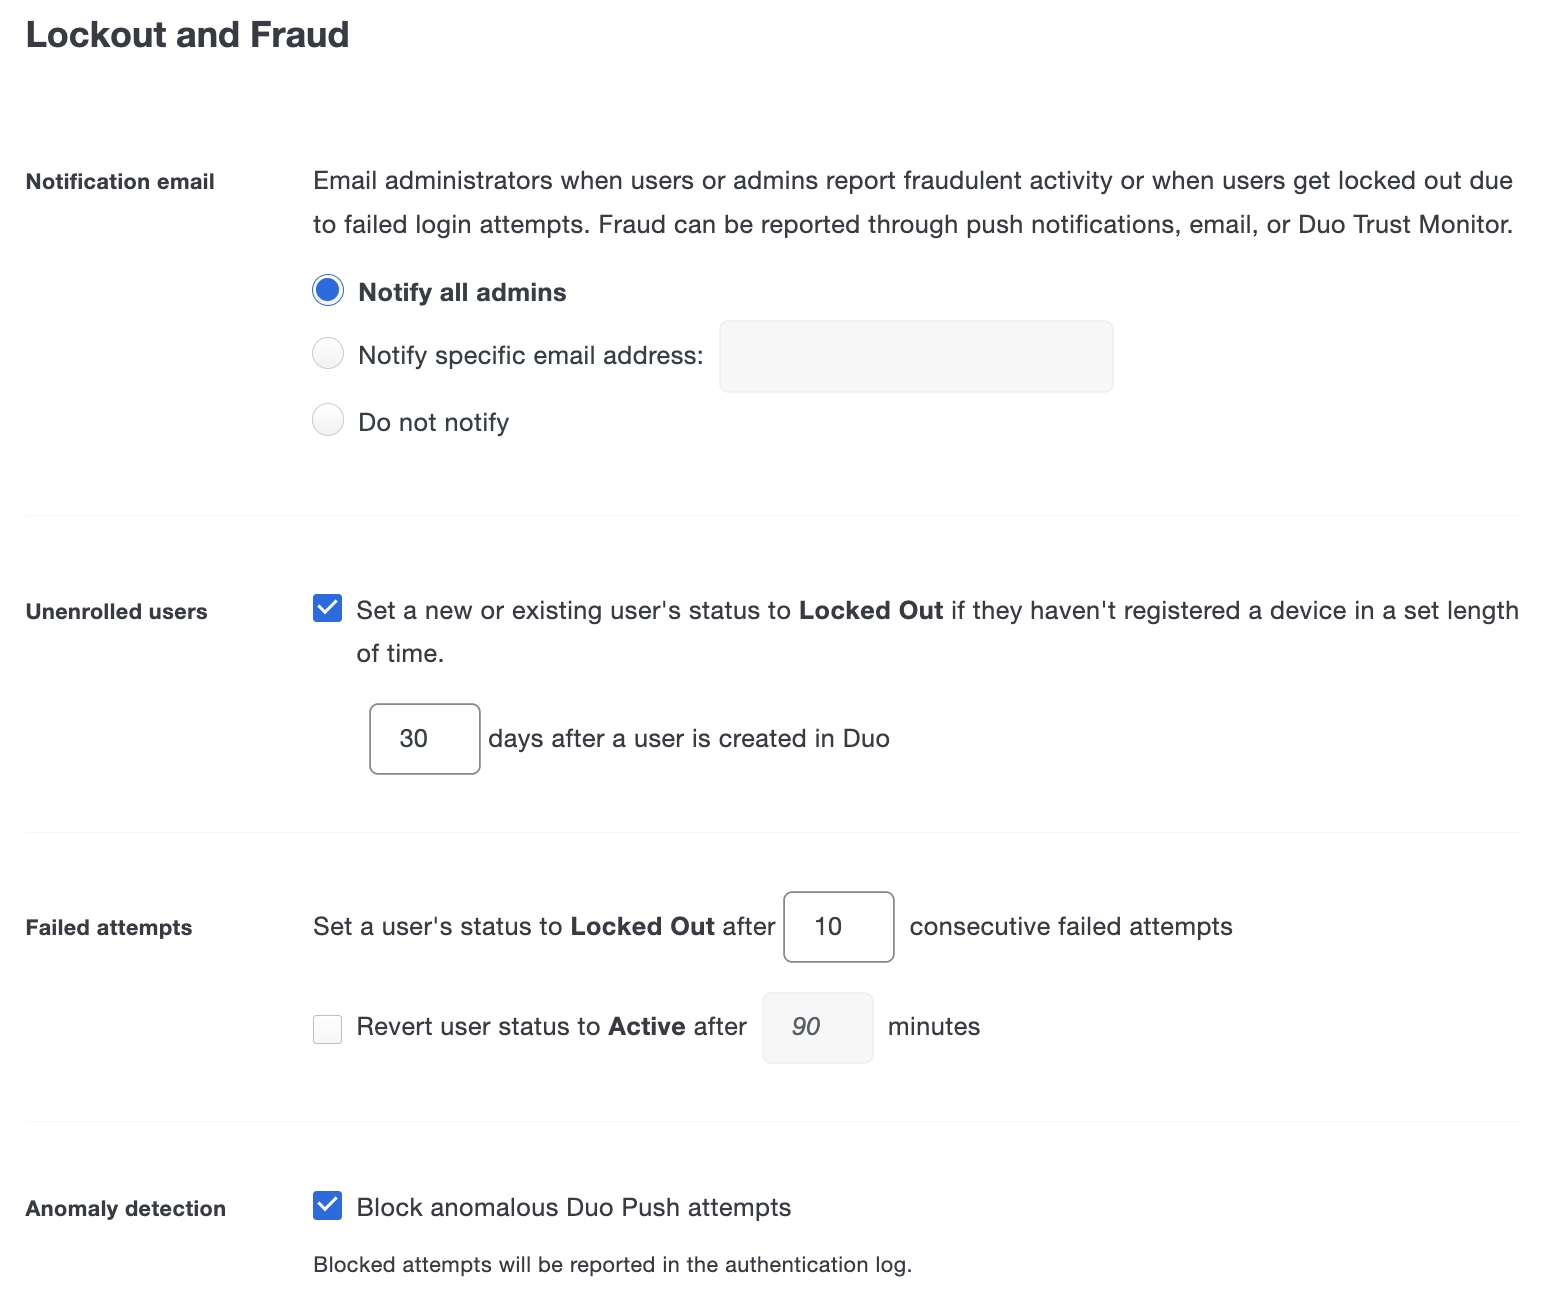
In the "Lockout and Fraud" section of this page, you can specify who to email when a user authentication is reported as fraudulent or when a user's login failures trigger a lockout with the "Notification Email" setting.
The default selection Notify all admins sends an email to all Duo administrators at each user lockout. Notification emails get sent to administrators with "Active" status only. Use the Notify specific email address field to limit which Duo administrators receive lockout notifications or to specify a distribution list. Enable the Do not notify option to send no emails to administrators.
Improve the security of your Duo account by minimizing the number of users that exist with no enrolled authentication methods. Enable the Set a user's status to Locked Out if they haven't registered a device in a set length of time option to automatically lock out users who haven't completed enrollment within the period you specify. We recommend that you set this to 30 days and mention this time frame in any enrollment emails or messages you send to users. If a user is locked out by this process they will need to contact a Duo administrator to have their status changed back to "Active" so they can complete enrollment. Note that when you enable this setting it will act upon any existing unenrolled users who have exceeded the number of days specified.
You can also adjust the number of consecutive failed authentication attempts allowed before the user's account is locked out to prevent brute force attacks with the "Failed attempts" setting. The user lockout counter increments after each failed authentication attempt (such as push timeout or incorrect passcode entered). The default lockout threshold is ten failed attempts.
Select the Revert user status to Active after _ minutes option if you want a Duo user who was locked out due to failed authentication attempts moved back to "Active" status after the specified amount of time. Otherwise, locked-out users may not log in until you manually change that user's status from "Locked Out" to "Active" or "Bypass". This setting has no effect on users locked out for any other reason.
-
Log in to the Duo Admin Panel and click Users in the left sidebar.
-
Select a user by clicking their username. You will see the user's current status in the "Status" section of the user properties page:
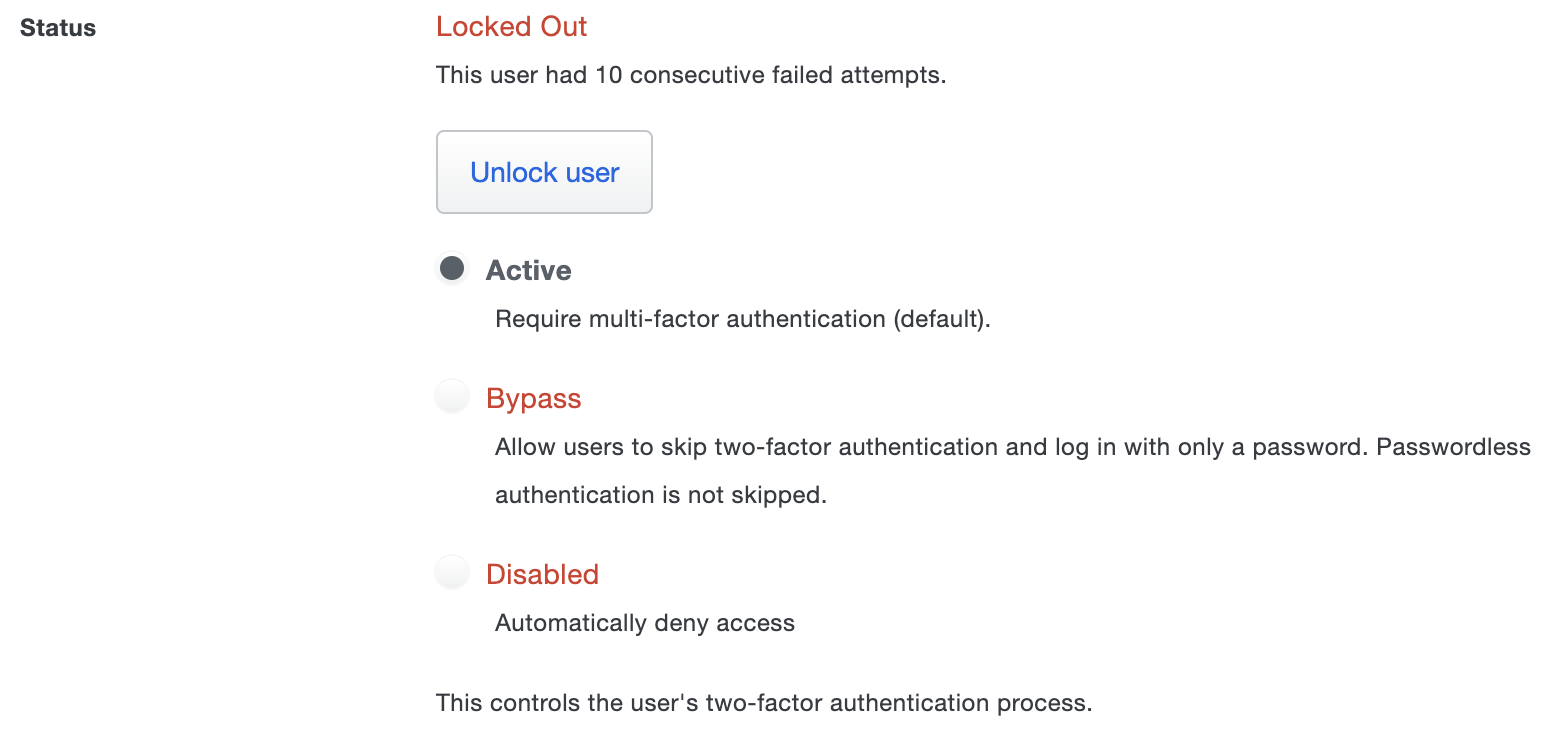
-
Re-enable the user by selecting the desired status, then scroll down and click the Save Changes button.
Enabling the "Anomaly Detection" setting provides enhanced protection from fraudulent authentication requests for Duo Mobile users. Check the box next to Block anomalous Duo Push attempts to activate this option. Anomaly detection prevents Duo Mobile from receiving multiple push requests per user within a short period of time. Users will need to wait one minute before requesting another Duo Push. Authentication Log entries alert administrators to the behavior. Customers who have created automation leveraging two-factor authentication should add delays to their process to avoid triggering anomaly detection.
See Raising the Bar - Anomaly Detection in the Duo Blog for more information about anomalous push detection. If you are unsure of whether to enable this feature, please contact support.
These settings do not apply to Duo administrator accounts. Learn more about administrator lockout here.
You can also enable and disable this feature via the Admin API.
Telephony Credits
Duo's telephony usage includes activation and authentication SMS messages and authentication phone calls for both end users and Duo administrators. Duo debits your telephony credit balance for each authentication call or SMS message sent (as per the rate card). Paid accounts are issued credits yearly, and may purchase extra telephony credits as needed. Duo Free accounts do not receive automatic credit refills, but may purchase additional telephony credits.
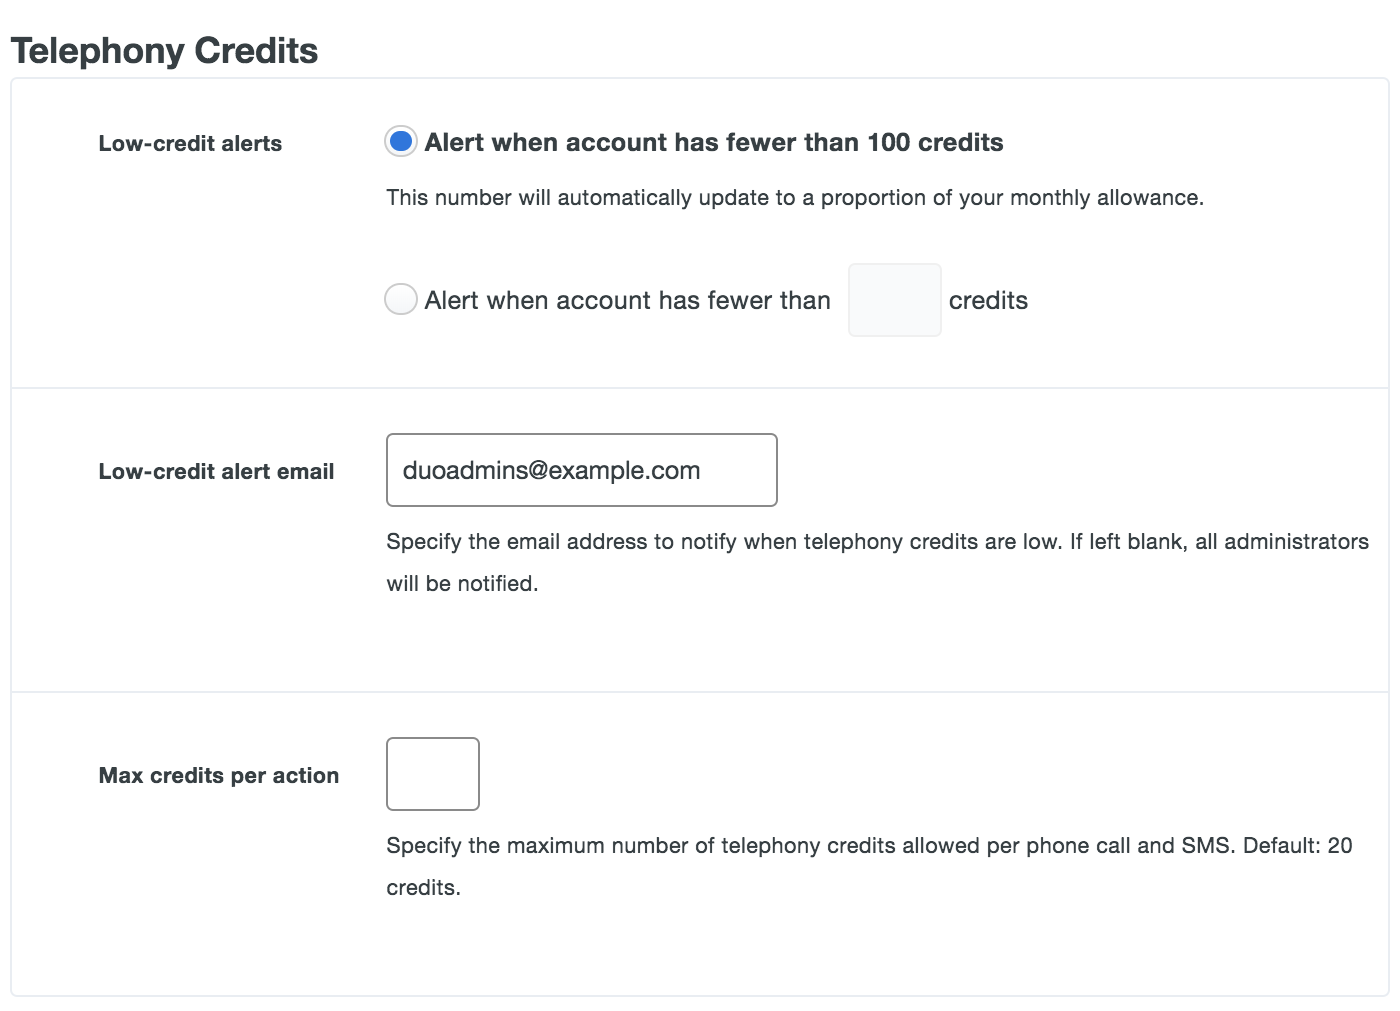
If you ever exhaust your telephony credit balance, your users will not be able to receive authentication phone calls or text messages. To avoid this, Duo automatically notifies all account administrators when the credit balance falls below 20% of your recurring telephony credits allowance, or below 100 credits if you do not have an allowance.
You can configure the credit balance email alert to send notifications at a custom threshold in the "Telephony Credits" section of the settings page. Change the "Low-credit alerts" option to Alert when account has fewer than _ credits and enter a number in the blank to change when the alert gets triggered.
You can also change the low-credit alert email recipient by entering an email address in the Low credit alert email field. If no email is specified then all Duo administrators receive the low-credit alert email.
The rate card shows how many credits each SMS message or telephone call consumes per country. By default, Duo restricts the maximum telephony credits used per transaction to 20 credits. If your users are in locations with more expensive telephony rates you can increase the 20 credit maximum. Conversely, if you know that telephony rates for your users should never exceed a certain amount you may reduce the maximum allowed credits below 20. To raise or lower the maximum credit usage per user authentication, enter the desired number in the Max credits per action box.
User Deletion
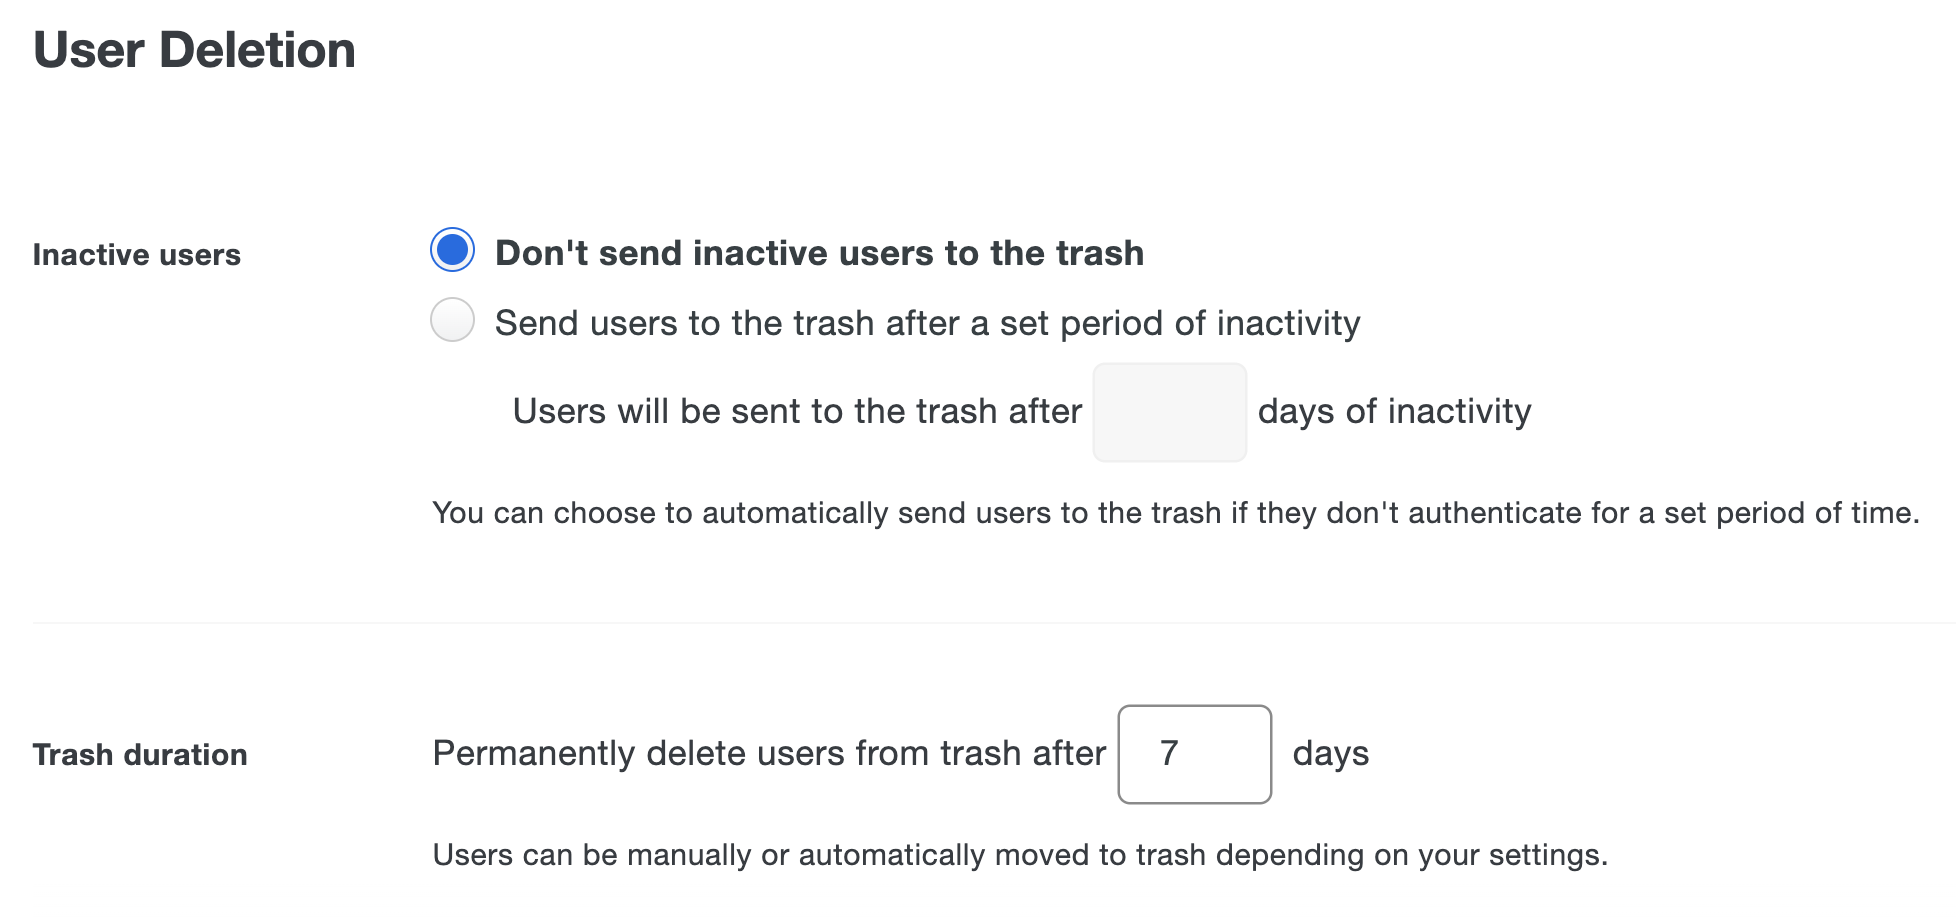
Since Duo is licensed on a per-user basis, you are charged based on the number of users you have in Duo, regardless of their activity. Duo's default behavior with regard to inactive accounts is to do nothing. Admins may choose to automatically remove inactive users from Duo after a set period. To do this, click the radio button next to Send users to the trash after a set period of inactivity and enter the maximum number of days an inactive user will be permitted to remain in Duo (up to 365). The number of inactive days is calculated from the last successful Duo authentication. Failed authentication attempts do not reset the inactivity counter.
If this option is enabled, Duo moves users who do not successfully authenticate for the specified number of days into the "Trash" with a "pending deletion" status as part of a daily process.
You can customize how long a user has a "pending deletion" status by changing the number in Permanently delete users from trash after __ days next to "Trash duration". This can be between 1 to 30 days, the default is 7 days. After the number of days specified in the Trash duration has passed, the user is permanently deleted from Duo.
If you enable user deletion and set the maximum number of inactive days to 90, then going forward, any user whose inactivity counter reaches 90 days will also be put into the Trash for the specified Trash duration, and then permanently deleted at the end of the Trash period. The inactivity counter for a user starts after the setting is enabled.
A user may not log in with Duo while their Duo account is pending deletion. At any time before the Trash duration ends you may restore the user from the Trash. Restoring a user account from the Trash doesn't change the user's status; you'll need to update the user's status back to "active" or "bypass" before they can log in.
If you restore the user account but the user still does not log in to Duo, then the account will be sent to the Trash once again for inactivity.
A user deleted by the system for inactivity will need to re-enroll in Duo in order to authenticate again.
User deletion doesn't apply to users managed by Directory Sync. Those users remain in Duo as long as they're present in the source directory groups selected in your directory sync configuration. When you remove users from all groups you've synced to Duo in the source directory, the next scheduled sync places those users into the Trash for the Trash duration.
Duo Mobile App
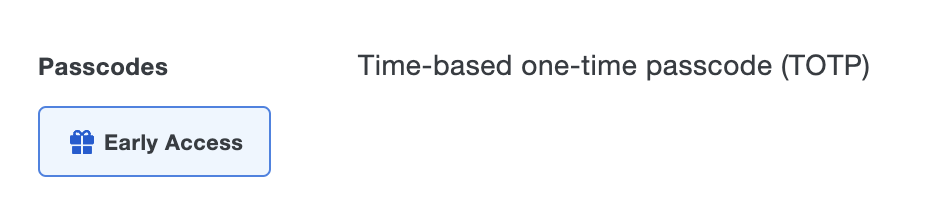
Passcodes
One-time passcodes (OTP) are temporary passcodes that can be generated in Duo Mobile. OTP codes can be used to log in to Duo-protected applications if Duo Mobile passcodes are an allowed authentication method. There are two types of OTP, hash-based message authentication code one-time passcodes (HOTP) and time-based one-time passcodes (TOTP). HOTP codes only expire once they're used. TOTP codes expire once they are used or after 30 seconds.
Because unused HOTP codes do not expire, we recommend you switch to TOTP codes as soon as possible for increased security. HOTP codes that were previously phished could be used by an attacker later.
Change Passcodes Setting
Use the Passcodes setting to change the type of OTP generated by Duo Mobile. Users must be running Duo Mobile 4.49.0 or newer to generate TOTP codes. If a user's device is running Duo Mobile 4.48.0 or older, then Duo Mobile will still generate HOTP codes, regardless of any of the options in this setting. If you choose to discontinue HOTP support permanently, all HOTP codes will be rejected.
Duo administrator accounts in Duo Mobile 4.49.0 and later automatically generate TOTP codes, regardless of this setting. If an administrator is running an older version of Duo Mobile, HOTP codes will be generated. The Duo Admin Panel will accept both HOTP and TOTP codes until "Discontinue HOTP support permanently" is selected. Once HOTP codes are permanently disabled, the Duo Admin Panel will not accept HOTP codes.
This setting does not affect OTP hardware tokens.
Choose from these passcode settings options:
- Do not generate TOTP codes in Duo Mobile: Only HOTP codes are generated in Duo Mobile for all end users. Duo-protected applications accept only HOTP codes. This is the default option.
- Generate TOTP codes in Duo Mobile for specific groups: Only certain user groups have TOTP codes generated in Duo Mobile, all other users have HOTP codes generated. To select which groups, click the drop down next to User Groups and select the desired groups. Both TOTP and HOTP codes are accepted for Duo-protected applications.
- Generate TOTP codes in Duo Mobile for all users: Duo Mobile 4.49.0 and newer generate TOTP codes only. Older Duo Mobile versions continue generating HOTP codes. Both TOTP and HOTP codes are accepted for Duo-protected applications.
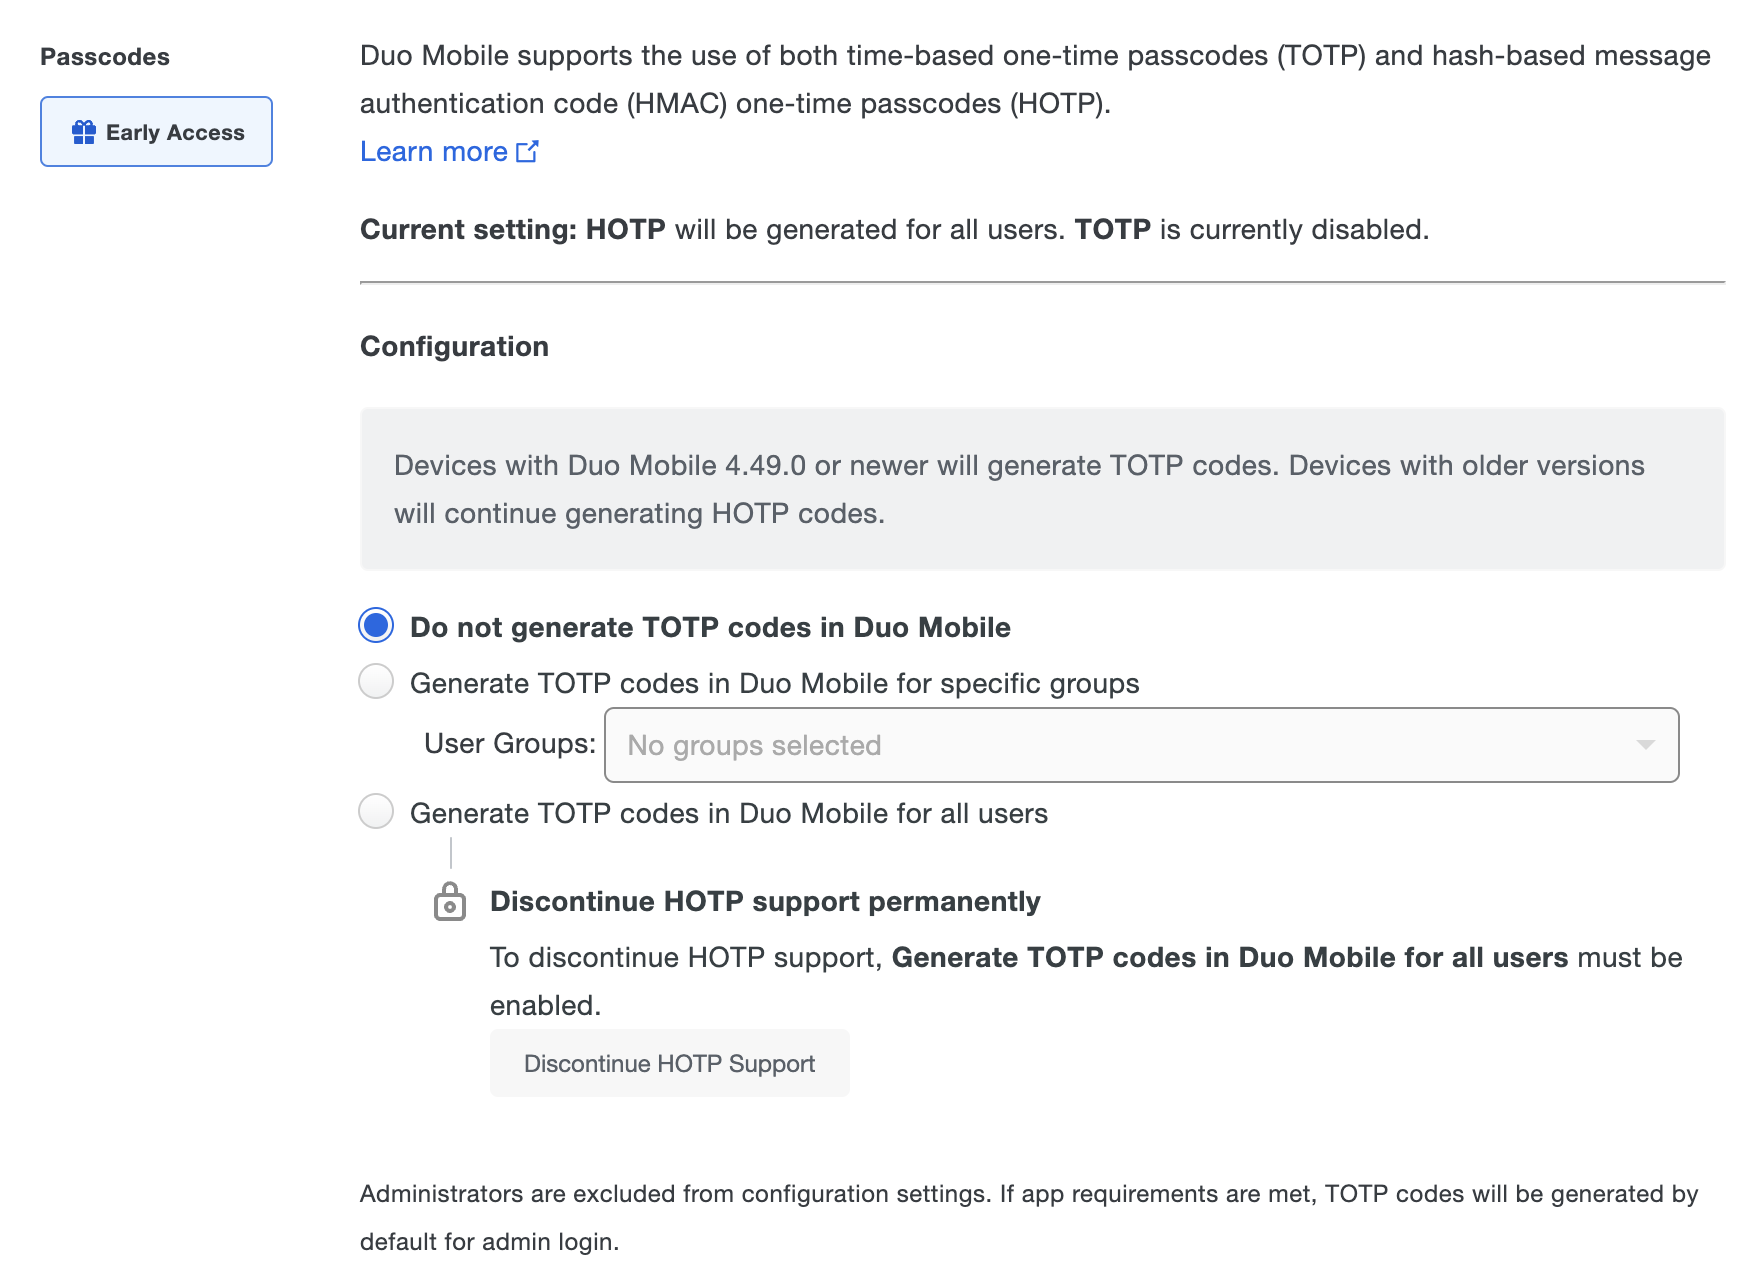
Disabling HOTP codes is a permanent change! All Duo-protected applications and the Duo Admin Panel will only accept TOTP codes. All HOTP codes will be invalid. Only enable this once you are sure all users and administrators are running Duo Mobile 4.49.0 or newer!
To discontinue HOTP support permanently for all Duo-protected applications and the Duo Admin Panel:
-
Click the Discontinue HOTP Support button.
-
In the pop-up window, check the box next to Yes, I want to permanently disable HOTP support for all users and then click Yes, discontinue HOTP support.
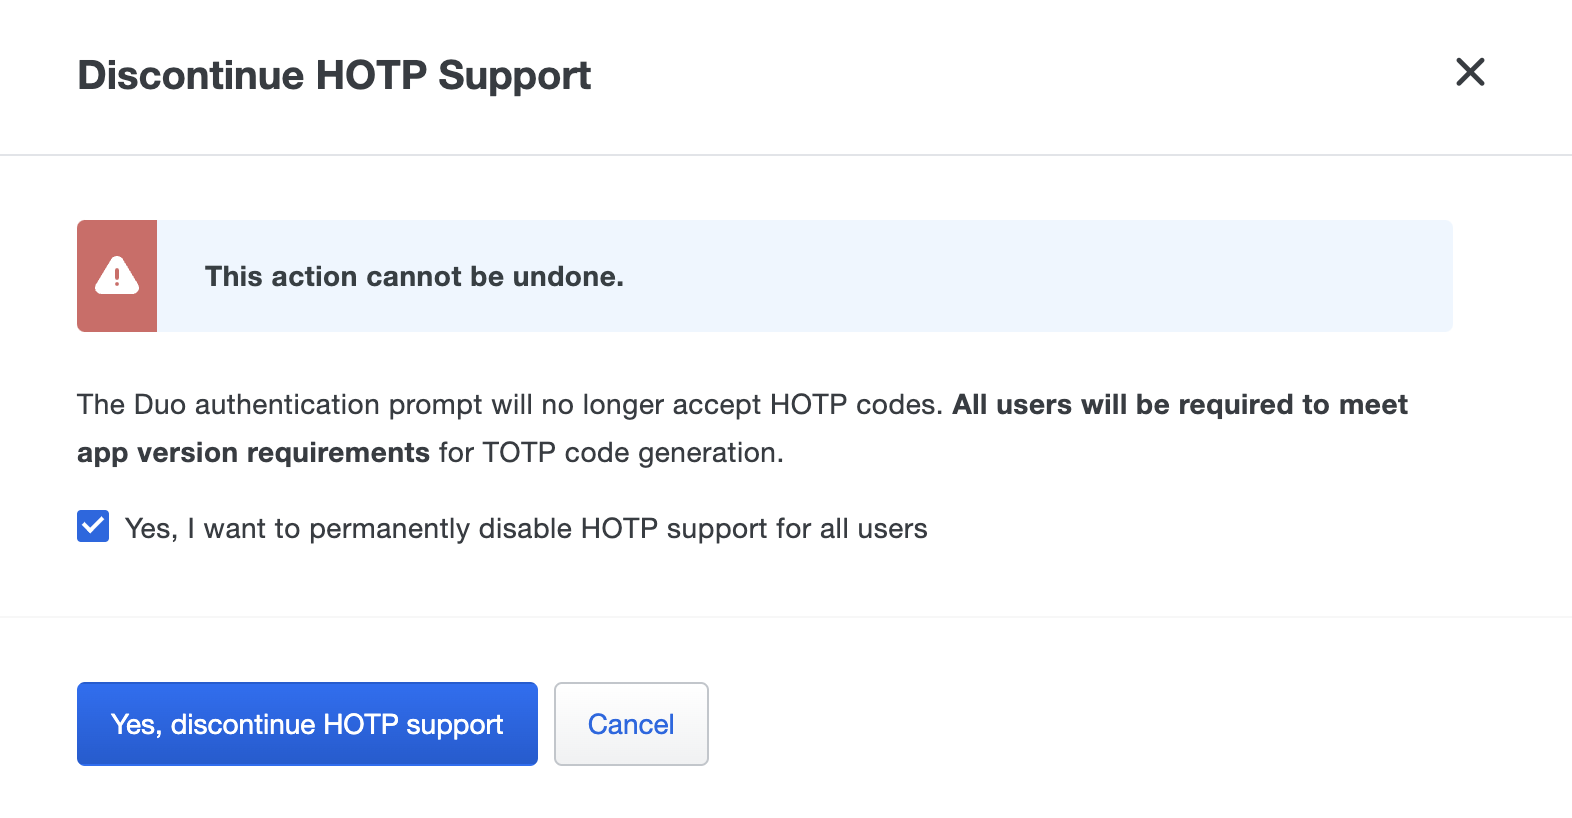
Click the Cancel to make no changes to HOTP code support.
-
Click the Save Changes button at the top of the page.
The passcodes setting options will disappear once HOTP support is permanently disabled. Only TOTP codes will be accepted for all Duo-protected applications and the Duo Admin Panel. Any end user and administrator with Duo Mobile 4.28.0 or earlier must use a different authentication method.
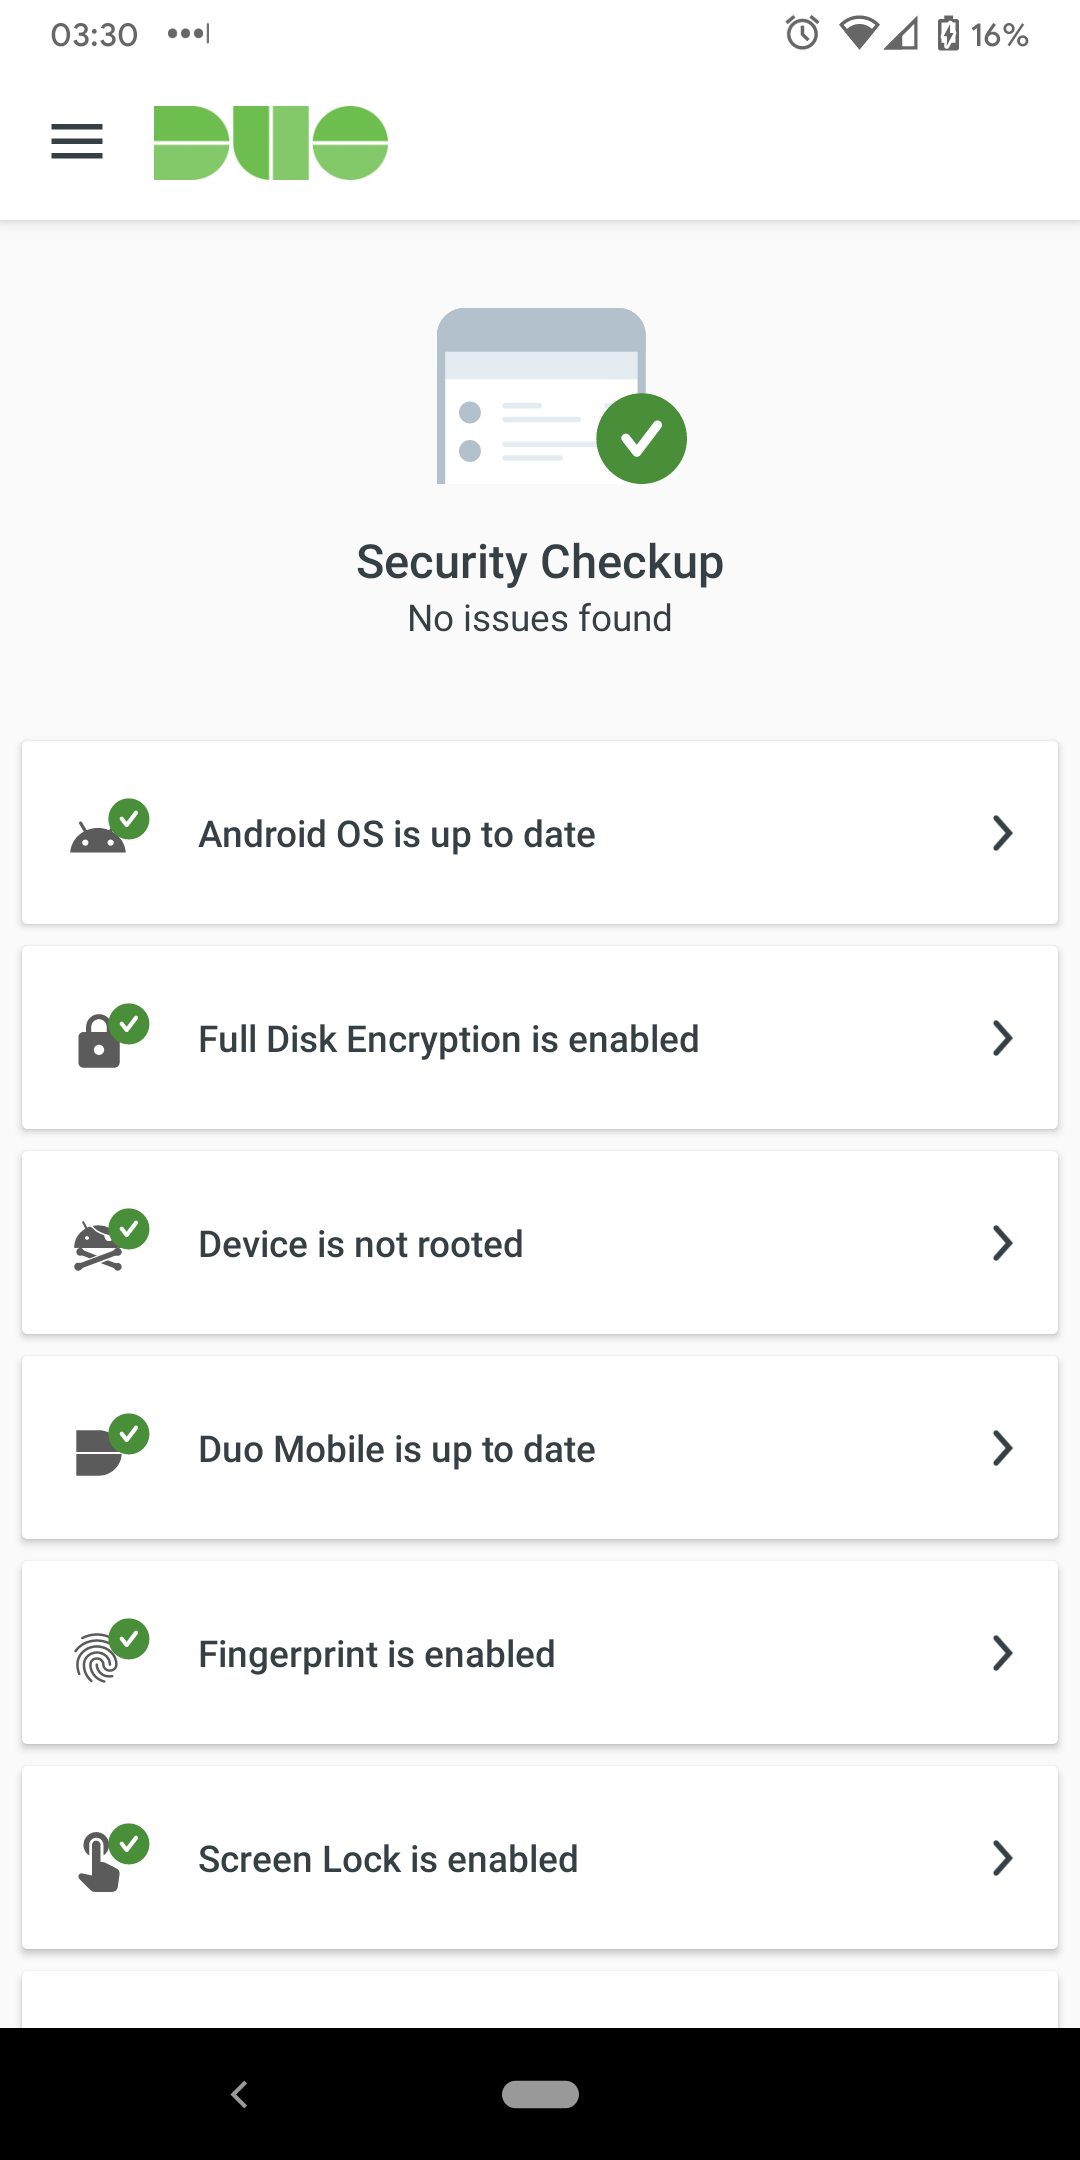
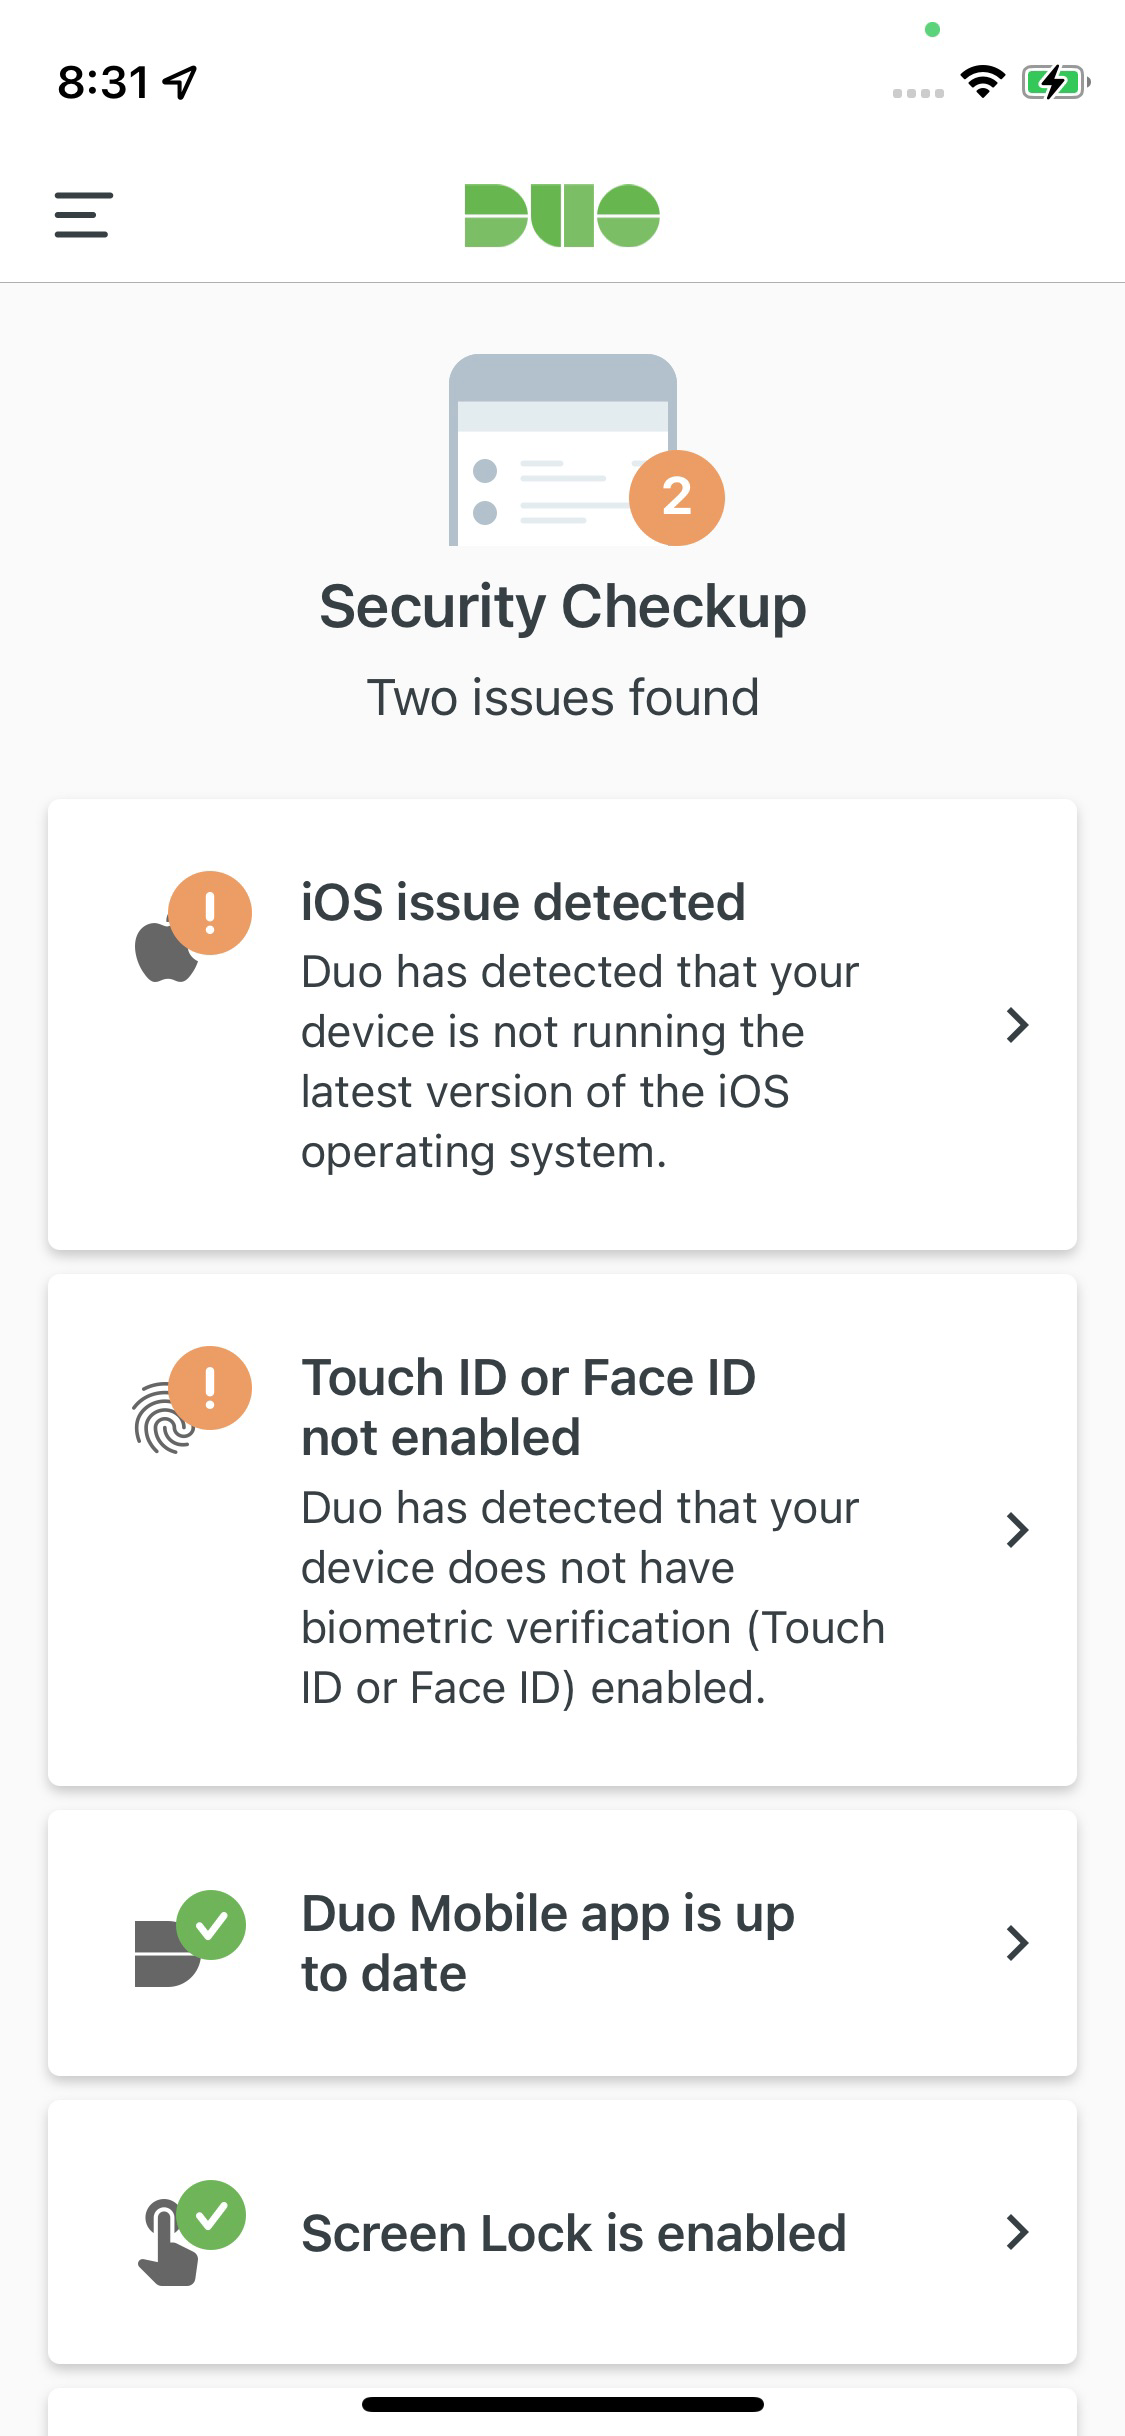
Security Checkup
The Duo Mobile app's Security Checkup feature checks and reports on a user's iOS or Android device security hygiene in the application itself. Potential device security issues, like an outdated operating system or lack of screen lock, are flagged within Duo Mobile for action by the user. The Security Checkup is enabled by default. You can change this on the Settings page.

Security Checkup always verifies device settings against Duo's recommended security settings, regardless of any authentication device policy settings you've created. For instance, Security Checkup flags rooted status on an Android device whether you've enabled a policy that blocks authentication from rooted or jailbroken devices or not.
Security Checkup doesn't block users from authenticating if it does find any issues with a user's phone. Be sure to implement Duo policy restrictions to prevent access and authentication for users with device security issues.
With Security Checkup enabled, Duo Mobile checks these device attributes:
Android Devices
- Operating system up to date
- Duo Mobile app up to date
- Full Disk Encryption enabled
- Screen Lock enabled
- Device not rooted
- Passes Google Play Integrity Attestation
- Fingerprint enabled
iOS Devices
- Operating system up to date
- Duo Mobile app up to date
- Screen Lock enabled
- Device not jailbroken
- Biometric verification enabled
Security Checkup notifies users about detected issues via a pop-up at the bottom of the app screen, which they can tap to see more information. End users can always view their device's security posture from within the Duo Mobile app. On iOS go to Menu → Security Checkup and on Android go to Menu → Settings → Security Checkup.
Example: Android device with all recommended settings
Example: iOS device without all recommended settings
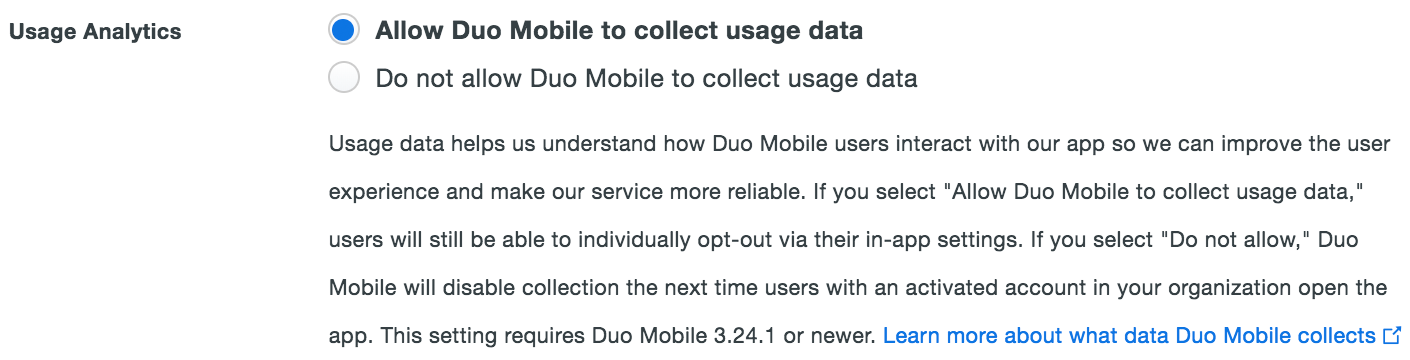
Usage Analytics
Duo Mobile collects usage analytics and crash reporting information that we use to improve our service. Individual end users may opt-out of sending usage data at any time from within the Duo Mobile app's settings. Learn more about what information Duo collects and how we use it.
You can disable Duo Mobile usage analytics and crash reporting collection at an organizational level by changing the "Usage Analytics" setting to Do not allow Duo Mobile to collect usage data. This change becomes effective the next time a user opens Duo Mobile.
Muted Push
To help prevent push harassment, Duo allows users to temporarily pause Duo Push notifications. Muted push is triggered when a user receives a push, denies it, and marks it as fraudulent in the Duo Mobile app. After a push is marked as fraudulent, Duo Mobile won't show any push notifications for the next 20 minutes. If the user is in a muted state, they can still authenticate even though their push notifications are muted. Users can approve a muted push by opening the Duo Mobile app and approving the pending authentication.
In the authentication log, muted pushes will show Muted due to previous user-marked fraud.
This setting is enabled by default and applies to normal push notifications and verified Duo Push notifications. To disable muted push for your users, select Don't pause Duo Push notifications temporarily after user marks a Duo Push as fraudulent on Duo Mobile.

Duo Mobile Instant Restore
Instant Restore enables account recovery of "Duo-Protected" accounts (accounts used to approve logins for Duo-protected applications and services) and "Duo Admin" administrator login accounts when a Duo Mobile user gets a new iOS or Android device. To enable it, select Allow Instant Restore for Duo Mobile on Android and iOS. Then, instruct your iOS users to ensure that iCloud Keychain is enabled on the iOS devices where they use Duo Mobile. Android users should toggle on the Backup accounts with Google Drive option in Duo Mobile and follow the in-app prompts to connect to Google Drive to store their app backup.
You can export user activity logs for Instant Restore as a CSV file by clicking the Export button.

When users with account backups open Duo Mobile on their new device, they can tap Get My Account Back to begin the Instant Restore process. Android users must have their old device available to scan a QR code generated on that device to transfer the information to the new device.
iOS users don't need their old device available to complete the restore, but we do push a restore notification to the old phone. If the user did indicates they did not initiate the restore action, Duo deactivates both the old and the new iOS devices and emails the Duo administrators configured to receive Lockout and Fraud alert emails.
Successful Instant Restore deactivates the "Duo-Protected" and "Duo Admin" accounts on the old device.
Note that Instant Restore does not restore third-party OTP accounts in Duo Mobile nor deactivate third-party accounts on the old device. Users should still enable third-party account recovery in Duo Mobile to restore third-party OTP accounts with a recovery password.
Users who leave your organization still retain the Duo Mobile account backups until they delete the accounts or remove the backup. Disabling/deleting the user's account in Duo as part of your offboarding process prevents use of any restored Duo Mobile accounts, as they will remain disconnected.
Instant Restore requires Duo Mobile for Android 3.32.0 or later and Duo Mobile for iOS 3.33.0 or later.
Duo Mobile Restore
Duo Restore for the Duo Mobile app is a legacy recovery implementation that gives your end users the ability to backup Duo account information from the Duo Mobile app to Google Drive (Android devices) or iCloud (iOS devices). They can use this saved backup information to recover those Duo accounts to a replacement device of the same platform as the original backup via accessing a designated Duo-protected application.
Duo Restore differs from the self-service portal feature as follows:
- Any edition may use Duo Restore, even Duo Free.
- Duo Restore does not require enabling the self-service portal on any application.
When enabling Duo Restore, you'll designate a specific Duo-protected application to use with this feature. Users need to perform primary authentication as required by that designated application, plus Duo authentication using any other factor available to them, such as phone call approval, a hard token or SMS passcode, an administrator-issued bypass code, etc. As such, we don't recommend selecting an application to use with Duo Restore that also has an authentication methods policy applied which restricts use of factors other than Duo Push, as this prevents user recovery of accounts using Duo Restore to a new device unless your users typically have a second device already activated for Duo Push.
To enable Duo Restore:
- Select a web-based application you're already protecting with Duo from the drop-down list.
- Provide the URL of the application chosen in step 1 in the space provided.
- Click the Save Changes button at the top right of the Settings page.
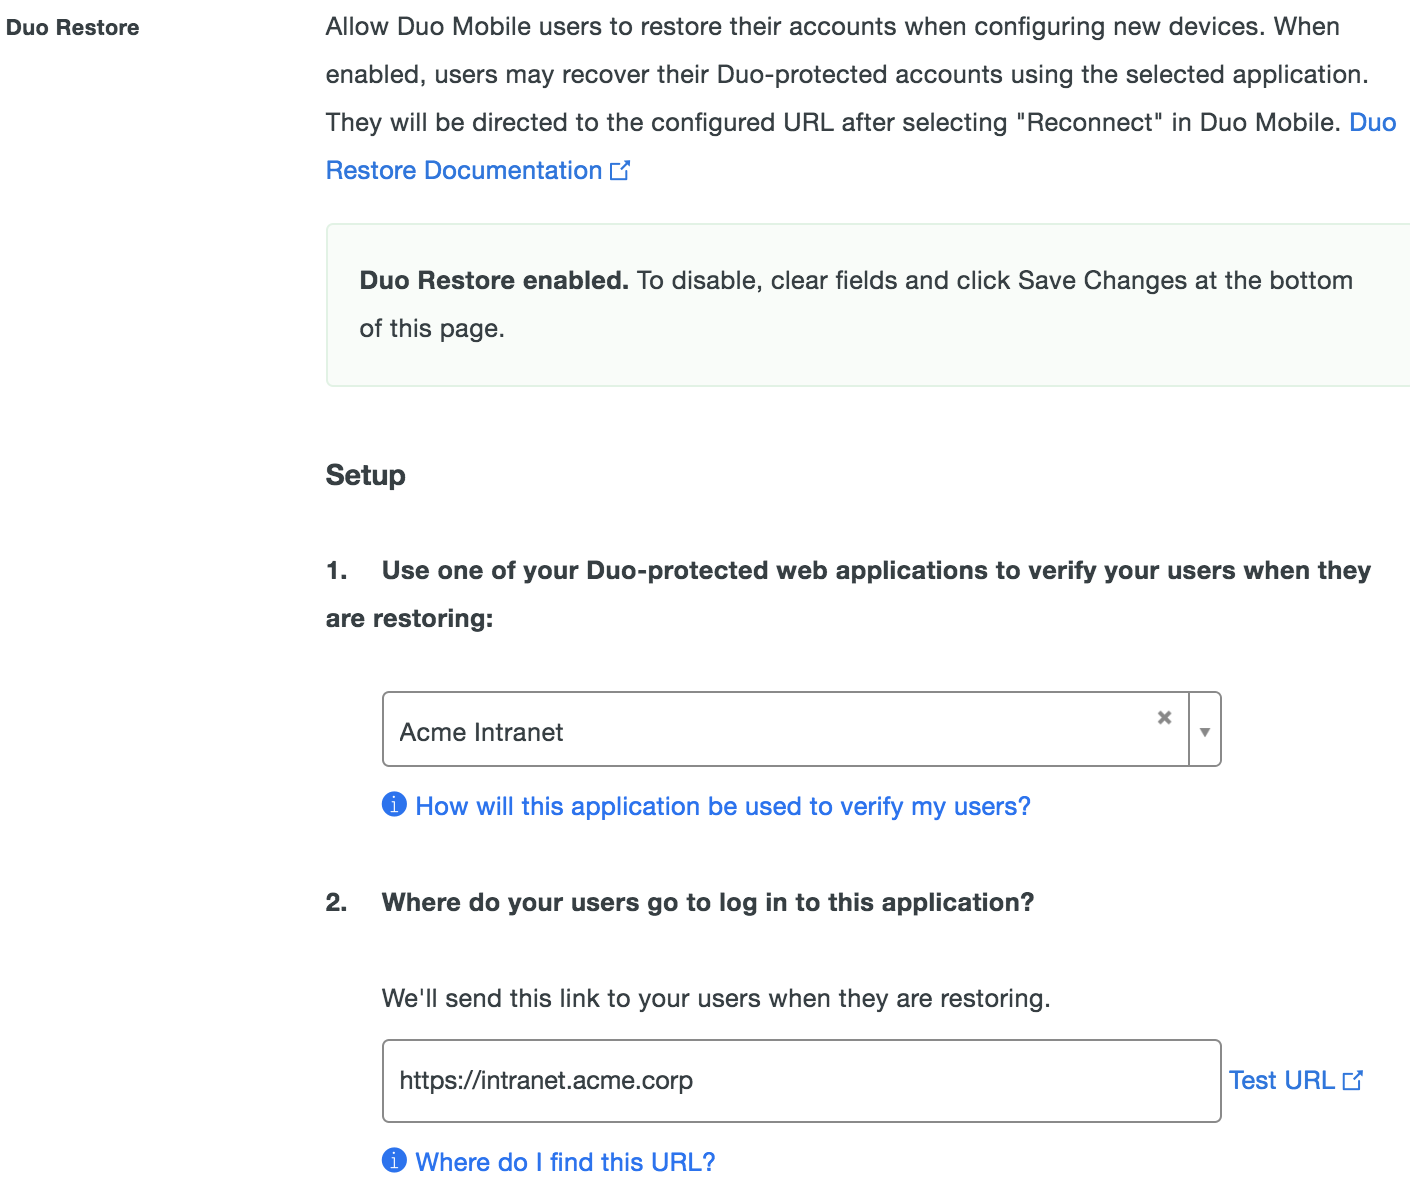
Once you enable Duo Restore your end users can avail themselves of the Duo Mobile app's account recovery options after installation on a new device. Successful Duo Restore deactivates the "Duo-Protected" and "Duo Admin" accounts on the old device.
To learn more about the Duo Restore experience for end users, see the Duo Restore page in the end-user guide.
Please note that Duo's app account backup and restore will not restore any third-party service accounts (where users scanned a QR code to enable 2FA on an external service like Facebook or Twitter) to a replacement device. After completing Duo Restore on a new device, a user needs to manually reactivate the Duo app for any third-party services. Note that an iOS user who backs up their device to iCloud can restore both Duo and third-party accounts to the same device. This is not possible for Android devices.
Third-Party Account Restore
Neither Instant Restore nor Duo Restore restore third-party OTP accounts. Be sure to advise your users to set up backups for these third-party accounts in Duo Mobile no matter which Duo account restore option you choose for your organization. Additionally, ensure that users are aware that while restoring Duo-protected and Duo admin accounts to a new device deactivates those accounts on the old device, restoring third-party accounts to a new device does not deactivate those OTP accounts on the old one, so the old device could still be used to generate login passcodes for those third-party services. The user should delete those accounts from Duo Mobile on the old device, or delete the app on the old device.
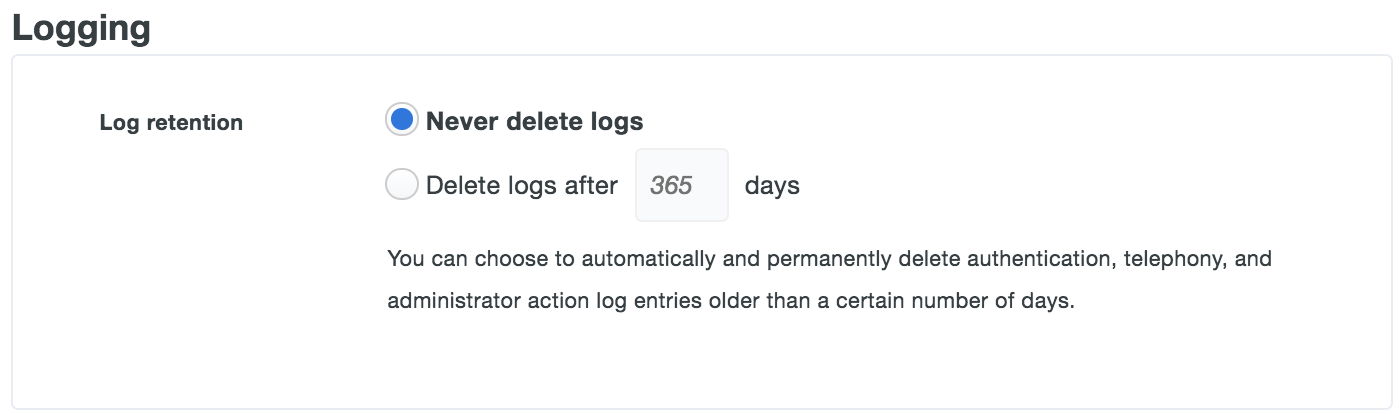
Logging
By default, Duo authentication, telephony, and administrator action log entries are retained indefinitely. The "Logging" settings allow you to specify a retention period by selecting the Delete logs after _ days option and entering the maximum number of days to retain the log entries. When this option is set to delete, log entries older than the given number of days are purged. This setting becomes effective as soon as you save it; immediately deleting log information beyond the days specified.
Note that the log retention setting does not change the 180 day limitation for viewing and retrieving log information in the Duo Admin Panel, exported reports, or via Admin API.
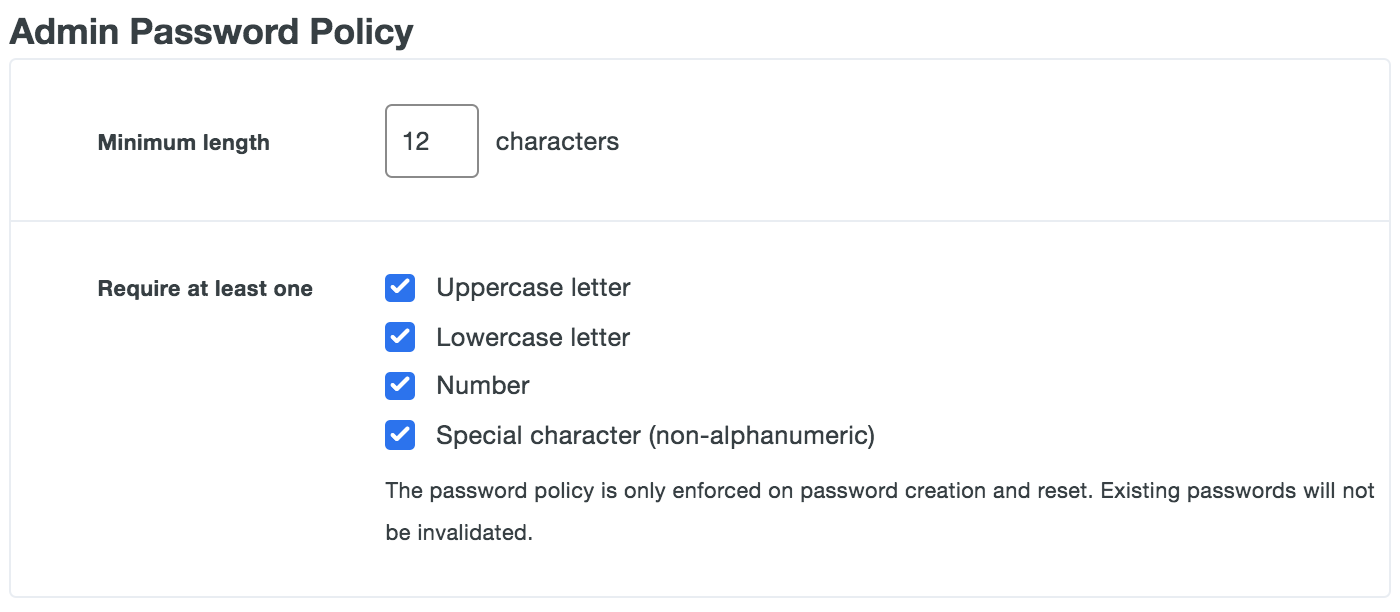
Admin Password Policy
The "Admin Password Policy" settings define the length and strength requirements for Duo administrative user passwords. The default setting for new Duo customers requires administrator passwords with a minimum length of 12 or more characters. Existing Duo customers who currently have the minimum password length set to a value less than 12 may increase this value incrementally, but once increased may not decrease it.
To change the minimum password length to a value greater than the default, enter the desired number of characters in the Minimum length box.
To enforce password complexity, next to the Require at least one option select any combination of uppercase letter, lowercase letter, number, or special character. We recommend enabling these complexity requirements to ensure administrators choose strong passwords.
Troubleshooting
Need some help? Try searching our Knowledge Base articles or Community discussions. For further assistance, contact Support.