
Contents
Duo integrates with Okta to offer inline user enrollment, self-service device management, and support for a variety of authentication methods — such as passkeys and security keys, Duo Push, or Verified Duo Push — in the Duo Universal Prompt.
Overview
Duo Security’s authentication platform secures access to Okta, extending two-factor protection to applications launched from an Okta browser session.
If you want to update an existing Okta MFA factor showing the traditional Duo Prompt to an Okta OIDC factor showing the Duo Universal Prompt then please review the Migration from Duo MFA Factor to Duo OIDC Factor information.
Prerequisites
Okta Requirements
Ensure your Okta tenant has the features necessary for Duo as an OIDC factor. Without these features in place you may not see all the options and settings needed for configuration.
-
Okta Classic customers - Contact Okta Support and request that they enable these features in your Okta tenant to allow use of the Open ID Connect IdP identity provider:
- TOP_WINDOW_REAUTH_FROM_ENDUSER_SETTINGS
- STATE_TOKEN_ALL_FLOWS
- CLAIMS_AS_FACTOR
- GENERIC_OIDC_IDP
-
Okta Identity Engine customers - You should already have the required features enabled in your Okta tenant. If unsure, confirm with Okta Support.
Custom factor-only identity providers and sign-on policies created for Duo in Okta Classic should remain intact through an Okta Identity Engine tenant migration. If you have concerns about your upcoming platform migration please contact Okta support.
Duo Requirements
Duo MFA for Okta with Universal Prompt is available to Duo Premier, Duo Advantage, and Duo Essentials commercial plans. Duo Federal plans do not include support for the Duo custom OIDC IdP factor solution. Deploy the traditional Duo Prompt Okta MFA Factor configuration instead.
This application communicates with Duo's service on SSL TCP port 443.
Firewall configurations that restrict outbound access to Duo's service with rules using destination IP addresses or IP address ranges aren't recommended, since these may change over time to maintain our service's high availability. If your organization requires IP-based rules, please review Duo Knowledge Base article 1337.
Effective June 30, 2023, Duo no longer supports TLS 1.0 or 1.1 connections or insecure TLS/SSL cipher suites. See Duo Knowledge Base article 7546 for additional guidance.
Migration from Duo MFA Factor to Duo OIDC Factor
Plan to migrate your users to the new Duo OIDC IdP factor with Duo Universal Prompt from the legacy Duo Security MFA factor (with traditional Duo Prompt) in stages. When both the IdP factor and the Duo Security MFA factor are active, then users subject to an effective sign-on policy that requires multifactor will see both the traditional Duo Prompt factor and the new Duo OIDC factor available for them to use in Okta.
The recommendation from Okta is to leave your existing Duo Security MFA factor intact and create a new Okta application in Duo to use for the IdP factor. Then, pilot enrollment in both the legacy Duo Security factor and the new Duo OIDC IdP factor in Okta with expanding groups of users. When your users have completed registration of the new Duo OIDC factor in Okta, you can phase out the original Duo Security MFA integration and disable the "Duo Security" legacy factor..
Educating your users about what to expect during the migration period is essential to your success. Contact Okta support for assistance with planning sign-on policies and rules to support your migration.
First Steps
- Sign up for a Duo account.
- Log in to the Duo Admin Panel and navigate to Applications.
-
Click Protect an Application and locate the entry for Okta in the applications list. Click Protect to the far-right to configure the application. and get your Client ID, Client secret, and API hostname. You'll need this information to complete your setup. See Protecting Applications for more information about protecting applications in Duo and additional application options.
Previously, the Client ID was called the "Integration key" and the Client secret was called the "Secret key".
The security of your Duo application is tied to the security of your secret key (skey). Secure it as you would any sensitive credential. Don't share it with unauthorized individuals or email it to anyone under any circumstances!
Duo Universal Prompt
The Duo Universal Prompt provides a simplified and accessible Duo login experience for web-based applications, offering a redesigned visual interface with security and usability enhancements.
| Universal Prompt | Traditional Prompt |
 |
 |
Okta has already updated their hosted Duo Okta application to support the Universal Prompt, so there's no installation effort required on your part to update the application itself. You can activate the Universal Prompt experience for users of new and existing Duo Okta applications from the Duo Admin Panel.
Before you activate the Universal Prompt for your application, it's a good idea to read the Universal Prompt Update Guide for more information about the update process and the new login experience for users.
Activate Universal Prompt
Activation of the Universal Prompt is a per-application change. Activating it for one application does not change the login experience for your other Duo applications.
Once a user authenticates to the updated Duo custom OIDC IdP in Okta, the "Universal Prompt" section of the Okta application page reflects this status as "Ready to activate", with these activation control options:
- Show traditional prompt: (Default) Your users experience Duo's traditional prompt when logging in to this application.
- Show new Universal Prompt: Your users experience the Universal Prompt via redirect when logging in to this application.
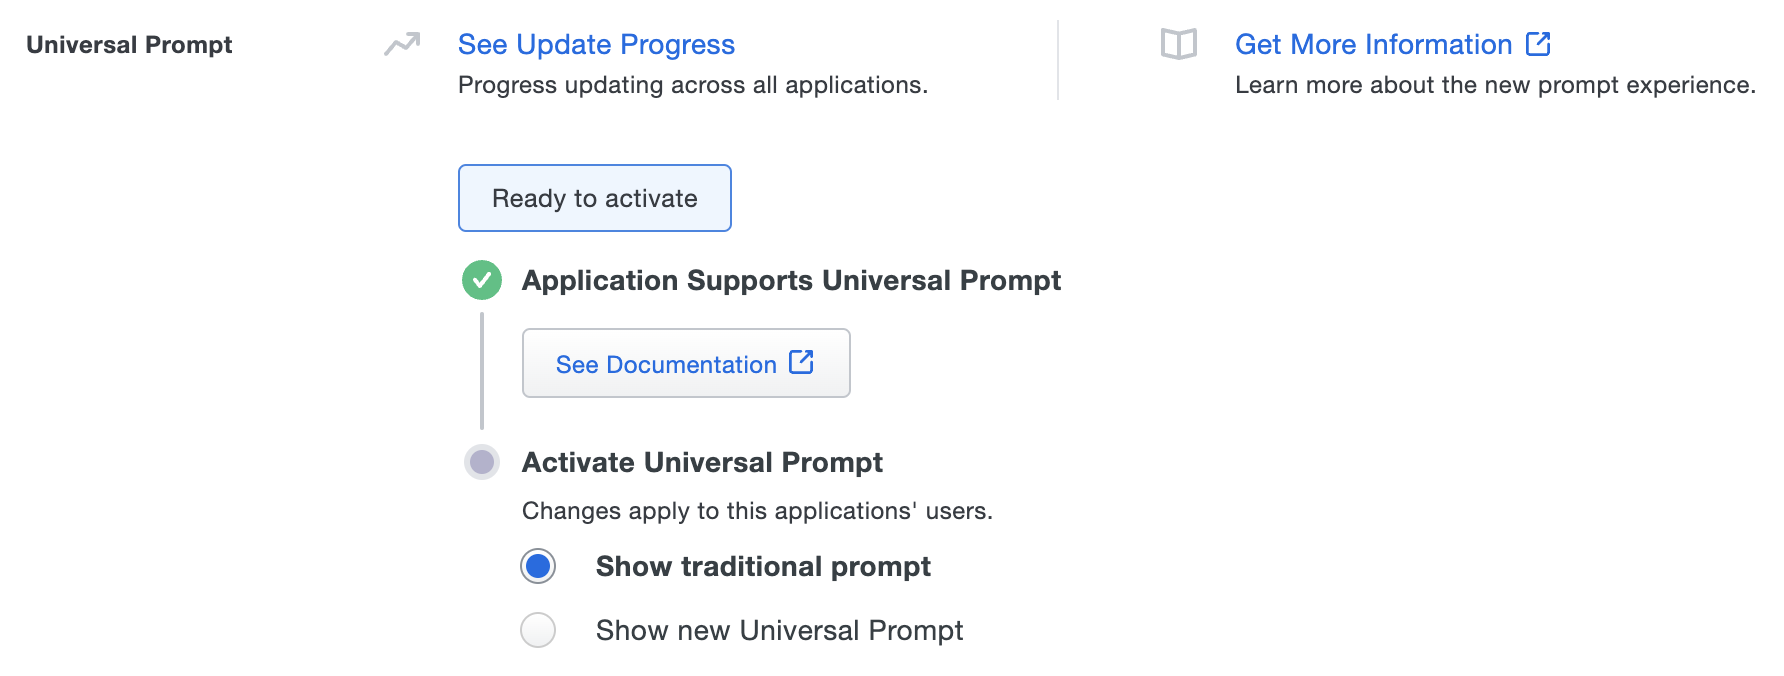
Enable the Universal Prompt experience by selecting Show new Universal Prompt, and then scrolling to the bottom of the page to click Save.
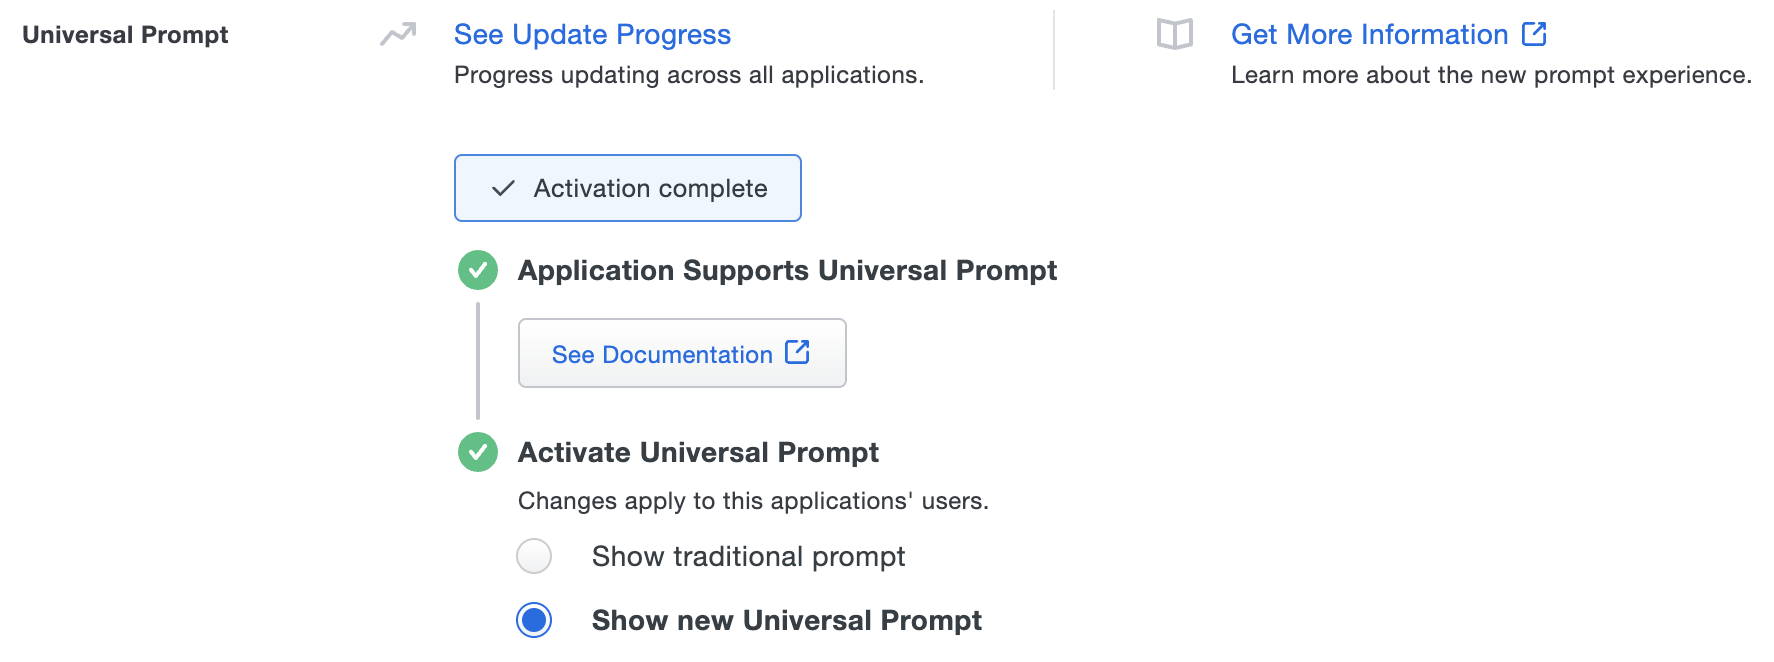
Once you activate the Universal Prompt, the application's Universal Prompt status shows "Activation complete" here and on the Universal Prompt Update Progress report.
Should you ever want to roll back to the traditional prompt, you can return to this setting and change it back to Show traditional prompt. However, this will still deliver the Duo prompt via redirect, not in an iframe.
Universal Update Progress
Click the See Update Progress link to view the Universal Prompt Update Progress report. This report shows the update availability and migration progress for all your Duo applications. You can also activate the new prompt experience for multiple supported applications from the report page instead of visiting the individual details pages for each application.
Duo Custom IdP Authenticator in Okta Identity Engine
Adding Duo as a custom IdP (identity provider) authenticator lets you use it as a step in your sign-on policies so that users log in to Okta with the Duo Universal Prompt. You will need to copy several values from your Okta application in the Duo Admin Panel to the Okta Admin Console.
Create the Duo OIDC IdP in Okta Identity Engine
-
Log into your Okta account as an administrator and click the Admin button.
-
Navigate to Security → Identity Providers and click Add identity provider.
-
Click the Open ID Connect IdP to select it and then click Next. If you do not see Open ID Connect IdP on the Okta application page then stop and contact Okta Support to confirm your Okta tenant has the necessary features. You cannot continue with setup without the Open ID Connect IdP option.
-
Configure the following "General settings" and "Client details" information, copying and pasting information from the "Details" section of your Okta application in the Duo Admin Panel as needed:
Name Give this custom provider a descriptive name ("Duo OIDC MFA" in the example). IdP usage Use the drop-down to select Factor Only. If you do not see this option then stop and contact Okta support. Scopes Remove the email and profile scopes, leaving only openid. Client ID The Client ID or Integration key from your Duo Okta application. Authentication type Leave set to Client secret. Client Secret The Client secret or Secret key from your Duo Okta application. Authorize requests Check the box to Enable signed requests and then select HS256 from the "Algorithm" drop-down that appears. If you do not see this option, you may be missing a required Okta feature and should contact Okta support before continuing. Proof key for code exchange (PKCE) Do not enable this option. -
Return to the Okta application page in the Duo Admin Panel. Click + Show More shown underneath the "API hostname" value to view additional values.
-
Configure the "Endpoints" information in Okta, using the additional information from the Duo Admin Panel:
Issuer The Issuer URL from your Duo Okta application. Authorization endpoint The Authorization endpoint URL from your Duo Okta application. Token endpoint The Token endpoint URL from your Duo Okta application. JWKS endpoint The JWKS endpoint URL from your Duo Okta application. Userinfo endpoint (optional) Leave blank. -
The optional "Authentication Settings" may or may not need changing depending on how you identify your Okta users in Duo. The default values will try to match
Okta Usernameto the user in Duo by email address (fromidpuser.email). You can adjust these to correctly identify your users in Duo with the value that matches a user value in Okta. See the Okta guide for Enterprise Identity Provider for more information. -
Click Finish to create the new Duo custom factor-only IdP authenticator.
-
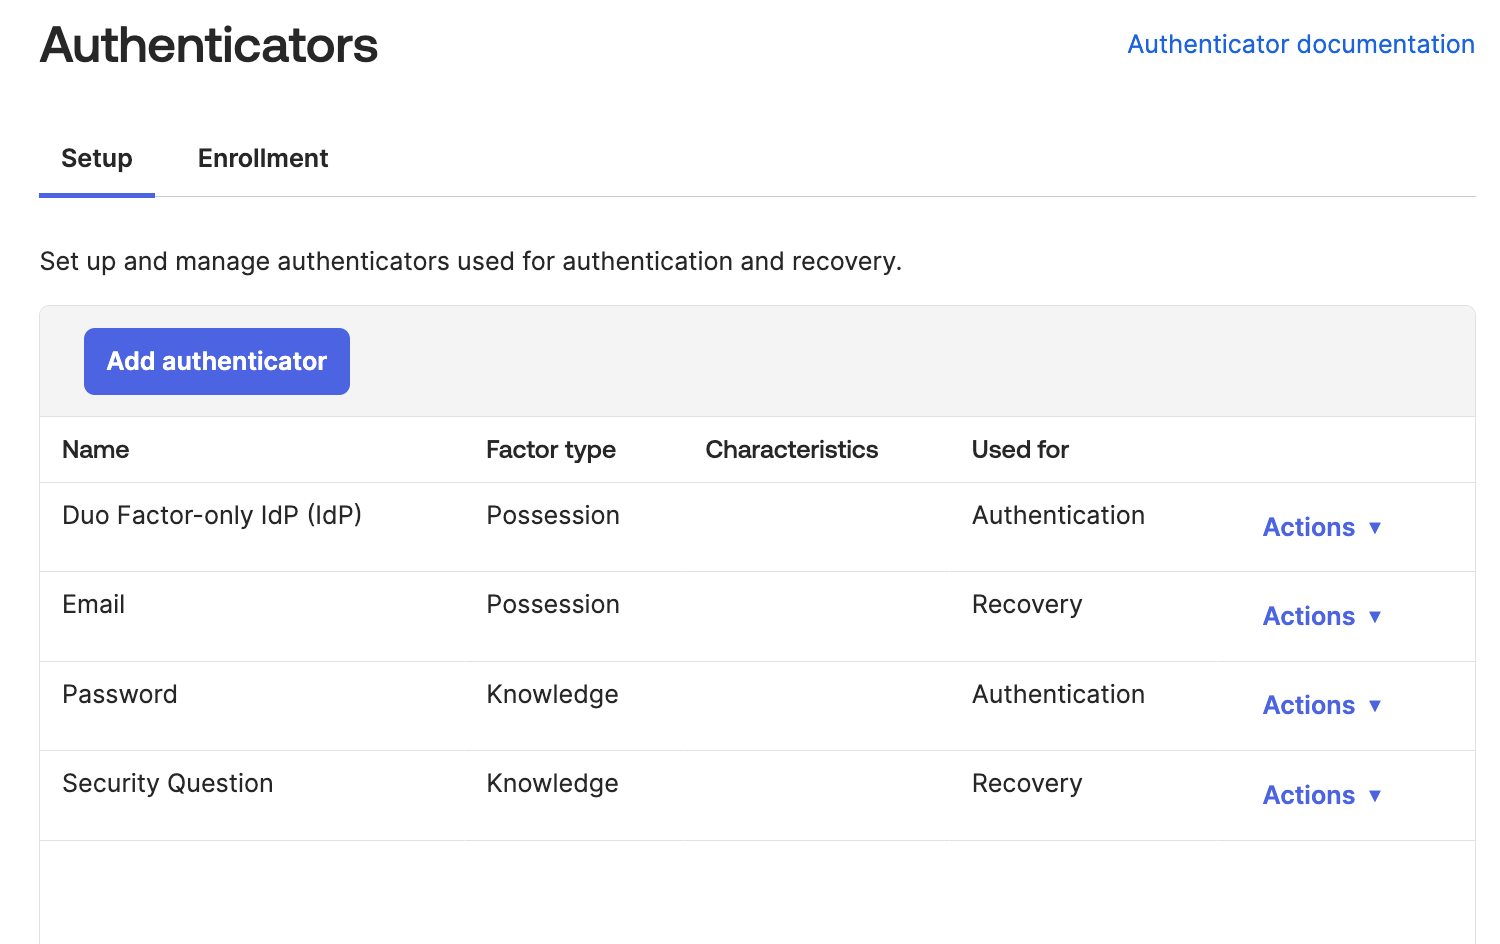
Navigate to Security → Authenticators.
-
Verify that the new Duo OIDC custom IdP you created is shown in the list of authenticators on the "Setup" tab. If it is not shown, go back to Security → Identity Providers and try creating the OpenID IdP for Duo again.
-
Click the Enrollment tab on the "Authenticators" page. Here you can choose to modify the default enrollment policy to set the Duo factor-only IdP authenticator to be required for all users, or create a custom enrollment policy by clicking Add a policy and specifying an Okta user group to receive the new policy requiring enrollment in the Duo IdP authenticator.
For more information about Okta OIDC identity providers please see Create an Identity Provider in Okta in the Okta Developer reference.
Update your Authentication Policies in Okta Identity Engine
Now that you have created the Duo factor-only custom OIDC IdP authenticator you can add it to your global or application sign-on policies (depending on your Okta tenant's platform). If migrating from the legacy Okta "Duo Security" factor to a replacement IdP factor then you should have policy rules guiding your users to the desired factor experience. Okta Identity Engine tenants can specify an IdP in a global sign-on policy from the Okta Admin Console, but the Okta Admin Console UI does not support adding an IdP in an application policy today. Refer to the Okta Policy API documentation to learn how to add IdP to an application.
Here is a simple example of adding the Duo IDP factor in a new authentication policy in Okta Identity Engine.
-
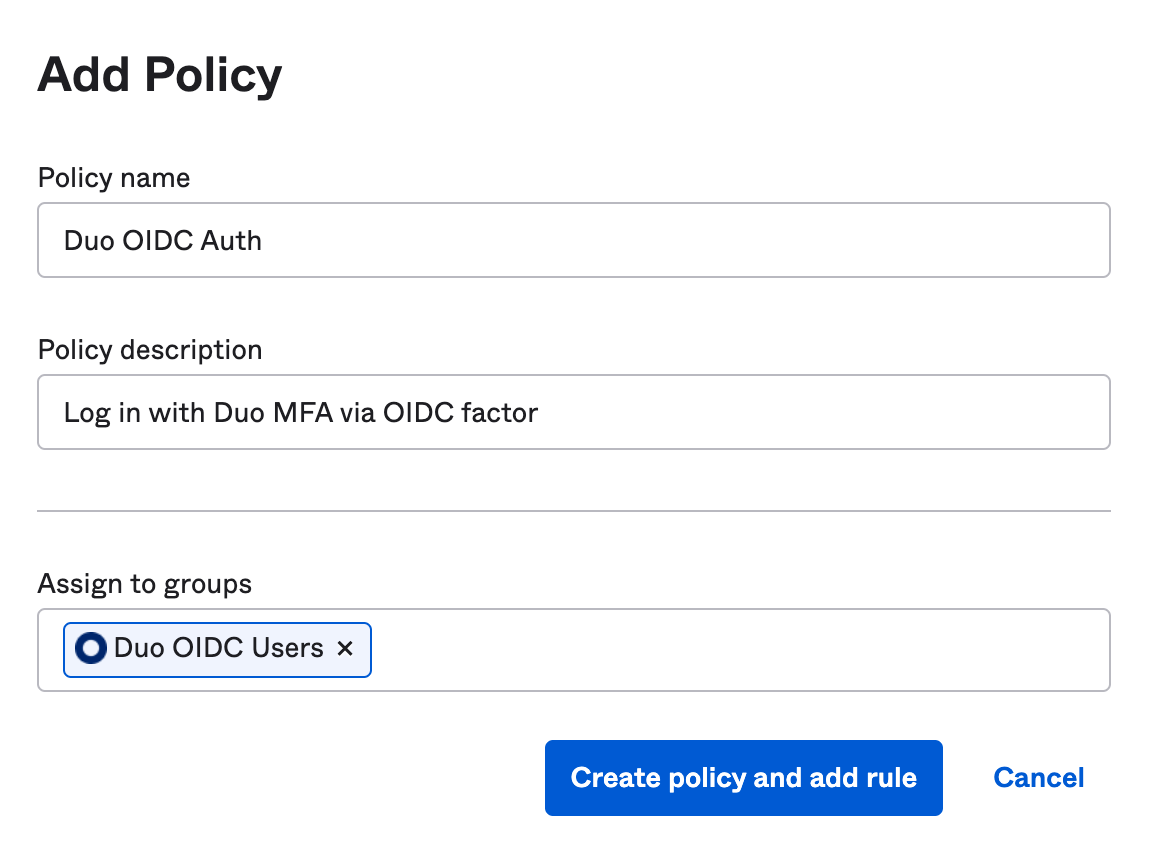
Navigate to Security → Authentication Policies. Click Add a policy.
-
Enter a descriptive name and description for the new policy and then click Save.
-
Determine whether you want to edit the "Catch-all" rule to require the Duo factor-only IdP authenticator or if you want to create a new rule in the policy to apply Duo IdP authentication to users based on conditions you specify, like group membership, IP address, or device platform.
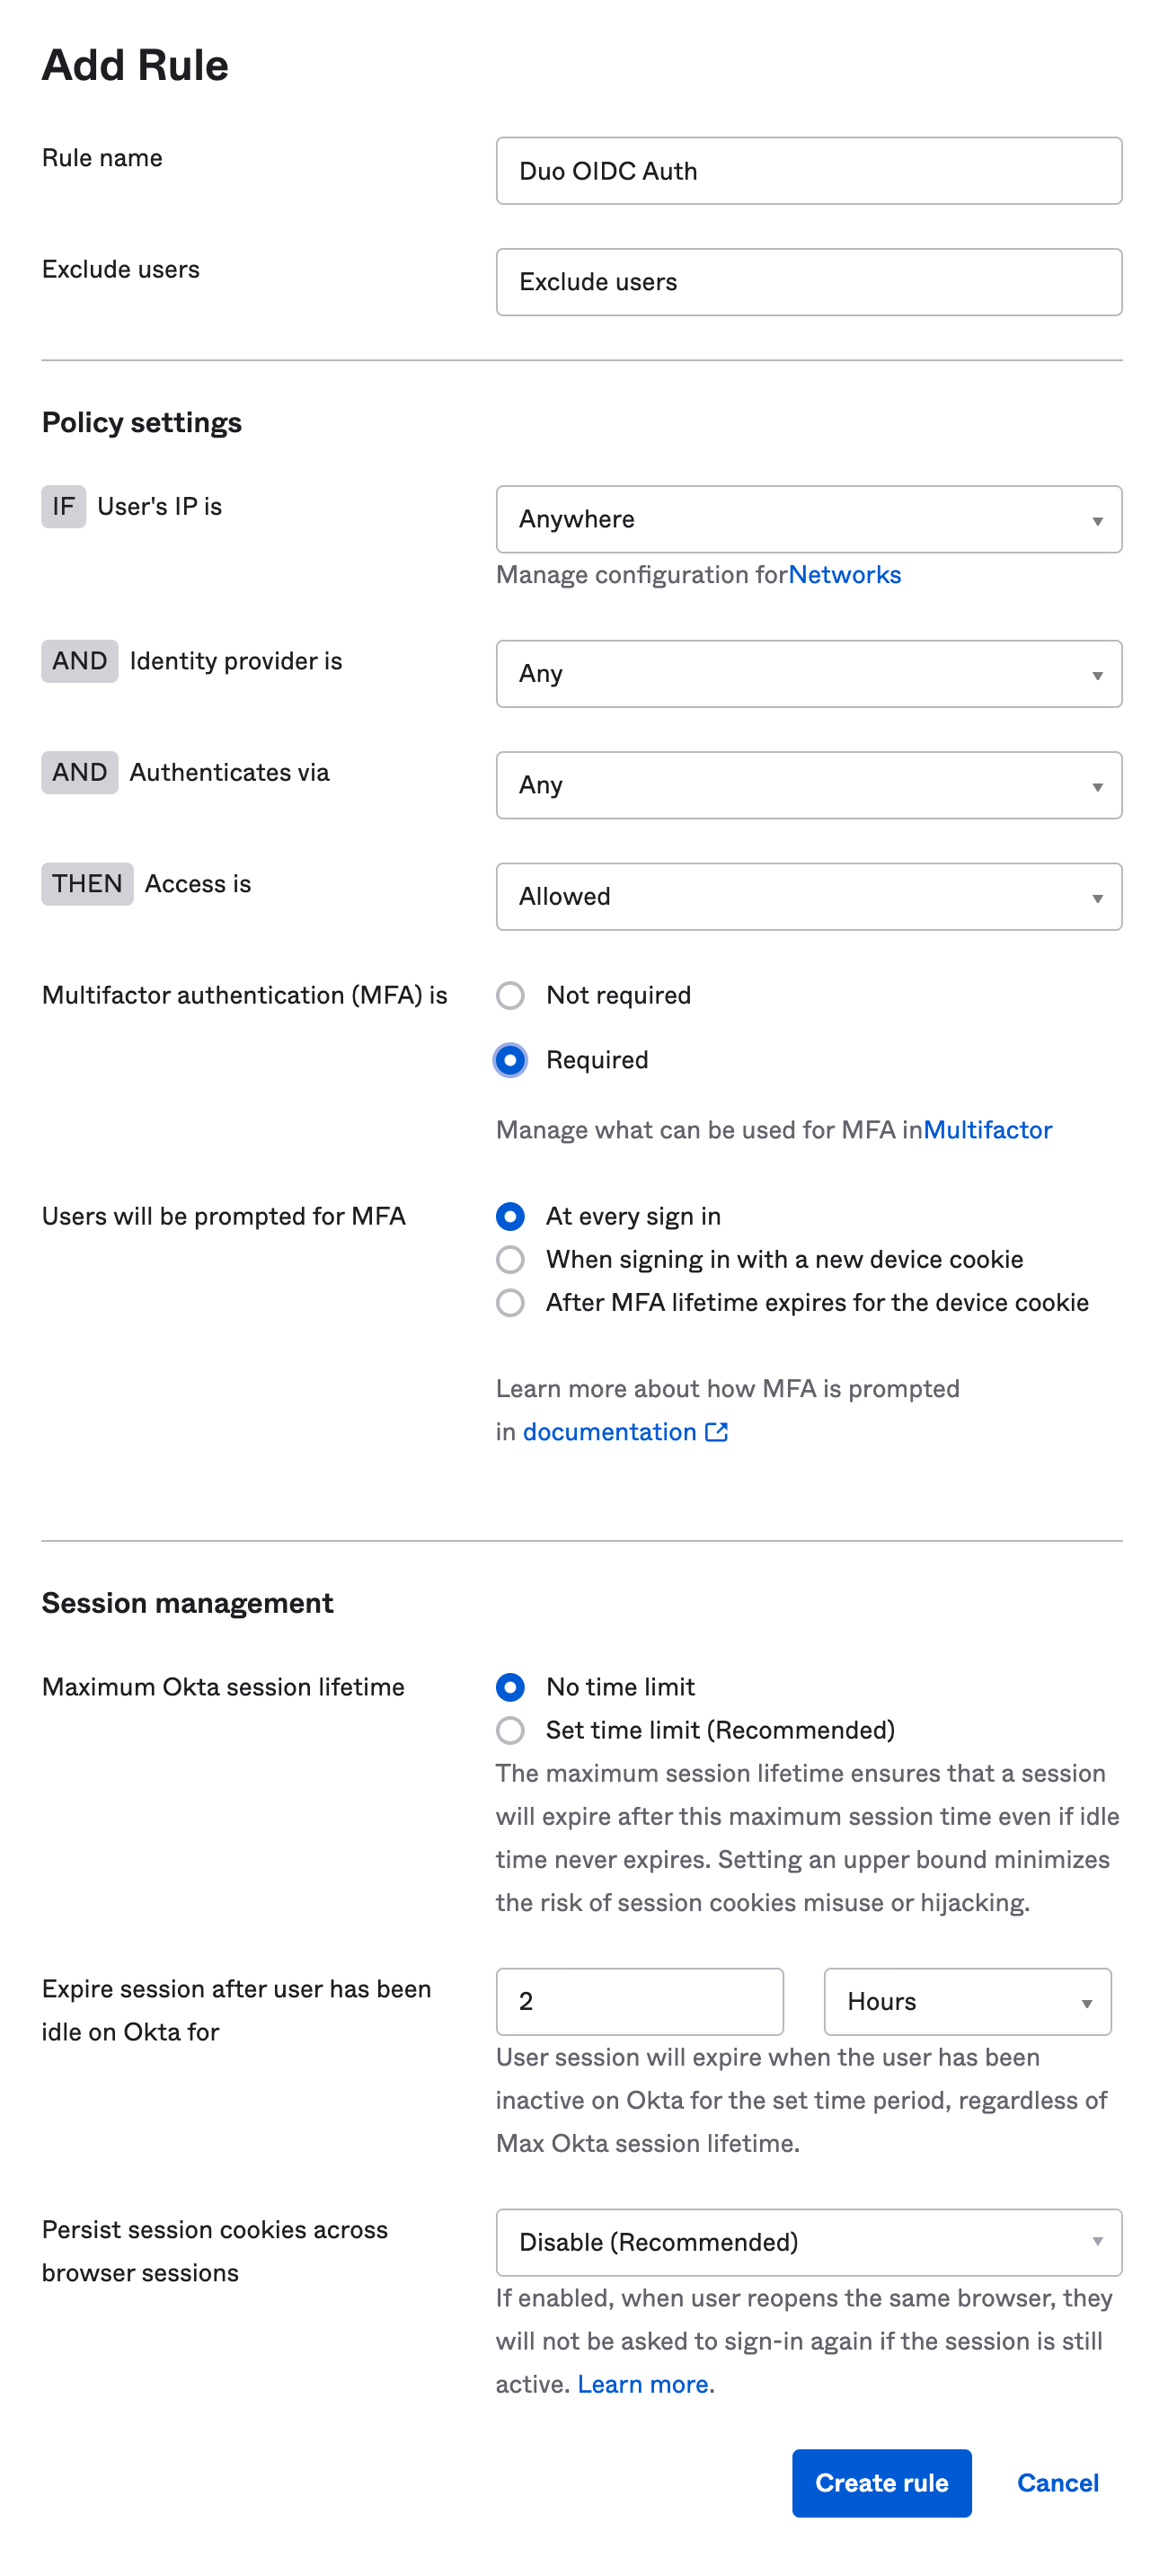
If you do want to create a new rule in the new policy for Duo authentication, click Add rule. Enter a name for the new rule and configure the "IF" conditions for the rule as desired.
-
To add Duo authentication using the Duo OIDC IdP factor, in the "THEN" section of the rule editor set User must authenticate with to Password / IdP + Another Factor (from the "2 factor Types" selections in the drop-down).
-
Next, in the "Possession factor constraints are" rule, you should ensure that the "Your org’s authenticators that satisfy this requirement" box shows the Duo factor-only IdP authenticator you created as the Additional factor types selection. The first authenticator could be Password or some other authenticator that is not the Duo IdP.
-
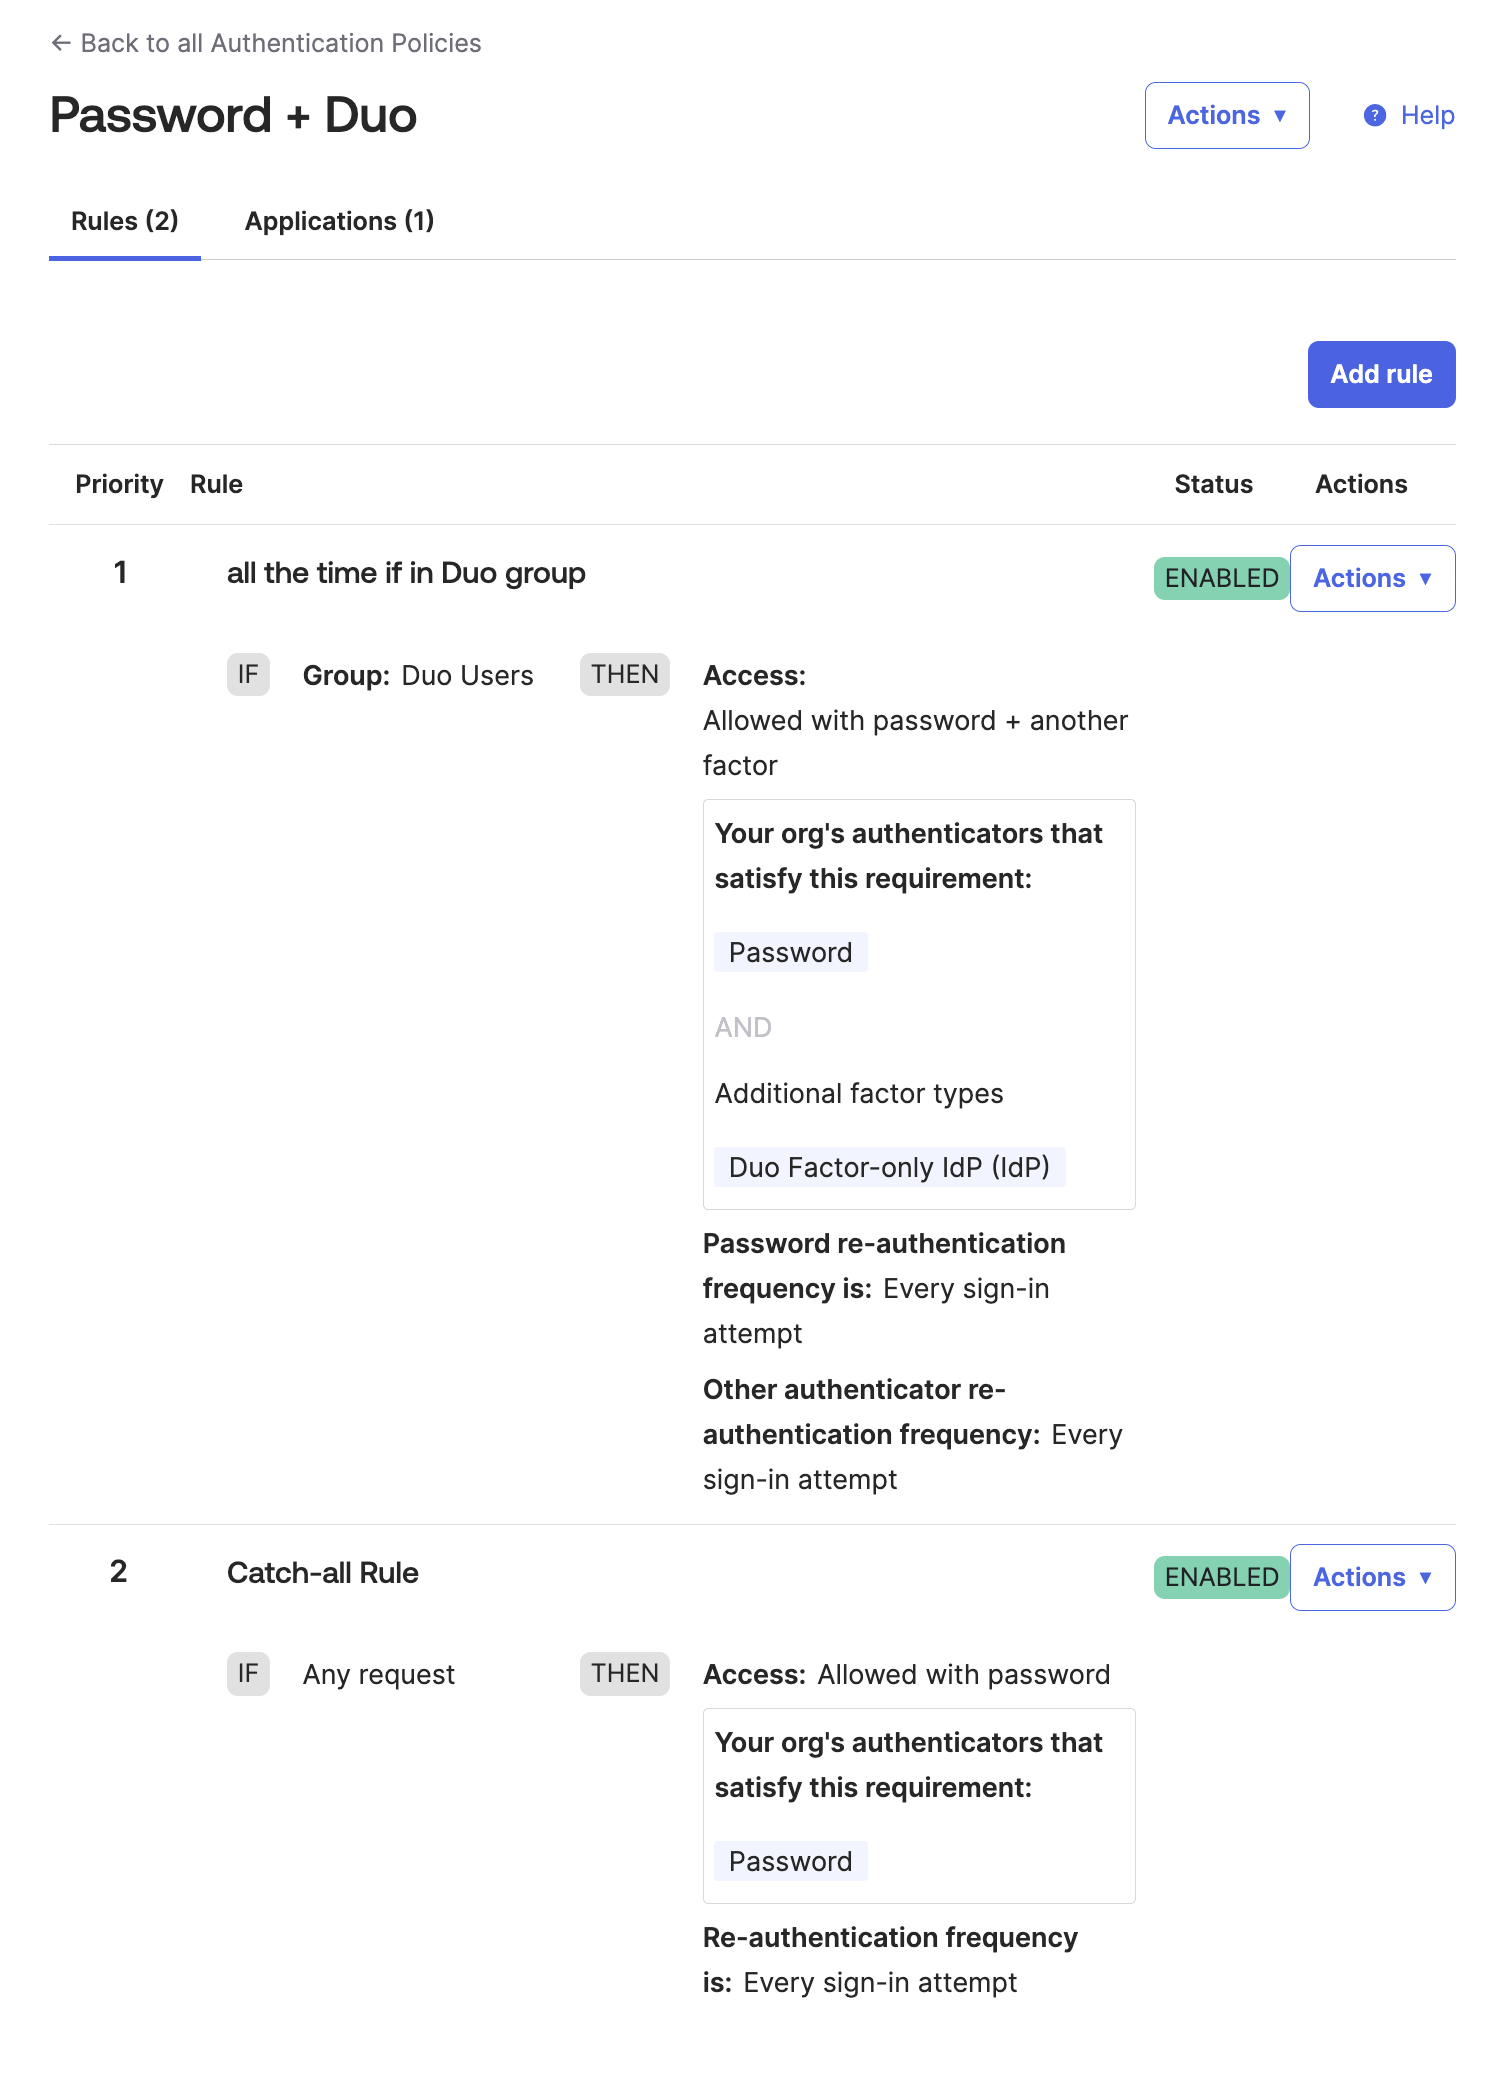
Finally, make your re-authentication frequency selections. Choose how often you want users subject to this policy to have to log in with Duo by changing the Re-authentication frequency for all other factors is setting.
-
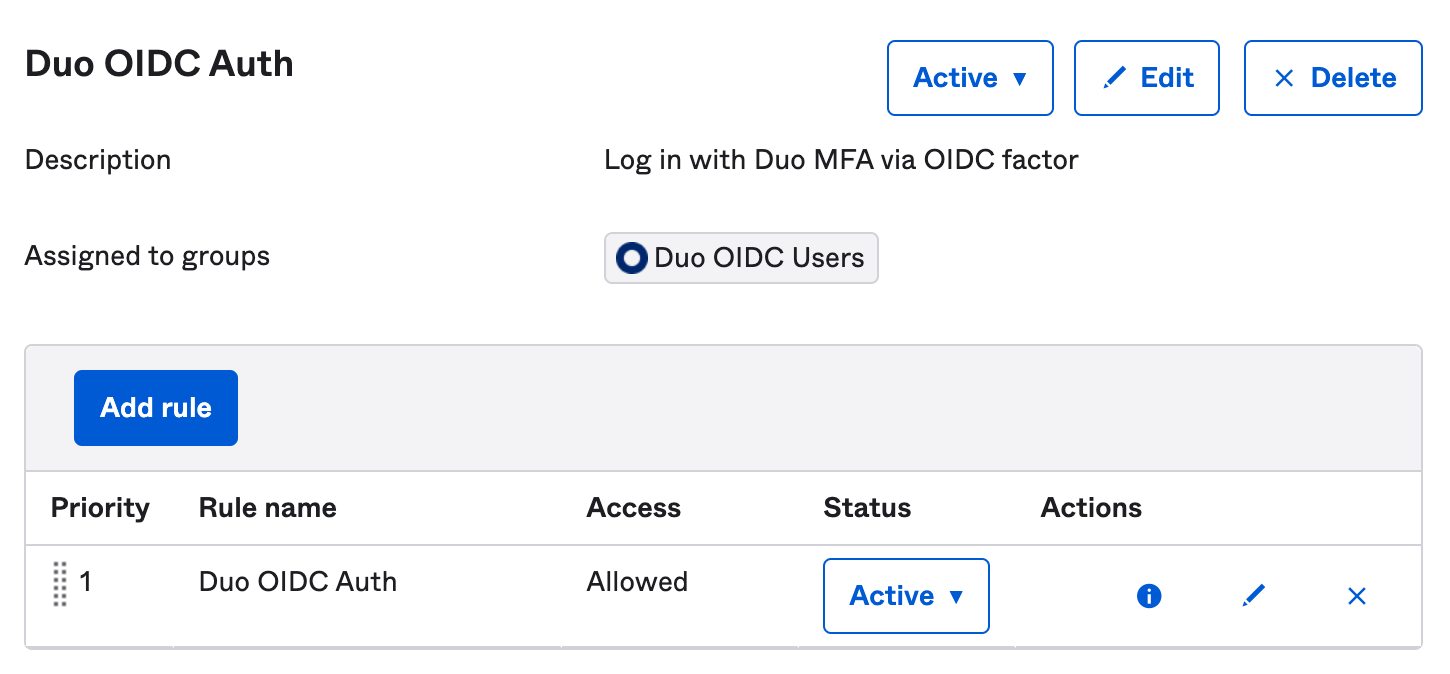
When you have finished editing the rule, click Save. The new authentication policy reflects your configured Duo IdP requirement.
Here is an example of a simple authentication policy with a rule requiring password plus Duo IdP authentication at every sign-in attempt by members of the "Duo Users" group, while the catch-all rule allows any users not targeted by the Duo rule to sign in with only a password.
Learn more about creating Okta OIE authentication policies in the Okta online help center.
Please contact Okta support if you have any questions about the integration or need assistance configuring your authentication and multifactor settings or creating sign-on policies incorporating a Duo factor. Contact Duo Support for assistance with the Duo service.
Duo Custom IdP Factor in Okta Classic
Adding Duo as a custom IdP (identity provider) factor lets you use it as a step in your sign-on policies so that users log in to Okta with the Duo Universal Prompt. You will need to copy several values from your Okta application in the Duo Admin Panel to the Okta Admin Console.
Create the Duo OIDC IdP in Okta Classic
-
Log into your Okta account as an administrator and click the Admin button.
-
Navigate to Security → Identity Providers and click Add identity provider.
-
Click the Open ID Connect IdP to select it and then click Next. If you do not see Open ID Connect IdP on the Okta application page then stop and contact Okta Support to confirm your Okta tenant has the necessary features. You cannot continue with setup without the Open ID Connect IdP option.
-
Configure the following "General settings" and "Client details" information, copying and pasting information from the "Details" section of your Okta application in the Duo Admin Panel as needed:
Name Give this custom provider a descriptive name ("Duo OIDC MFA" in the example). IdP usage Use the drop-down to select Factor Only. If you do not see this option then stop and contact Okta support. Scopes Remove the email and profile scopes, leaving only openid. Client ID The Client ID or Integration key from your Duo Okta application. Client Secret The Client secret or Secret key from your Duo Okta application. Authorize requests Check the box to Enable signed requests and select HS256 from the "Algorithm" drop-down. If you do not see this option, you may be missing a required Okta feature and should contact Okta support before continuing. -
Return to the Okta application page in the Duo Admin Panel. Click + Show More shown underneath the "API hostname" value to view additional values.
-
Configure the "Endpoints" information in Okta, using the additional information from the Duo Admin Panel:
Issuer The Issuer URL from your Duo Okta application. Authorization endpoint The Authorization endpoint URL from your Duo Okta application. Token endpoint The Token endpoint URL from your Duo Okta application. JWKS endpoint The JWKS endpoint URL from your Duo Okta application. Userinfo endpoint (optional) Leave blank. -
Click Finish to create the new Duo custom factor-only IdP.
-
Navigate to Security → Multifactor.
-
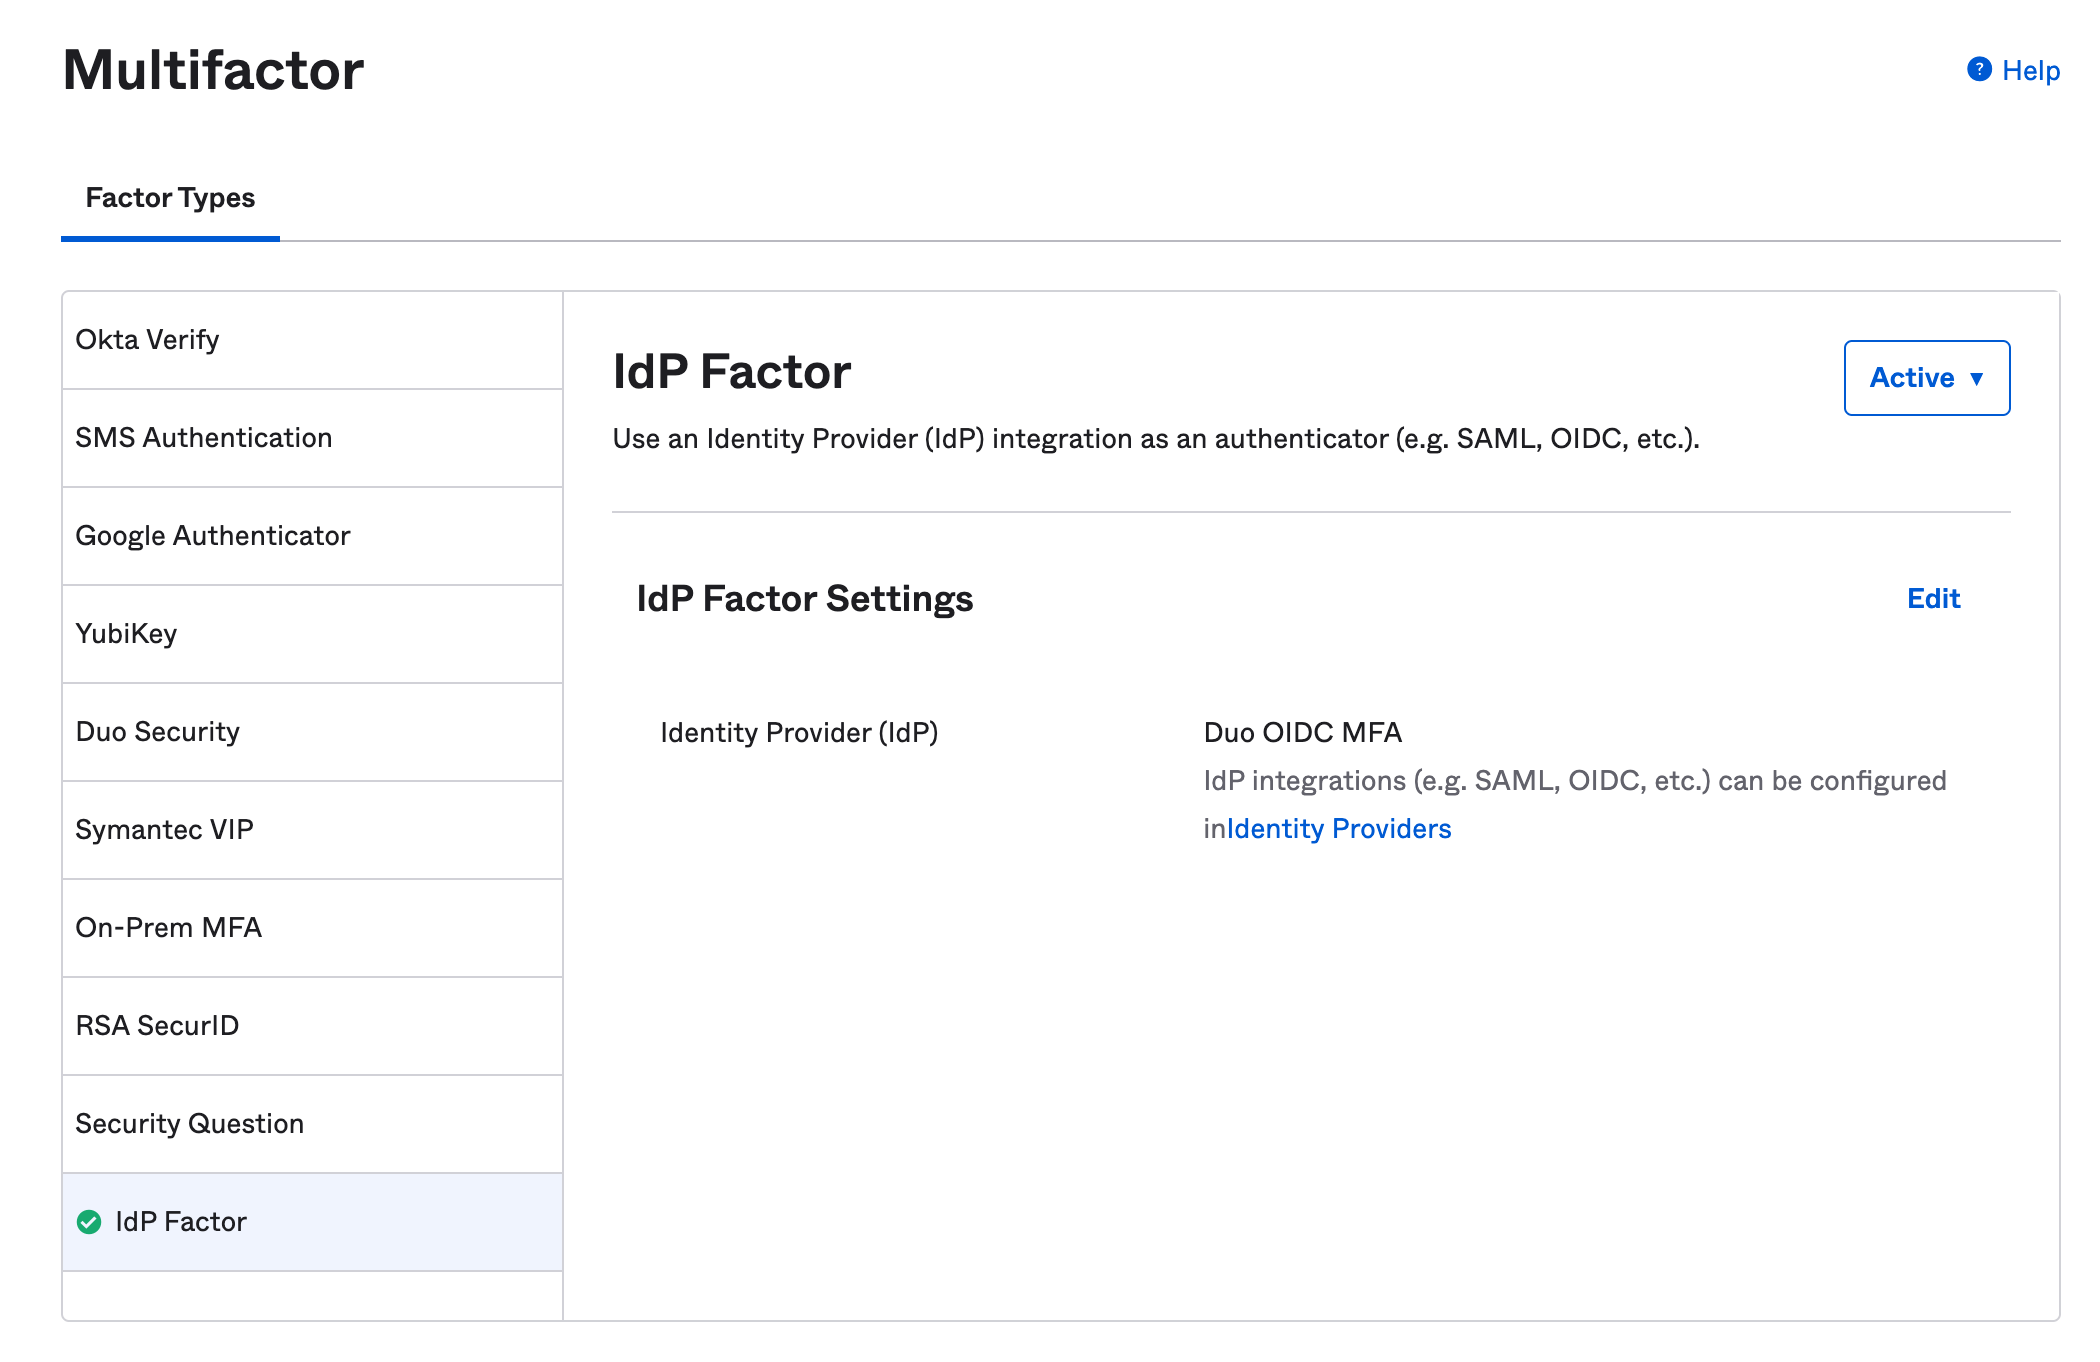
Click On IdP Factor in the list of factor types. IMPORTANT: Do not click the "Duo Security" factor type. This is the legacy traditional Duo Prompt application.
-
Verify that the new Duo OIDC custom IdP is shown in the "IdP Factor Settings". If it is not shown, click Edit and select it, clicking Save when done.
-
Click the Inactive button and select Activate to enable the Duo IdP factor.
-
After activating the IdP factor go to Security → Multifactor → Factor Enrollment to set the new IdP Duo factor to either Optional or Required.
For more information about Okta OIDC identity providers please see Create an Identity Provider in Okta in the Okta Developer reference.
Update your Sign On Policies in Okta Classic
Now that you have created the Duo factor-only custom OIDC IdP you can add it to your global or application sign-on policies (depending on your Okta tenant's platform). If migrating from the legacy Okta "Duo Security" factor to a replacement IdP factor then you should have policy rules guiding your users to the desired factor experience. Okta Classic and tenants can specify an IdP in a global sign-on policy from the Okta Admin Console.
Here is a simple example of adding the Duo IDP factor in a new sign-on policy in Okta Classic.
-
Navigate to Security → Authentication. Click the Sign On tab.
-
You can either add a new rule for Duo Authentication to an existing Okta sign-on policy, or create a new policy for Duo and assign it to specific groups. This example creates a new policy for Duo OIDC authentication and assigns it to a group.
Click on the Add New Okta Sign-on Policy button, enter a descriptive name and description for the new policy, and select the group you want to target with this new policy. Click Create policy and add rule.
-
Enter a name for your new Duo rule and exclude any users you don't want using Duo when logging in to Okta. Check the Prompt for Factor box to enable secondary authentication and determine whether you want 2FA required "Per Device", "Every Time", or "Per Session". Choose your desired options for the other rule settings and click Create Rule when finished.
-
The Okta sign-on policy shows your new Duo rule.
Learn more about creating Okta policies or see additional information about configuring Duo authentication in the Okta online help center.
Please contact Okta support if you have any questions about the integration or need assistance configuring your authentication and multifactor settings or creating sign-on policies incorporating a Duo factor. Contact Duo Support for assistance with the Duo service.
Test Your Setup
Test your new Duo OIDC factor-only IdP by logging in to Okta as a user subject to a sign-on policy that requires the Duo IdP factor.
-
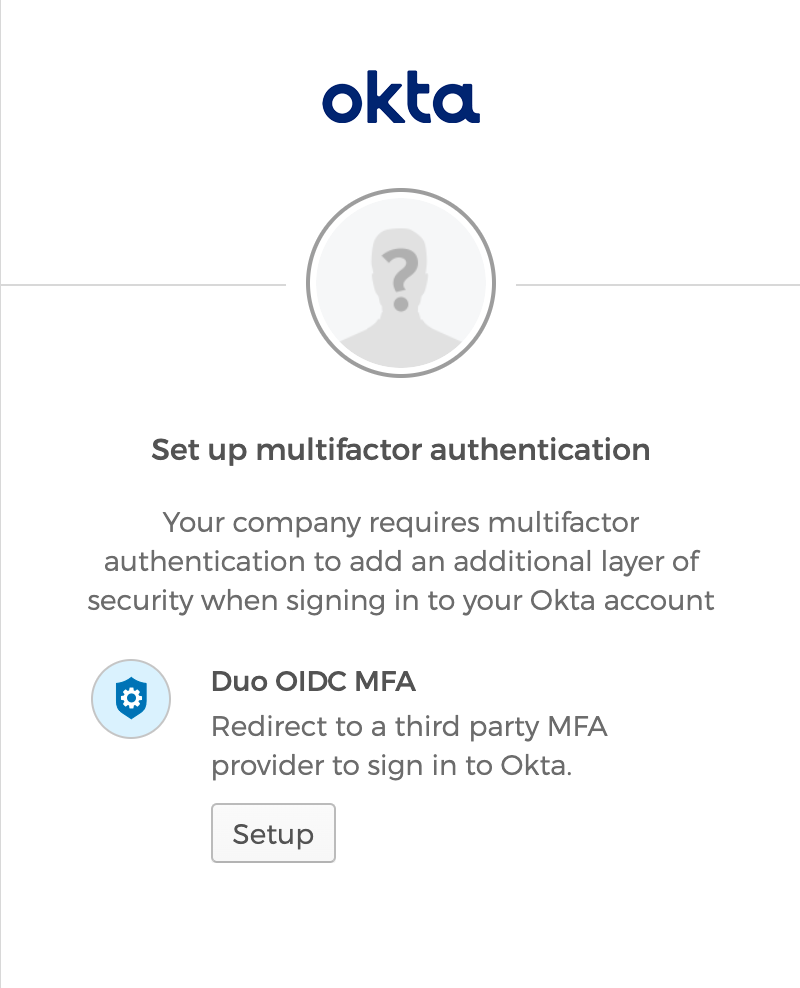
Okta prompts users who have not yet registered use of the Duo OIDC IDP factor to setup multifactor authentication at the first login to Okta after Duo OIDC is enabled. Click the Setup button for your Duo OIDC IDP factor.
-
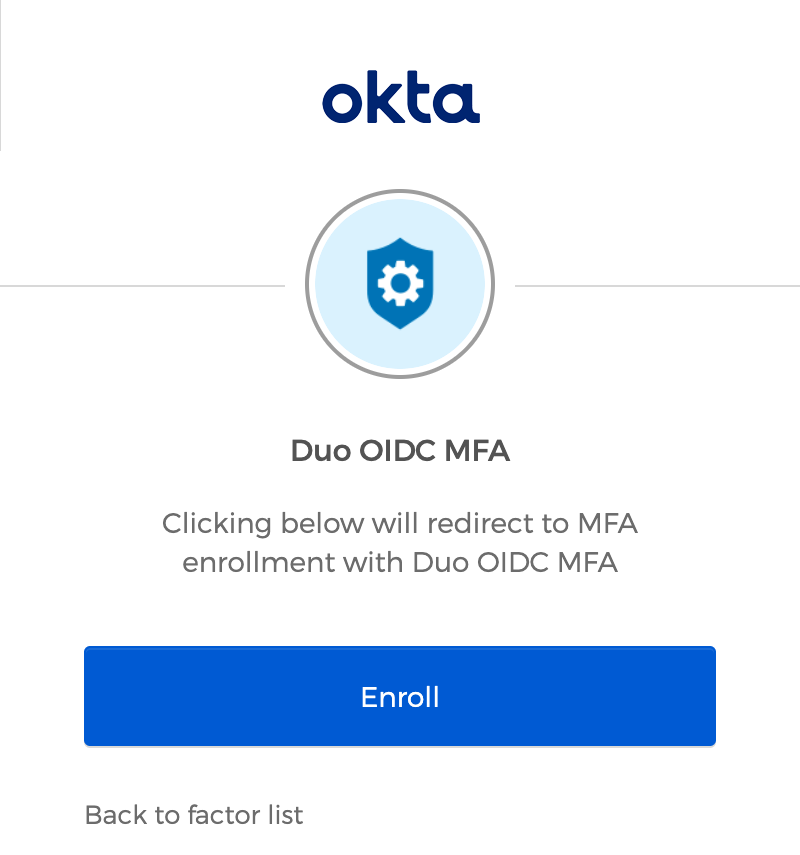
At the next step, click the Enroll button to be redirected to Duo.
-
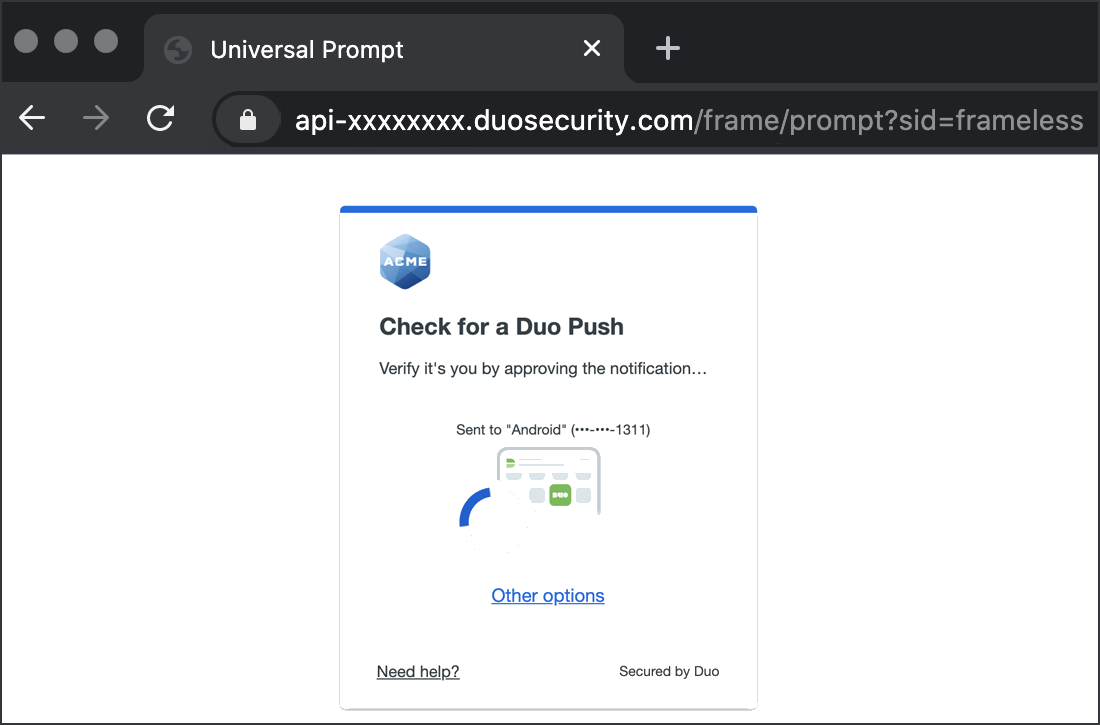
Okta redirects to the Duo Universal Prompt, where a user new to Duo can complete first-time Duo enrollment, or an existing Duo user can authenticate using an available method.
If you had set up Duo as an Okta MFA factor and opted to reuse the same Duo Okta application when creating a Duo OIDC factor in Okta then you may still see the traditional Duo Prompt in Okta instead of the Universal Prompt. Completing at least one Okta OIDC factor authentication to a pre-existing Duo Okta application using the traditional Duo Prompt is required before you can enable the Universal Prompt experience for that Okta application in Duo.
-
After completing Duo enrollment or authentication, Duo redirects back to Okta to complete Okta's multifactor setup. Click Finish to complete logging into Okta.
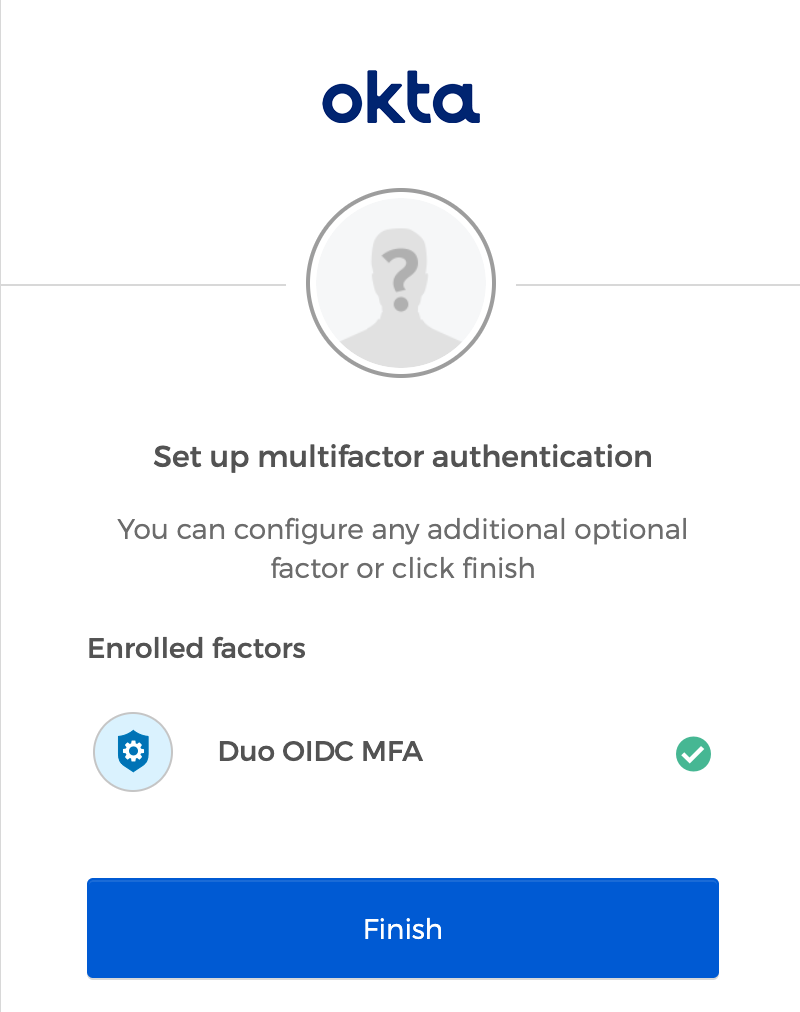
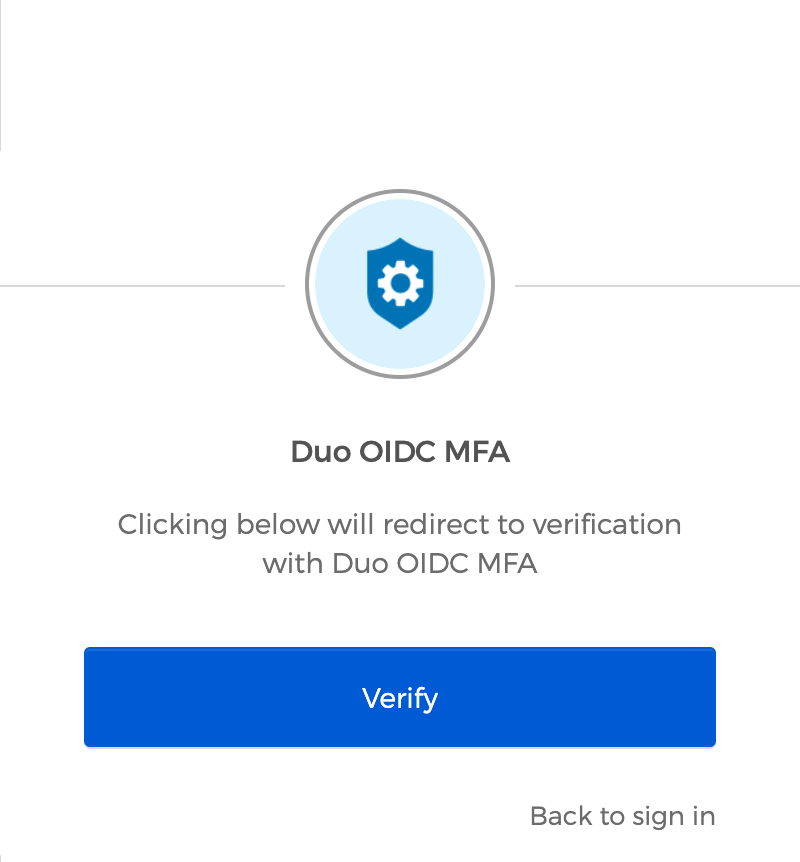
Future logins to Okta will prompt you to complete verification with the Duo OIDC MFA factor after you enter your Okta credentials. Click Verify to be redirected to Duo for two-factor authentication and you'll return to Okta after 2FA success. If more than one factor is activated then Okta remembers the last one used and should default to it next time.
If you saw the traditional Duo Prompt when you tested Duo as an OIDC factor, then you should now be able to go to that Okta application in the Duo Admin Panel and activate the Universal Prompt for future logins.
Duo MFA Factor
The Duo MFA factor option for Okta shows the traditional Duo Prompt in an iframe. We encourage you to set up Duo as an OIDC factor-only IdP instead, which provides users with the Duo Universal Prompt experience. Existing users of the legacy Okta Duo MFA factor option should plan your migration to OIDC factor.
Configure the Duo Factor
-
Log into your Okta account as an administrator and click the Admin button.
-
Navigate to Security → Multifactor. Click on Duo Security then click the "Duo Security Settings" Edit button. If you don't see Duo Security listed, contact Okta Support to have it enabled on your account.
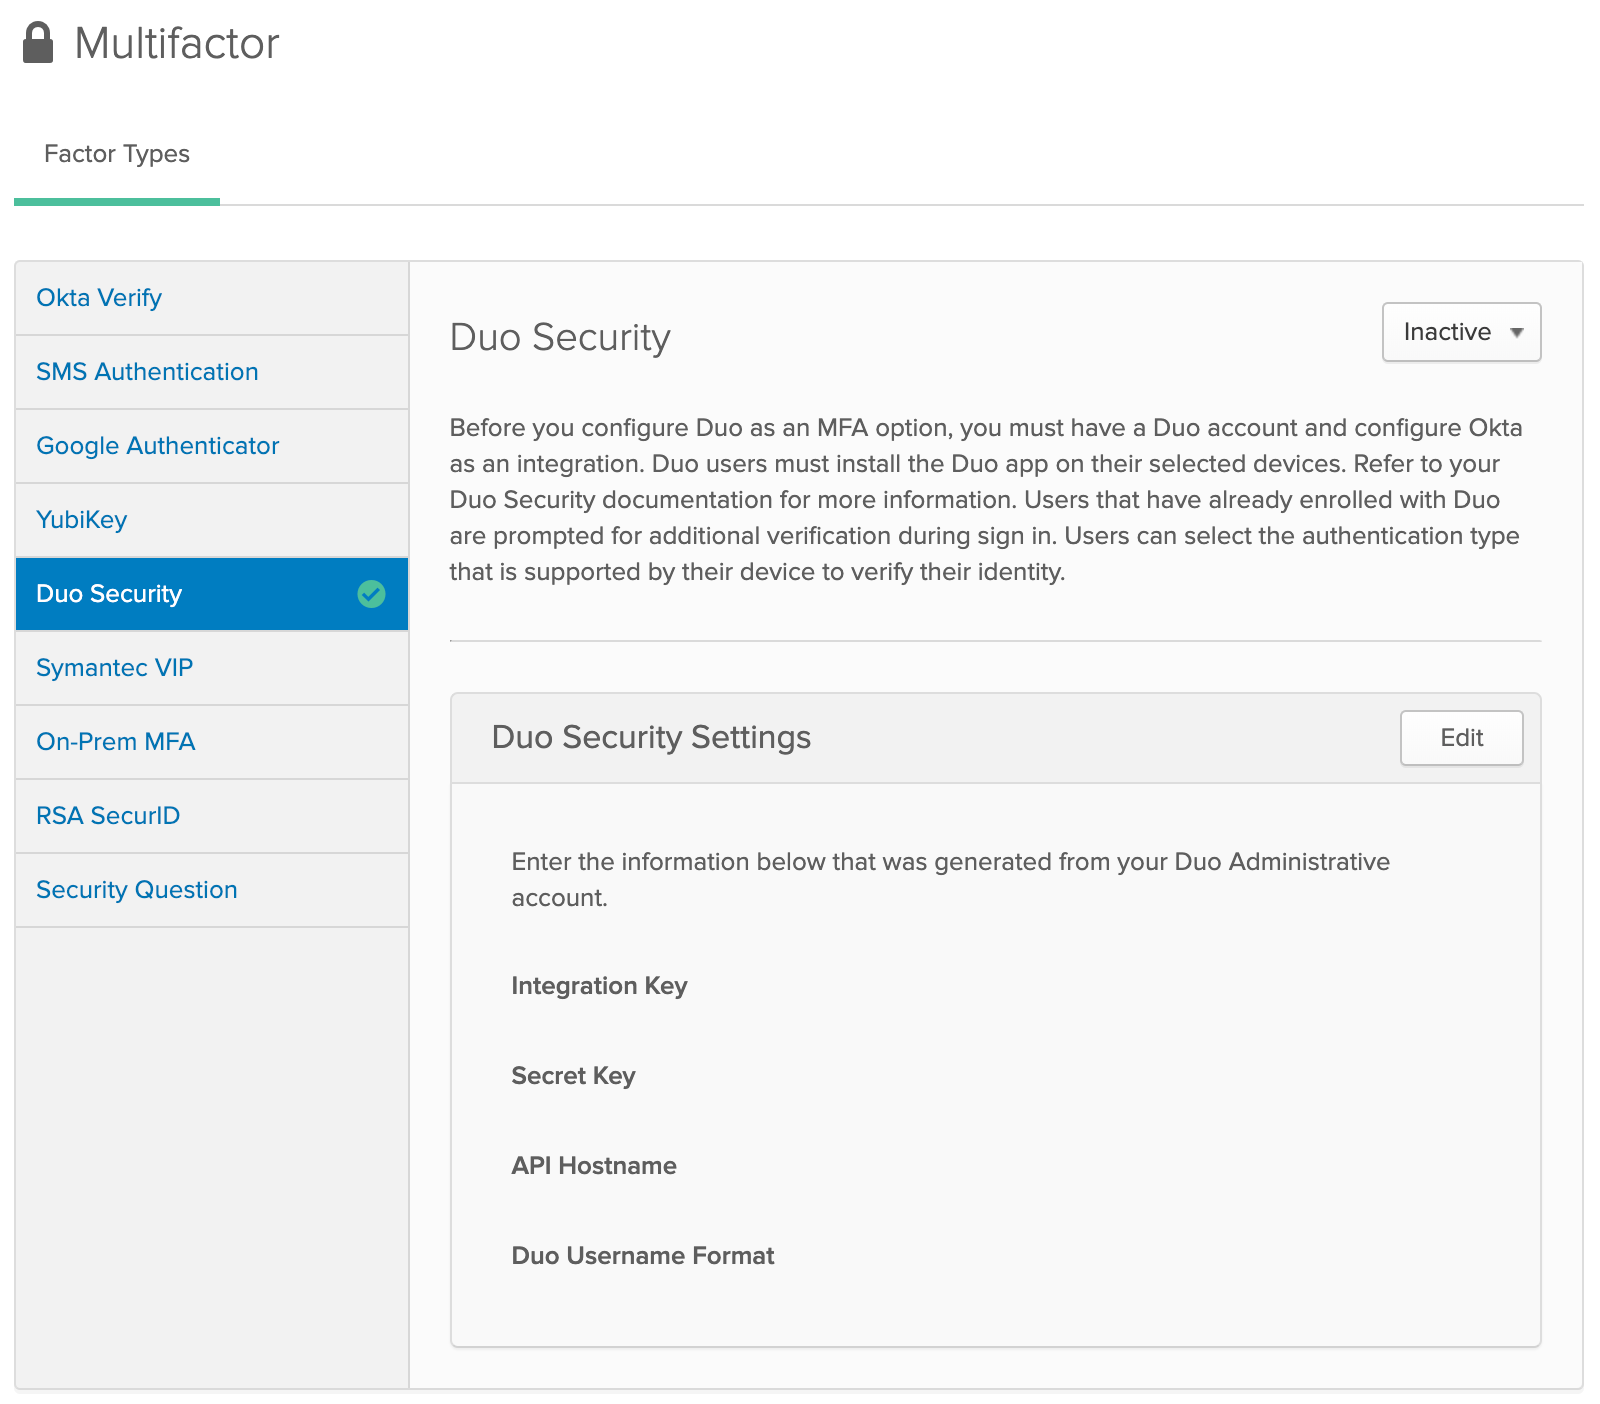
-
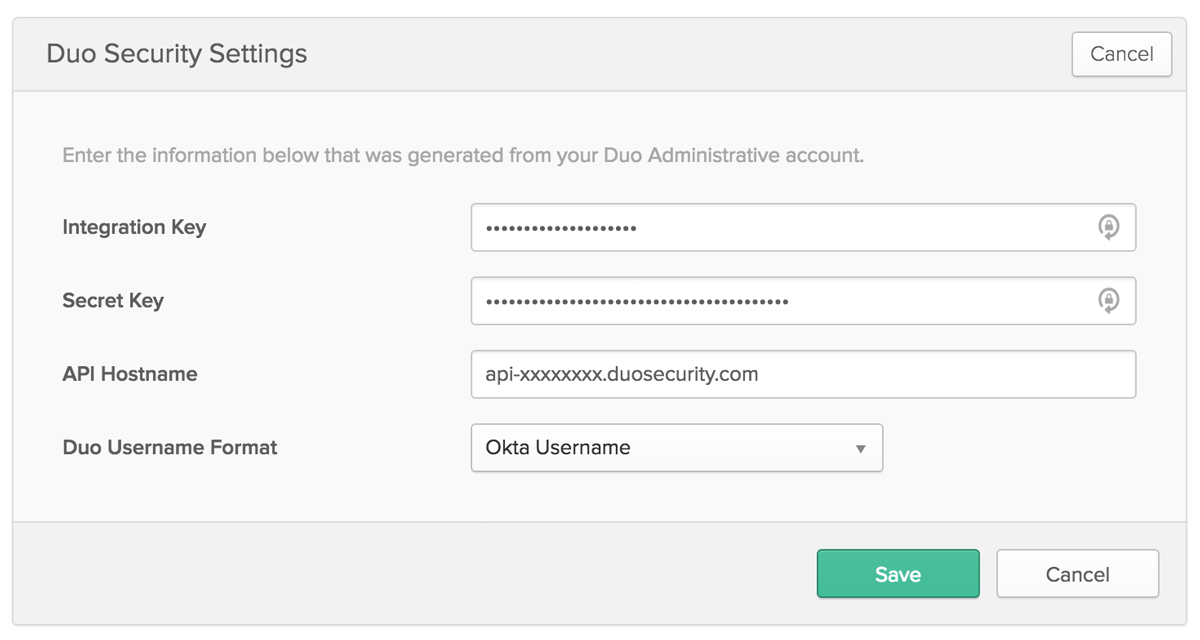
Fill out the form with your Duo Okta application information as follows.
Integration Key Your integration key (i.e. DIXXXXXXXXXXXXXXXXXX)Secret Key Your secret key API Hostname Your API hostname (i.e. api-XXXXXXXX.duosecurity.com)Duo Username Format Select the name format used to log in to Okta. Click the Save button when done.
-
While still viewing the Duo Security factor type, click the Inactive button and select Activate to enable Duo.
Update your Sign On Policies
-
Click the Security menu at the top and go to Authentication. Click the Sign On tab.
-
You can either add a new rule for Duo Authentication to an existing Okta sign-on policy, or create a new policy for Duo and assign it to specific groups. In this example, we'll turn on Duo for all users in the "Default Policy".
Click on the Default Policy, and then click the Add Rule button. Enter a name for your new Duo rule and check the Prompt for Factor box to enable secondary authentication and determine whether you want 2FA required "Per Device", "Every Time", or "Per Session". Choose your desired options for the other rule settings and click Create Rule when finished.
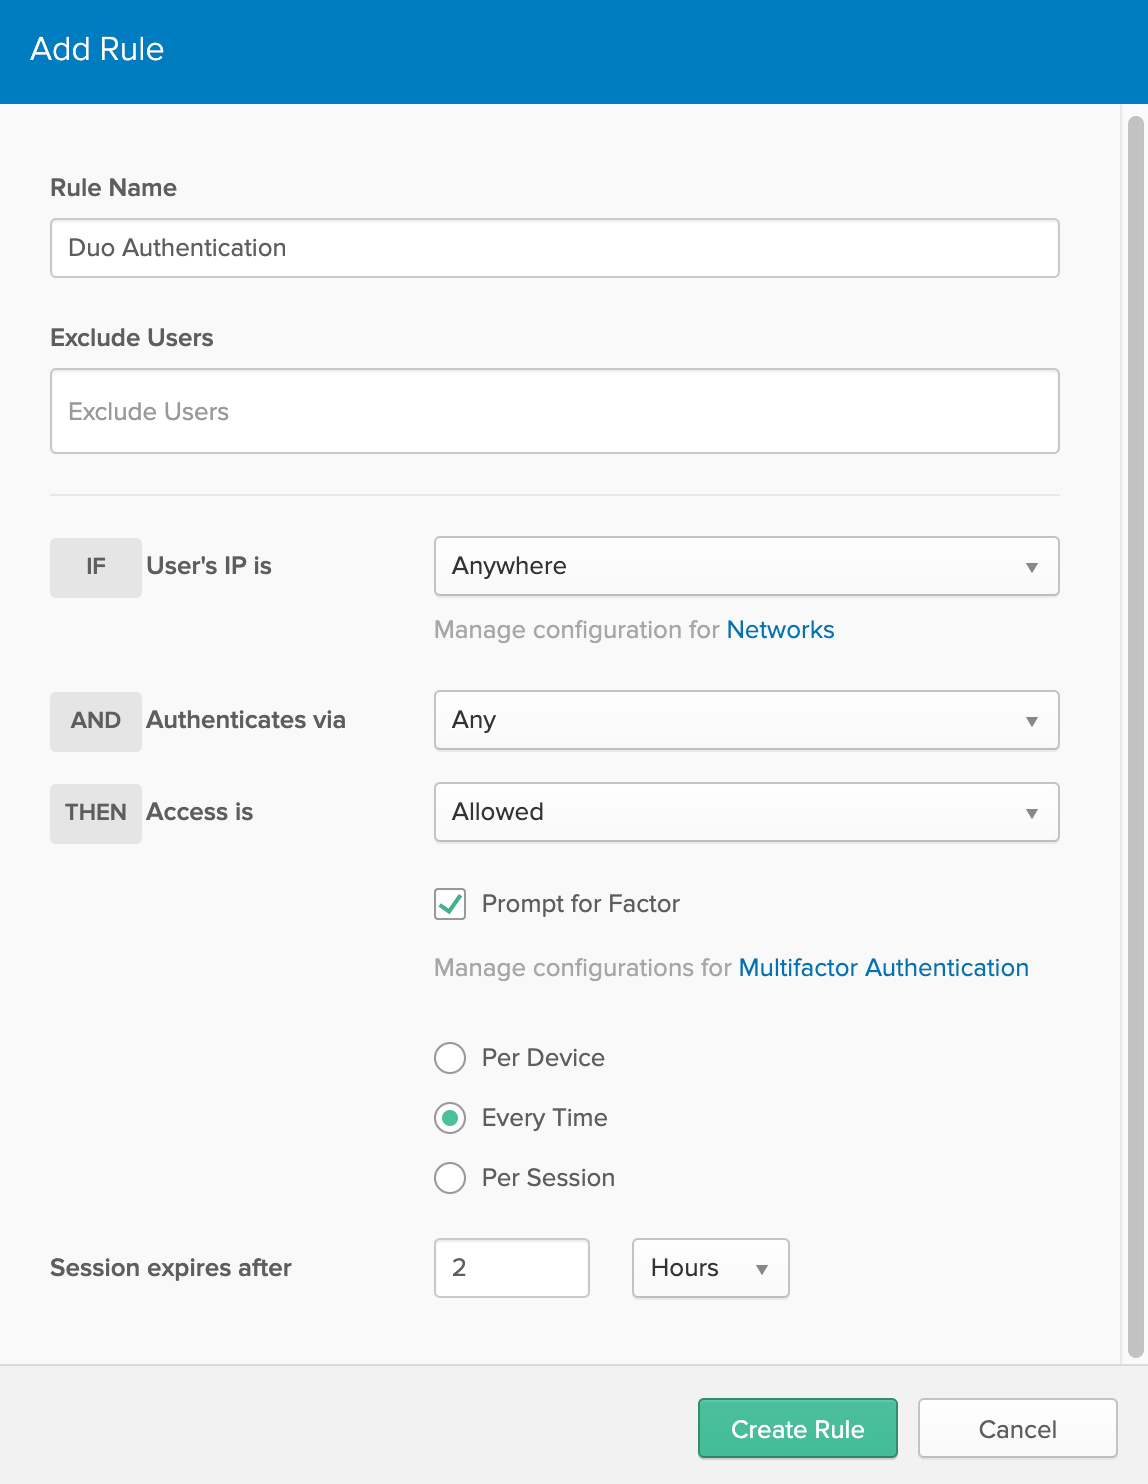
-
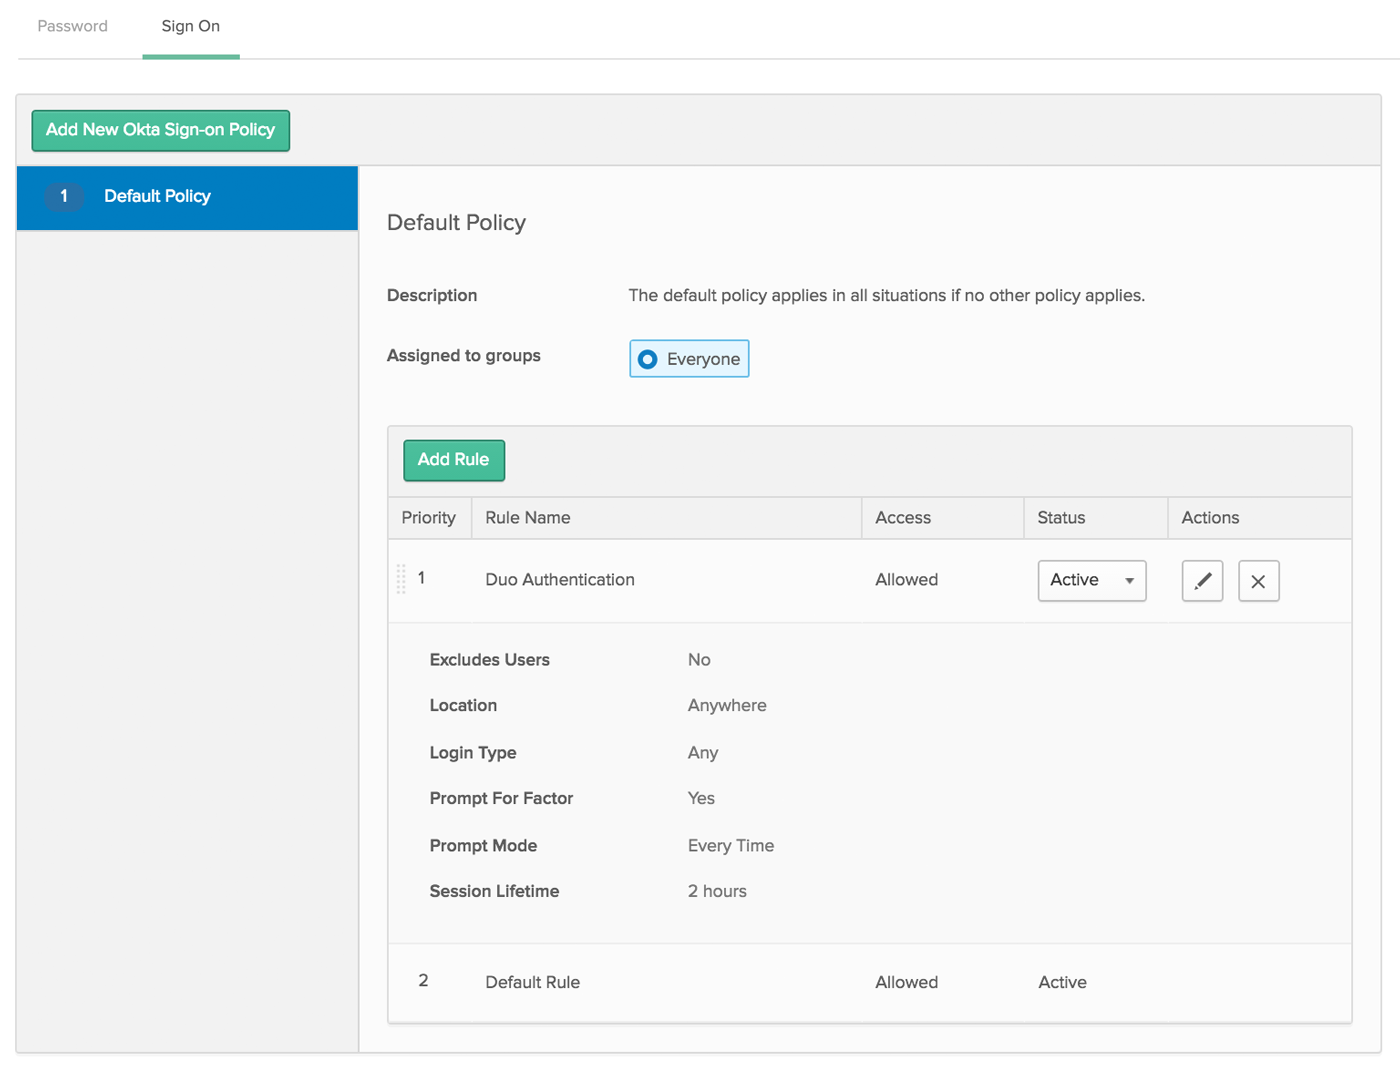
The Okta sign-on policy shows your new Duo rule.
Learn more about creating Okta policies or see additional information about configuring Duo authentication in the Okta online help center.
Please contact Okta support if you have any questions about the integration or need assistance configuring your authentication and multifactor settings. Contact Duo Support for assistance with the Duo service.
Test Your Setup
If you plan to permit use of WebAuthn authentication methods (security keys, U2F tokens, or Touch ID) in the traditional Duo Prompt, Duo recommends configuring allowed hostnames for this application and any others that show the inline Duo Prompt before onboarding your end-users.
The Duo Universal Prompt has built-in protection from unauthorized domains so this setting does not apply.
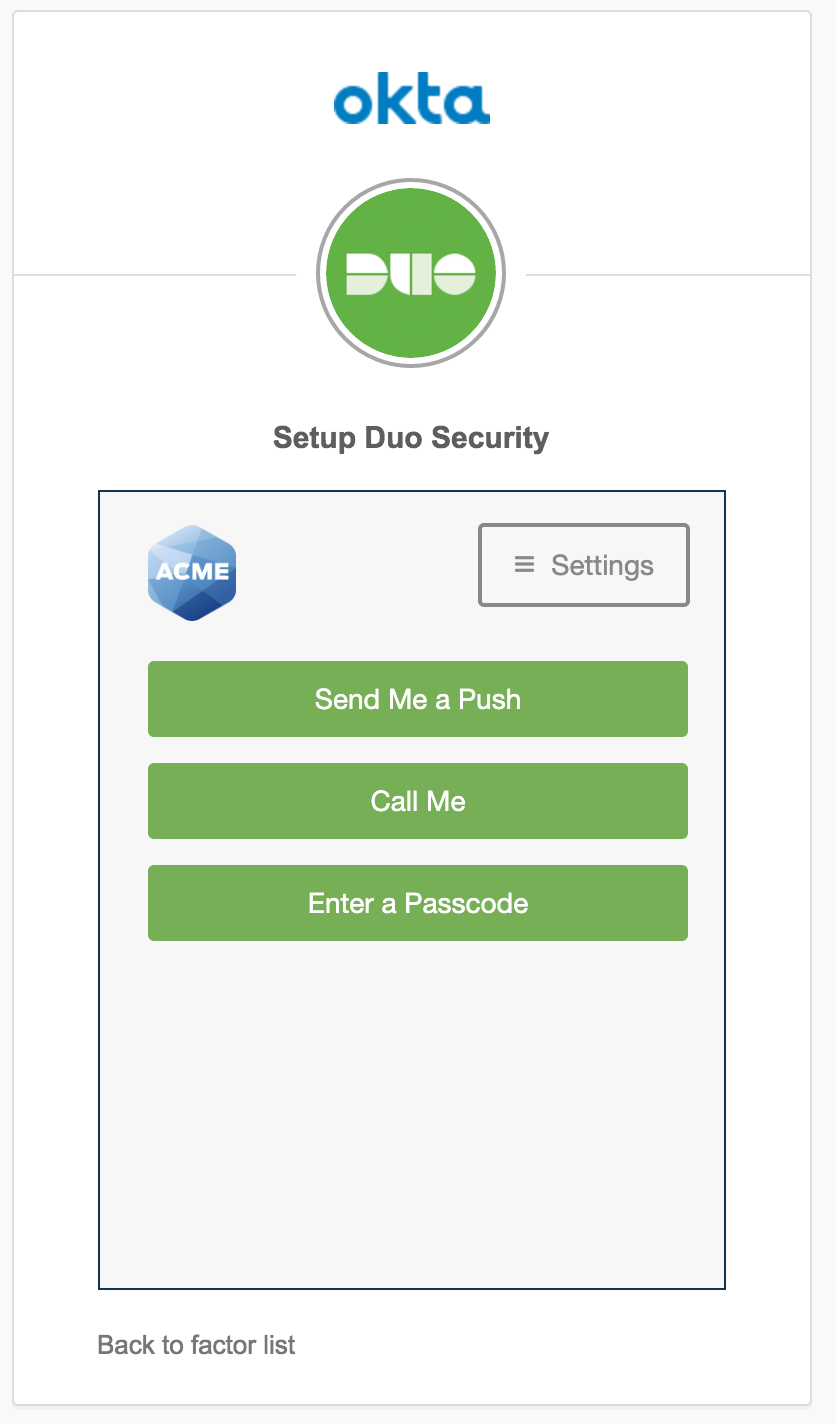
Okta prompts new, unenrolled Duo users to setup multifactor authentication at the first login to Okta after Duo is enabled. Click the Setup button for Duo Security.
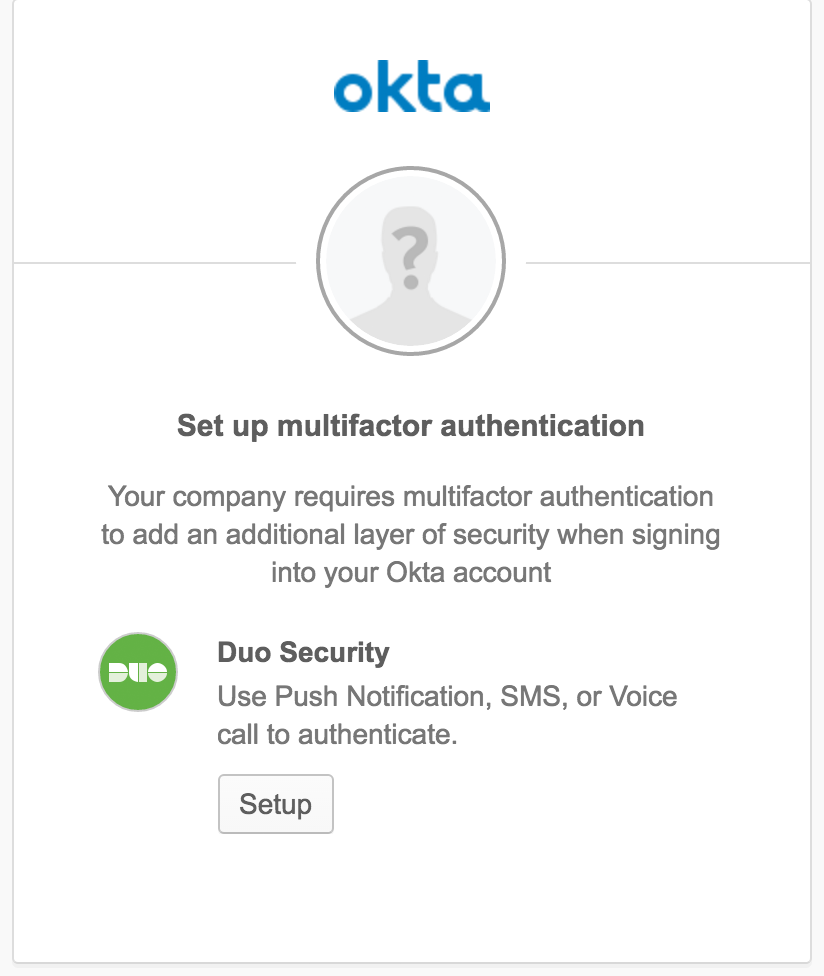
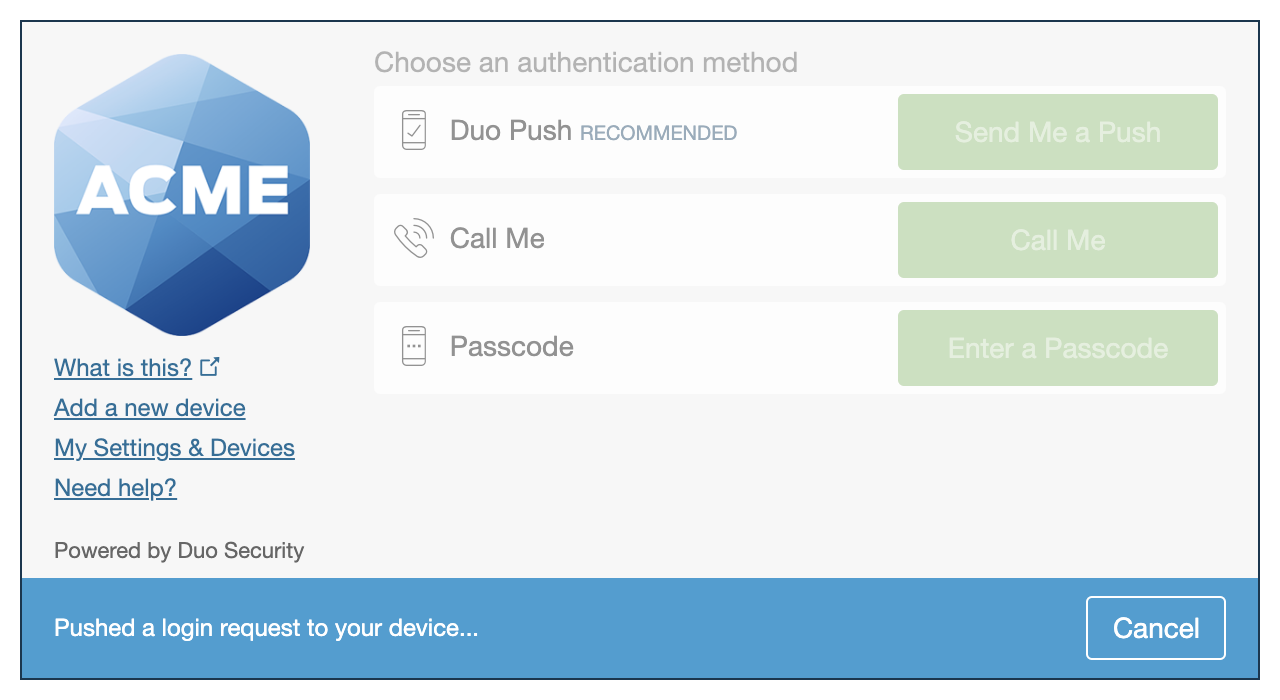
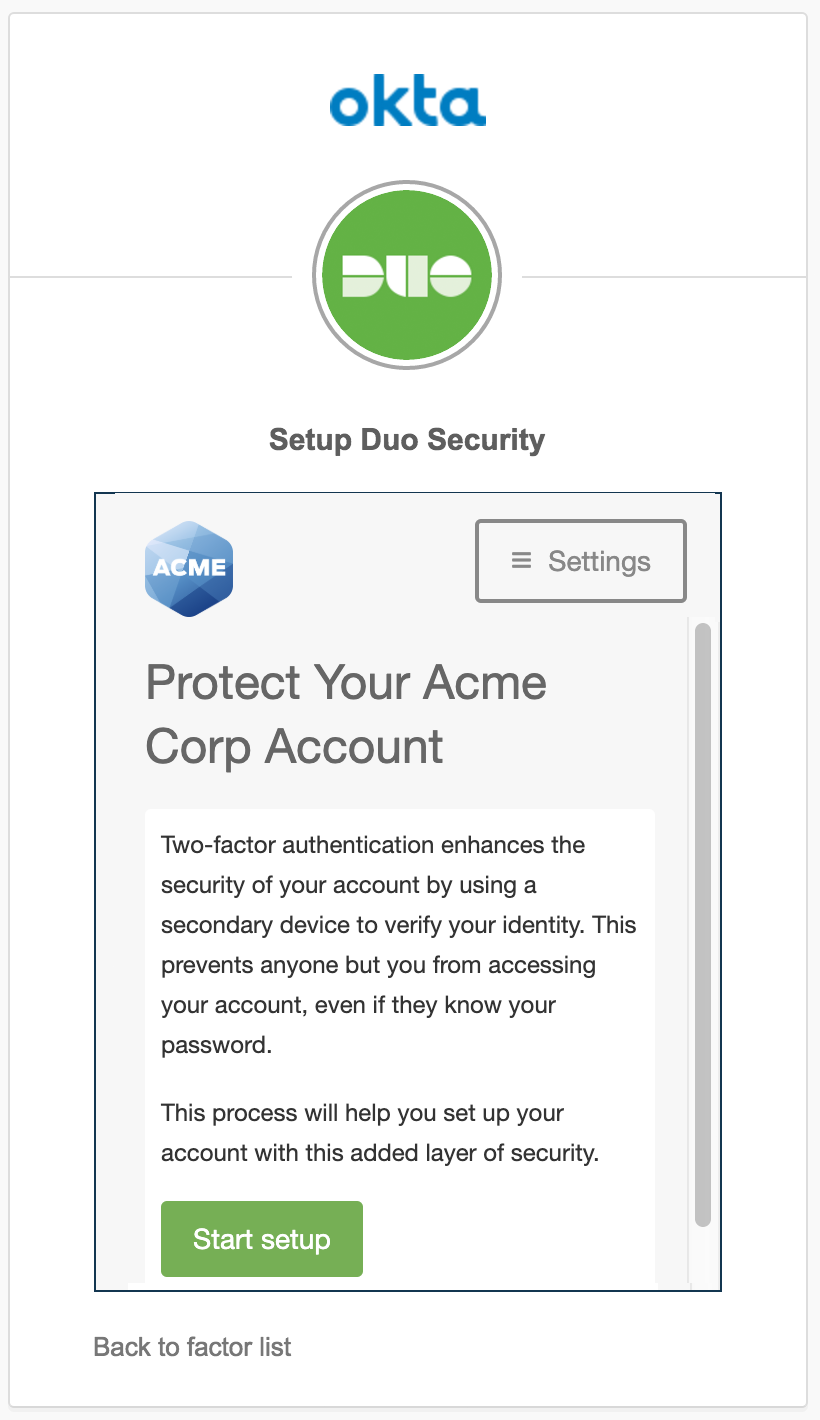
A "Setup Duo Security" window displays the Duo enrollment prompt. Complete Okta's multifactor setup by stepping through Duo enrollment.
When Duo enrollment is completed, users can choose one of the Duo authentication options to access Okta.
Troubleshooting
Need some help? Reach out to Duo Support for assistance with creating the Okta application in Duo, enrolling users in Duo, Duo policy questions, or Duo authentication approval issues. For assistance configuring or managing Okta please contact Okta Support.
Network Diagram
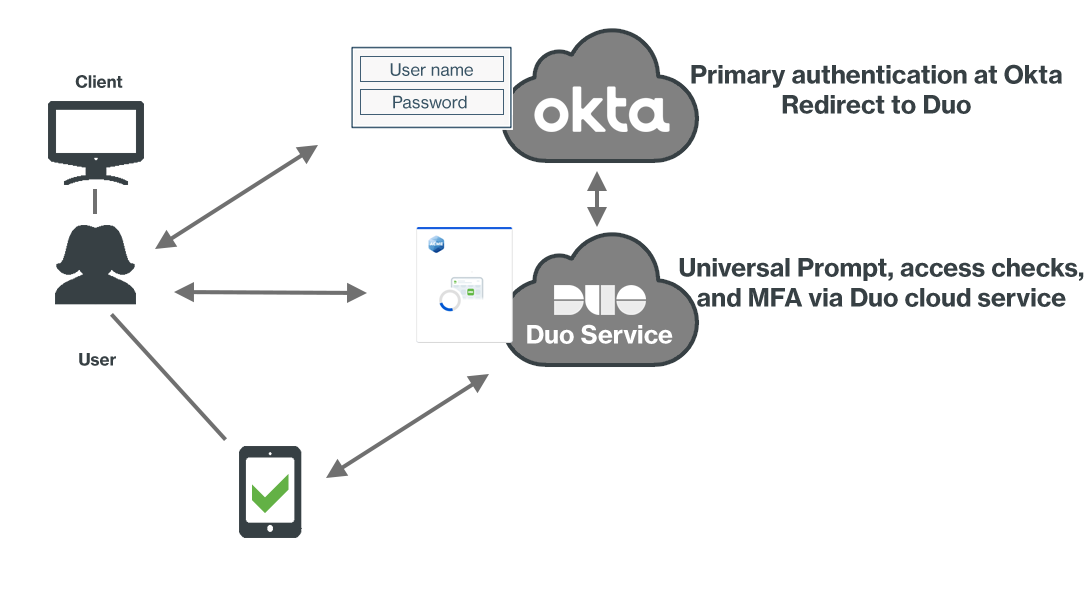
- Okta client connection initiated
- Primary authentication at Okta cloud service.
- OIDC redirect to Duo's service.
- Secondary authentication and client access device checks via Duo Universal Prompt.
- Okta receives Duo authorization response.
- Okta user login complete.