
Contents
Duo integrates with Epic Hyperdrive and Hyperspace to add two-factor authentication to Epic e-Prescription workflows.
Overview
Duo Authentication for Epic is a client-side .NET component that provides two-factor authentication for Epic Hyperdrive or Epic Hyperspace 2010 and later (up to and including Hyperspace 2020). It must be installed on all Epic workstations to provide complete protection.
Duo Authentication for Epic is a "Direct" authentication device capable of "User" authentication only. If configured as a "Passive authentication device", or to authenticate "Patient" logons, the Duo device will report an error message and return a failure to Epic.
Duo Authentication for Epic does not support inline self-enrollment, as Duo Security is not a qualified credential service provider (CSP) or certificate authority (CA) for EPCS identity verification purposes. You'll need to enroll your users ahead of time using directory synchronization, CSV import, or another method. Read the enrollment documentation to learn more about these options.
One-time passcodes (OTP) are validated to meet FIPS 140-2 Level 1 per the table below. For the purpose of EPCS compliance, choose between available authentication methods (OTP, Duo Push, phone call, or hardware token) that meet your compliance team’s interpretation of the Federal EPCS Guidelines.
| OTP Method | Meets EPCS compliance for FIPS 140-2 Level 1? |
|---|---|
| Hardware Token | Verify compliance with your token vendor |
| Duo Mobile Passcodes (iOS 6+) | Yes |
| Duo Mobile Passcodes (Android) | Yes with Duo Mobile for Android 3.25.0 and later |
| Duo Mobile Passcodes (Windows Phone) | Yes with Duo Mobile for Windows Phone 2.0 and later |
| Duo Mobile Passcodes (BlackBerry) | No - Disable BlackBerry use with an Operating System policy |
| SMS Passcodes | No - Disable SMS use with an Authentication Methods policy |
| Duo Bypass Codes | No - Do not issue bypass codes to EPCS users. Consider preventing your Help Desk admins from creating bypass codes for users. |
This application communicates with Duo's service on SSL TCP port 443.
Firewall configurations that restrict outbound access to Duo's service with rules using destination IP addresses or IP address ranges aren't recommended, since these may change over time to maintain our service's high availability. If your organization requires IP-based rules, please review Duo Knowledge Base article 1337.
Effective June 30, 2023, Duo no longer supports TLS 1.0 or 1.1 connections or insecure TLS/SSL cipher suites. See Duo Knowledge Base article 7546 for additional guidance.
If Duo Authentication for Epic is unable to contact the Duo Security cloud service then Duo "fails closed" and reports the failure to Epic. The defined Epic application workflow determines the next action.
If you're delivering the Epic client via application virtualization (like Citrix XenApp or Microsoft Remote Desktop Services), you should install Duo Authentication for Epic at the application host — not the end-user workstation.
Prerequisites
-
Check your Windows version before starting. This application supports Windows 10 and later client operating systems, and Windows 2016 and later server operating systems.
-
Duo Authentication for Epic Hyperdrive requires .NET Framework 4.6, Windows Installer 4.0 or later, and the Epic Hyperdrive client installed on the local system to function; none of which are included with the Duo Epic Hyperdrive installer.
-
Duo Authentication for Epic Hyperspace requires .NET Framework 4, Windows Installer 4.0 or later, and the Epic Hyperspace client installed on the local system to function; none of which are included with the Duo Epic Hyperspace installer.
First Steps
Before moving on to the deployment steps, it's a good idea to familiarize yourself with Duo administration concepts and features like options for applications, available methods for enrolling Duo users, and Duo policy settings and how to apply them. See all Duo Administrator documentation.
Then:
- Sign up for a Duo account.
- Log in to the Duo Admin Panel and navigate to Applications.
- Click Protect an Application and locate the entry for Epic in the applications list. Click Protect to the far-right to configure the application and get your integration key, secret key, and API hostname. You'll need this information to complete your setup. See Protecting Applications for more information about protecting applications in Duo and additional application options.
- Epic Hyperdrive customers should download the SAML public key from the details section of the application by clicking the Download Public Key button. Keep the downloaded PEM file; you will provide it to Epic later. If you do not see the download button please contact Duo Support
- Download the Duo Authentication for Epic Hyperdrive installer package (checksums) or the Duo Authentication for Epic Hyperspace installer package (checksums) as needed for your deployment.
The security of your Duo application is tied to the security of your secret key (skey). Secure it as you would any sensitive credential. Don't share it with unauthorized individuals or email it to anyone under any circumstances!
Duo Epic for Hyperdrive
Run the Epic Hyperdrive Installer
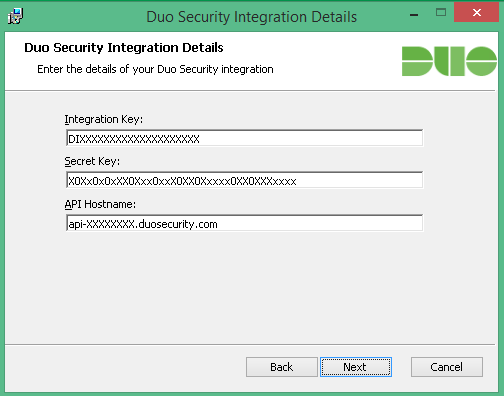
Run the Duo Authentication for Epic Hyperdrive installer with administrative privileges on the system(s) where the Epic client is installed. Accept the license agreement and enter your integration key, secret key, and API hostname when prompted:
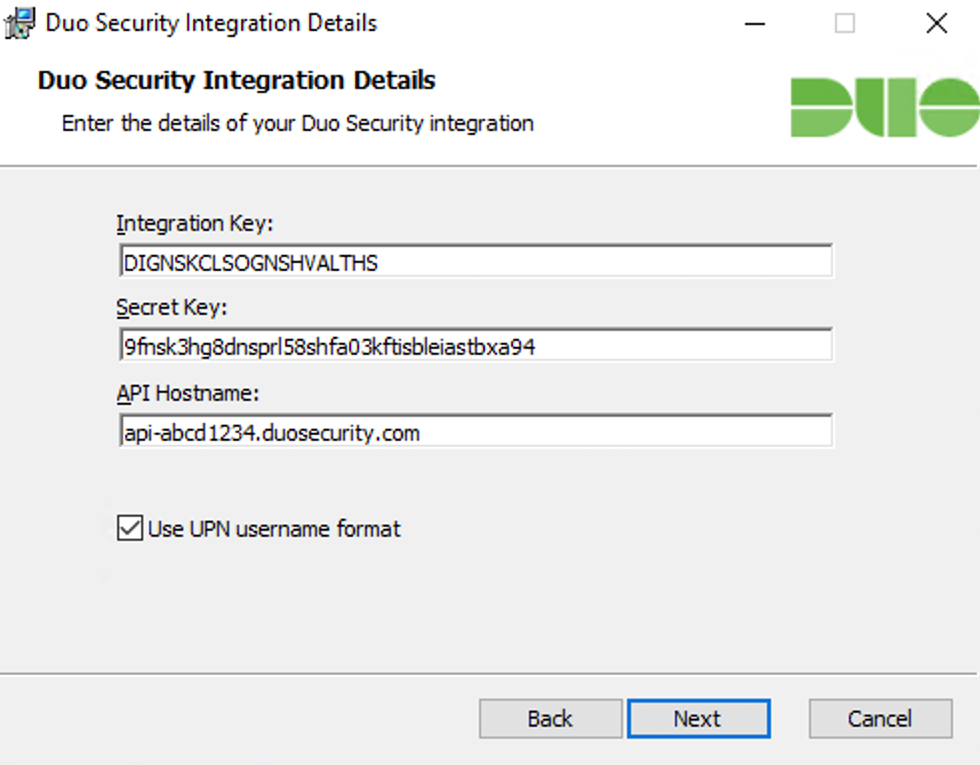
Duo sends the username as userPrincipalName. Uncheck the Use UPN username format box to send the username as sAMAccountName.
Configure Epic Hyperdrive to use Duo Authentication
To add Duo Authentication to Epic Hyperdrive, you will need to add the Duo application as an authentication device, and add that device as an authentication method to your desired context. The "ProgID" used when creating the Duo authentication device in Hyperdrive is Duo.EpicHyperdrive.AuthenticationDevice.
You will need to provide your public key and SAML Issuer to your Epic support. If you did not download this from the Duo Admin Panel when you created the Duo Epic application, return to the application's details page in the Duo Admin Panel and click the Download Public Key button to obtain the token as a PEM file for this application.
Your SAML Issuer is the Duo API Hostname followed by a colon (:) and your Duo integration key value. For example, if the API Hostname in your Duo Admin Panel is api-abcd1234.duosecurity.com and the Integration Key is DI1I65DCPTZFTN123ABC, your SAML Issuer is api-abdc1234.duosecurity.com:DI1I65DCPTZFTN123ABC. (Note that the ‘:’ colon is required.)
Provide the downloaded Duo public key PEM file to your Epic database administrator and the SAML Issuer information to your Epic Client Systems Administrator (ECSA) as part of your Duo deployment.
Please contact your Epic technical support representative for detailed instructions and more information about adding authentication devices.
Test Your Hyperdrive Setup
Note that the Duo two-factor prompt shown by the Epic application does not support self-service enrollment nor device management. The test user must be enrolled in Duo with a device for 2FA request approval.
To test your setup, log into Epic Hyperdrive and perform a test e-Prescription workflow. The Duo two-factor application prompt appears after you enter your Epic username and password. Select from the available two-factor authentication factors and click Log In.
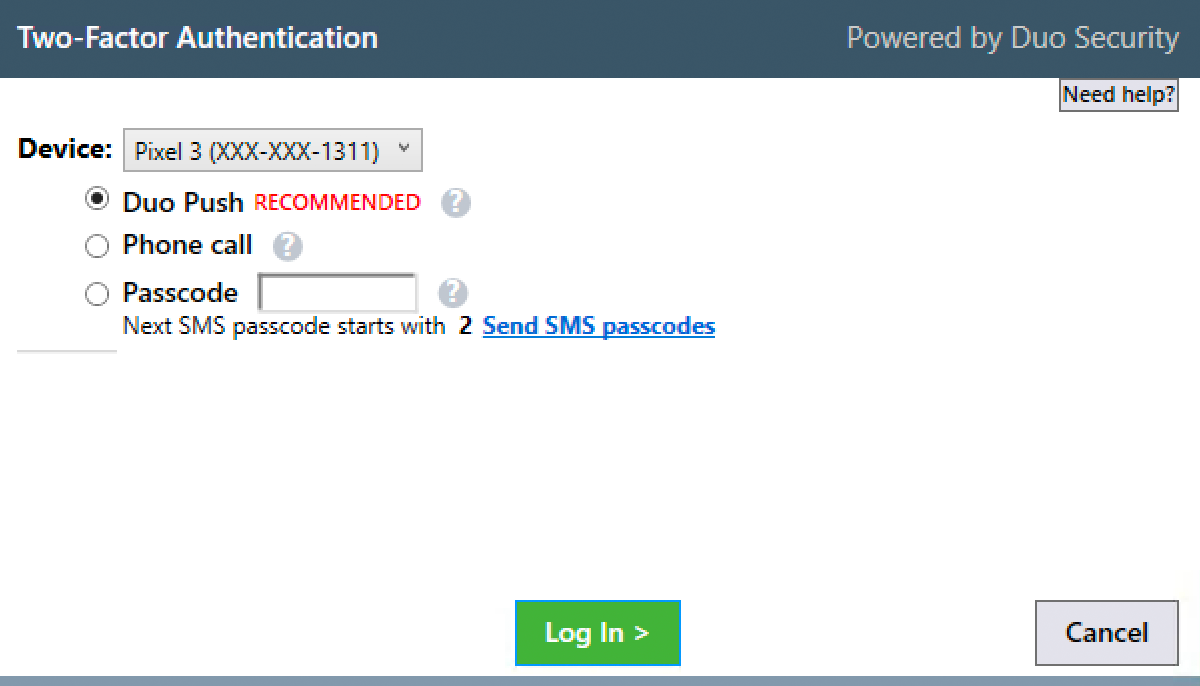
Upon approval of the Duo authentication request on your selected device, the Duo client passes the approval to Epic Hyperdrive as a SAML response and the e-Prescription workflow resumes.
Cancelling either the Epic or Duo authentication prompts returns you to the signing step of the e-Prescription workflow.
Advanced Hyperdrive Client Configuration With Group Policy
Additional client-side configuration options for Duo may be configured via Active Directory Group Policy. To create and apply the Duo Authentication for Epic Hyperdrive Group Policy Object (GPO):
-
Download the Duo Authentication for Epic Hyperdrive Group Policy template files and documentation. View checksums for Duo downloads here.
-
Extract the contents of the zip file and copy the files into your domain's Administrative Templates store.
\\your.domain.local\sysvol\your.domain.local\Policies\PolicyDefinitions\DuoEpicHyperdrive.admx \\your.domain.local\sysvol\your.domain.local\Policies\PolicyDefinitions\en-us\DuoEpicHyperdrive.adml -
On your domain controller or another system with the Windows Remote Server Administration Tools installed, launch the Group Policy Management console (GPMC).
-
Expand your forest and navigate down the tree to Group Policy Objects. Right-click the Group Policy Objects folder and click New. Enter a name for the new GPO (such as "Duo Epic Client") and click OK.
-
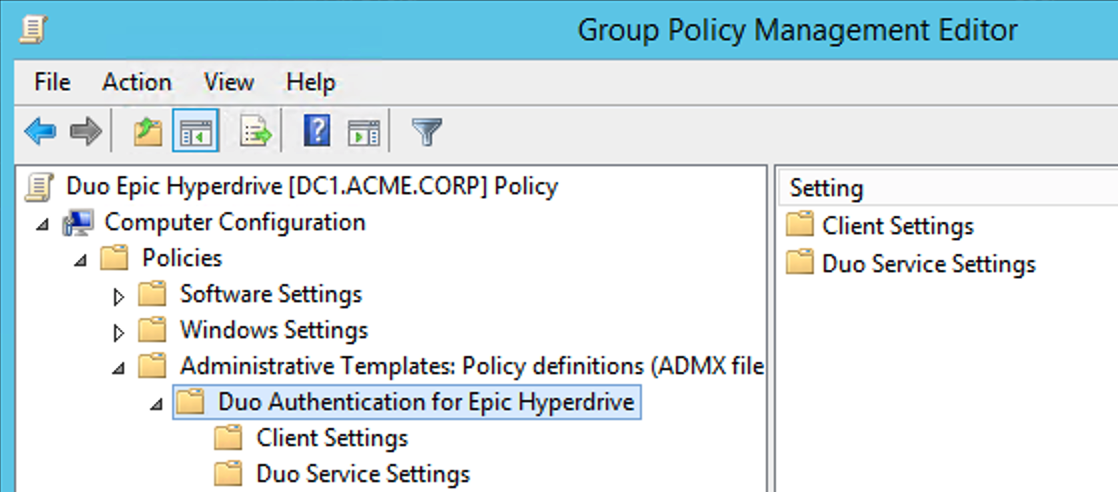
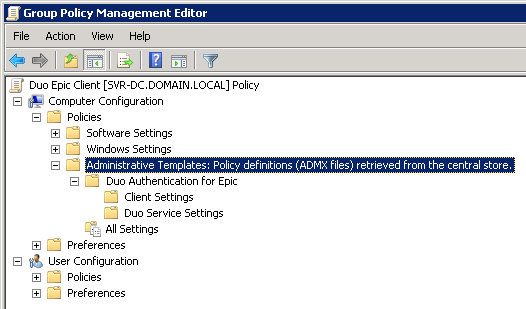
Right-click the new GPO created in step 4 and click Edit. Navigate to Computer Configuration\Policies\Administrative Templates and expand Duo Authentication for Epic Hyperdrive.
-
Double-click a setting to configure it. When you've finished configuring settings, close the policy editor.
-
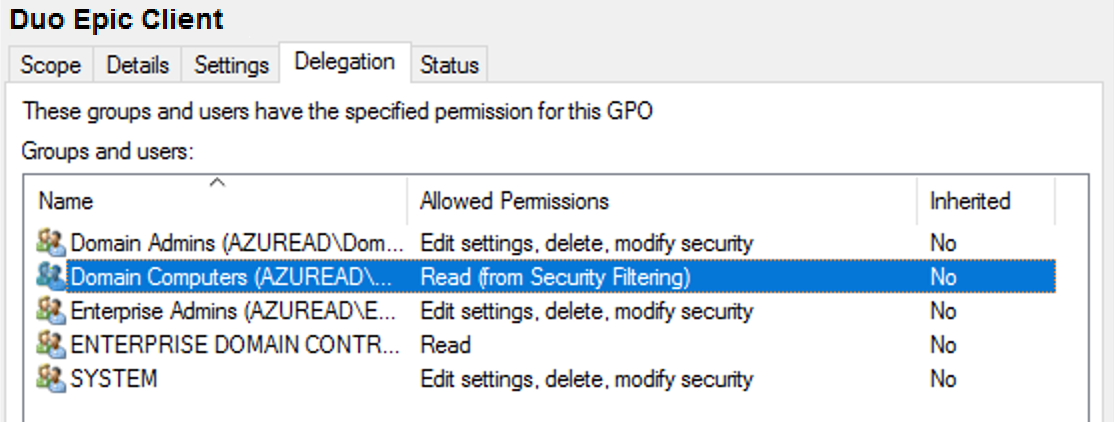
Once returned to the Group Policy Management window, click on the Delegation tab for your new Duo Epic GPO and then click the Advanced button. Click on the Authenticated Users group in the list and then click Remove.
Then, click Add... and type in Domain Computers, and then click OK. Check the permissions boxes in the "Allow" column to grant the "Domain Computers" group both Read and Apply group policy permissions. Click OK to apply the new delegated permissions. Verify that "Authenticated Users" no longer appears in the list.
-
Apply the new GPO for Epic to domain member workstations by linking the policy to the desired OU or container.
For additional information about using GPOs and administrative templates, please see Microsoft's Group Policy documentation collection.
Please contact Duo Support if you need to configure the Duo Authentication for Epic client settings without using Group Policy.
Duo Epic for Hyperspace
Run the Installer
Run the Duo Authentication for Epic installer with administrative privileges on the system(s) where the Epic client is installed. Accept the license agreement and enter your integration key, secret key, and API hostname when prompted:
Configure Epic to use Duo Authentication
To add Duo Authentication to Epic Hyperspace, you will need to add the Duo application as an authentication device, and add that device as an authentication method to your desired context. The "ProgID" used when creating the Duo authentication device in Hyperspace is DuoSecurity.EpicAuthenticationDevice.
Please contact your Epic technical support representative for detailed instructions and more information about adding authentication devices.
Test Your Setup
Note that the Duo two-factor prompt shown by the Epic application does not support self-service enrollment nor device management. The test user must be enrolled in Duo with a device for 2FA request approval.
To test your setup, log into Epic Hyperspace and perform a test e-Prescription workflow. The Duo two-factor application prompt appears after you enter your Epic username and password. Select from the available two-factor authentication factors and click Log In.
Upon approval of the Duo authentication request on your selected device, the Duo client passes the approval to Epic Hyperspace and the e-Prescription workflow resumes.
Cancelling either the Epic or Duo authentication prompts returns you to the signing step of the e-Prescription workflow.
Advanced Configuration With Group Policy
Additional client-side configuration options for Duo may be configured via Active Directory Group Policy. To create and apply the Duo Authentication for Epic Group Policy Object (GPO):
-
Download the Duo Authentication for Epic Group Policy template files and documentation. View checksums for Duo downloads here.
-
Extract the contents of the zip file and copy the files into your domain's Administrative Templates store.
\\your.domain.local\sysvol\your.domain.local\Policies\PolicyDefinitions\DuoEpic.admx \\your.domain.local\sysvol\your.domain.local\Policies\PolicyDefinitions\en-us\DuoEpic.adml -
On your domain controller or another system with the Windows Remote Server Administration Tools installed, launch the Group Policy Management console (GPMC).
-
Expand your forest and navigate down the tree to Group Policy Objects. Right-click the Group Policy Objects folder and click New. Enter a name for the new GPO (such as "Duo Epic Client") and click OK.
-
Right-click the new GPO created in step 4 and click Edit. Navigate to Computer Configuration\Policies\Administrative Templates and expand Duo Authentication for Epic.
-
Double-click a setting to configure it. When you've finished configuring settings, close the policy editor.
-
Once returned to the Group Policy Management window, click on the Delegation tab for your new Duo Epic GPO and then click the Advanced button. Click on the Authenticated Users group in the list and then click Remove.
Then, click Add... and type in Domain Computers, and then click OK. Check the permissions boxes in the "Allow" column to grant the "Domain Computers" group both Read and Apply group policy permissions. Click OK to apply the new delegated permissions. Verify that "Authenticated Users" no longer appears in the list.
-
Apply the new GPO for Epic to domain member workstations by linking the policy to the desired OU or container.
For additional information about using GPOs and administrative templates, please see Microsoft's Group Policy documentation collection.
Please contact Duo Support if you need to configure the Duo Authentication for Epic client settings without using Group Policy.
Network Diagram
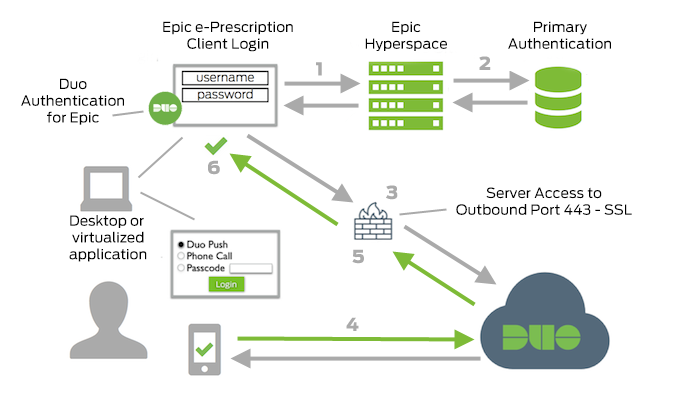
- Begin Epic Hyperspace e-Prescription workflow.
- Primary authentication.
- Duo Authentication for Epic connection established to Duo Security over TCP port 443.
- Secondary authentication via Duo Security’s service.
- Duo Authentication for Epic receives authentication response.
- Epic Hyperspace e-Prescription workflow continues.
Troubleshooting
Need some help? Take a look at the Epic Frequently Asked Questions (FAQ) page or try searching our Epic Knowledge Base articles or Community discussions. For further assistance, contact Support.